一、ElasticSearch-全文检索 官方文档:https://www.elastic.co/guide/en/elasticsearch/reference/current/index.html
官方中文:https://www.elastic.co/guide/cn/elasticsearch/guide/current/foreword_id.html
1.elasticsearch、ELK和Lucene是什么? 什么是elasticsearch?
一个开源的分布式搜索引擎,可以用来实现搜索、日志统计、分析、系统监控等功能
什么是elastic stack(ELK)?
是以elasticsearch为核心的技术栈,包括beats、Logstash、kibana、elasticsearch
什么是Lucene?
是Apache的开源搜索引擎类库,提供了搜索引擎的核心API
2、安装elastic search和kibana dokcer中安装elastic search
(1)下载ealastic search和kibana
docker pull elasticsearch:7.6.2
docker pull kibana:7.6.2
(2)配置
mkdir -p /mydata/elasticsearch/config  创建目录
mkdir -p /mydata/elasticsearch/data

echo "http.host: 0.0.0.0" >/mydata/elasticsearch/config/elasticsearch.yml

//将mydata/elasticsearch/文件夹中文件都可读可写
chmod -R 777 /mydata/elasticsearch/
(3)启动Elastic search
docker run --name elasticsearch -p 9200:9200 -p 9300:9300 \
-e  "discovery.type=single-node" \
-e ES_JAVA_OPTS="-Xms64m -Xmx512m" \
-v /mydata/elasticsearch/config/elasticsearch.yml:/usr/share/elasticsearch/config/elasticsearch.yml \
-v /mydata/elasticsearch/data:/usr/share/elasticsearch/data \
-v  /mydata/elasticsearch/plugins:/usr/share/elasticsearch/plugins \
-d elasticsearch:7.6.2
设置开机启动elasticsearch
docker update elasticsearch --restart=always
(4)如果用的阿里云的云服务启动记得要增加安全组
(5)启动kibana:
docker run --name kibana -e ELASTICSEARCH_HOSTS=http://8.138.99.194:9200 -p 5601:5601 -d kibana:7.6.2
设置开机启动kibana
docker update kibana --restart=always
(6)测试
查看elasticsearch版本信息: http://8.138.99.194:9200/
显示elasticsearch 节点信息http://8.138.99.194:9200/_cat/nodes,
127.0 .0 .1 15 92 2 0.01 0.25 0.26 dilm * dc4b51ce9fcf
访问Kibana: http://8.138.99.194:5601/app/kibana#/home
3、elasticSearch入门 1)_CAT (1)GET/cat/nodes:查看所有节点
如:http://8.138.99.194:9200/_cat/nodes :
127.0 .0 .1 15 92 2 0.01 0.25 0.26 dilm * dc4b51ce9fcf
注:*表示集群中的主节点
(2)GET/cat/health:查看es健康状况
如:http://8.138.99.194:9200/_cat/health
1713256998 08 : 43 : 18 elasticsearch green 1 1 3 3 0 0 0 0 - 100.0 %
注:green表示健康值正常
(3)GET/_cat/master:查看主节点_信息
如: http://8.138.99.194:9200/_cat/master
Bkzft80NS1imqnM5Hv7h-g 127.0 .0 .1 127.0 .0 .1 dc4b51ce9fcf
(4)GET/_cat/indicies:查看所有索引 ,等价于mysql数据库的show databases;
如: http://8.138.99.194:9200/_cat/indices
green open .kibana_task_manager_1 QIdIVwseSQOA89j9YCsRwQ 1 0 2 0 43.5 kb 43.5 kb green open .apm-agent-configuration 7 sfl0GqhS6qsFKYPLq_kgg 1 0 0 0 283 b 283 b green open .kibana_1 g2pECUCxRJKbDR9fW7J9zA 1 0 7 1 34 kb 34 kb
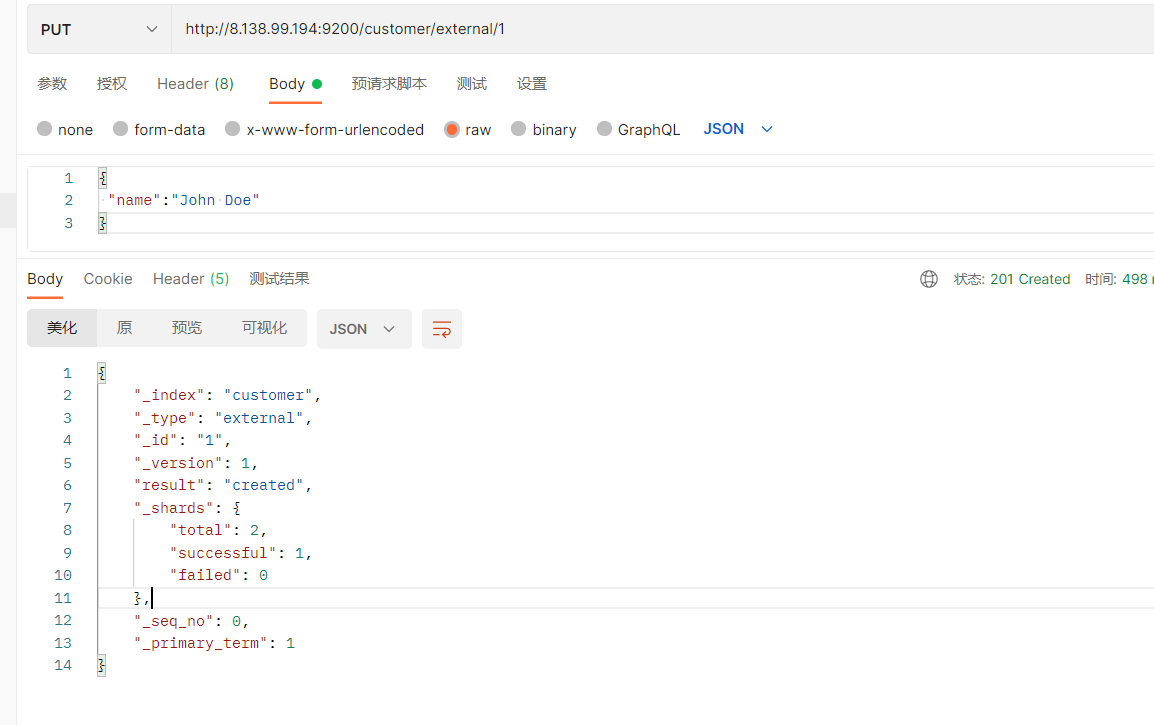
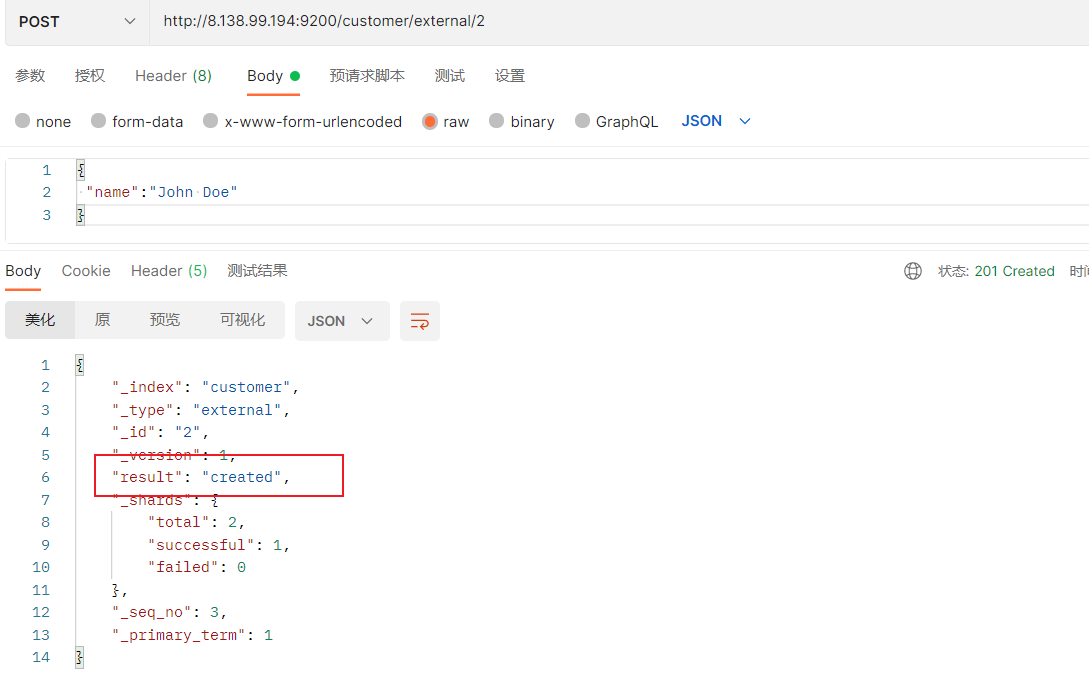
2)索引一个文档 保存一个数据,保存在哪个索引的哪个类型下,指定用那个唯一标识
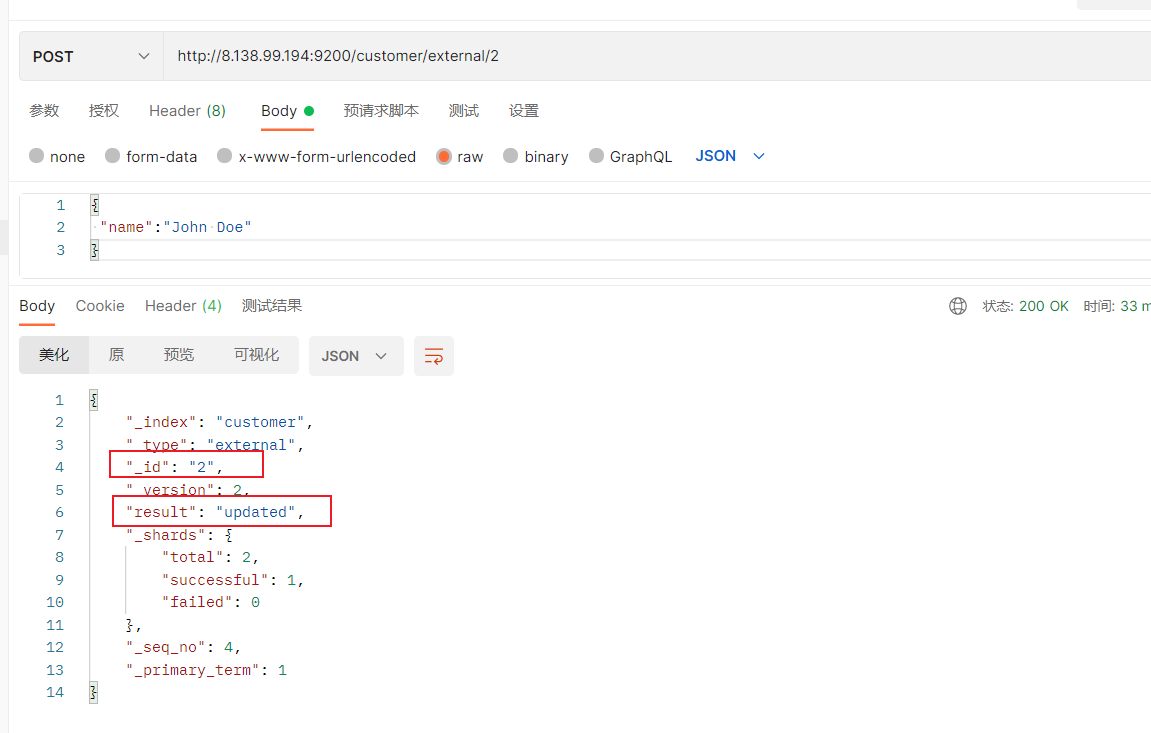
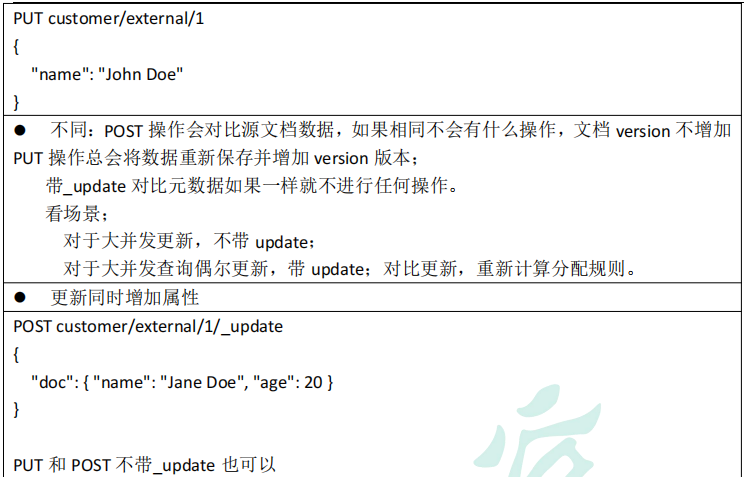
PUT和POST都可以PUT必须指定id ;由于PUT需要指定id,我们一般用来做修改操作,不指定id会报错。(发送多次是更新的操作,版本会叠加)
PUT操作
下面是在postman中的测试数据:
创建数据成功后,显示201 created表示插入记录成功。
{ "_index" : "customer" , "_type" : "external" , "_id" : "1" , "_version" : 1 , "result" : "created" , "_shards" : { "total" : 2 , "successful" : 1 , "failed" : 0 } , "_seq_no" : 0 , "_primary_term" : 1 }
这些返回的JSON串的含义;
带有下划线开头的,称为元数据,反映了当前的基本信息。
“_index”: “customer” 表明该数据在哪个数据库下;
“_type”: “external” 表明该数据在哪个类型下;
“_id”: “1” 表明被保存数据的id;
“_version”: 1, 被保存数据的版本
“result”: “created” 这里是创建了一条数据,如果重新put一条数据,则该状态会变为updated,并且版本号也会发生变化。
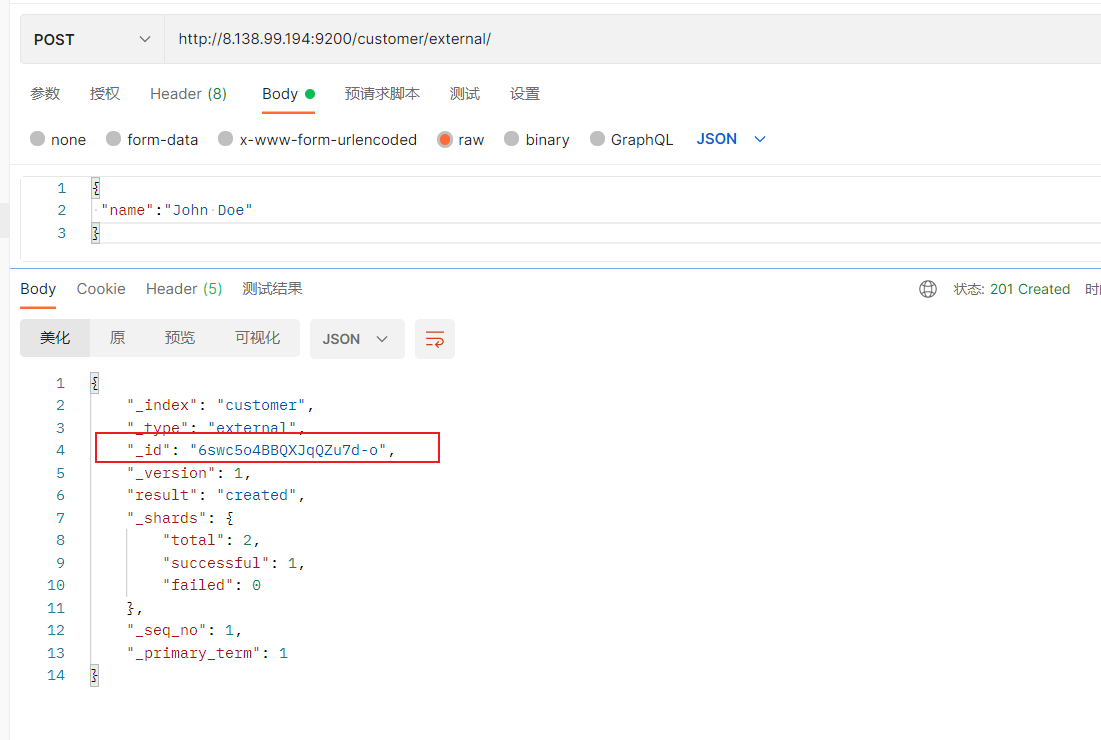
POST方式:
添加数据的时候,不指定ID,会自动的生成id,并且类型是新增:
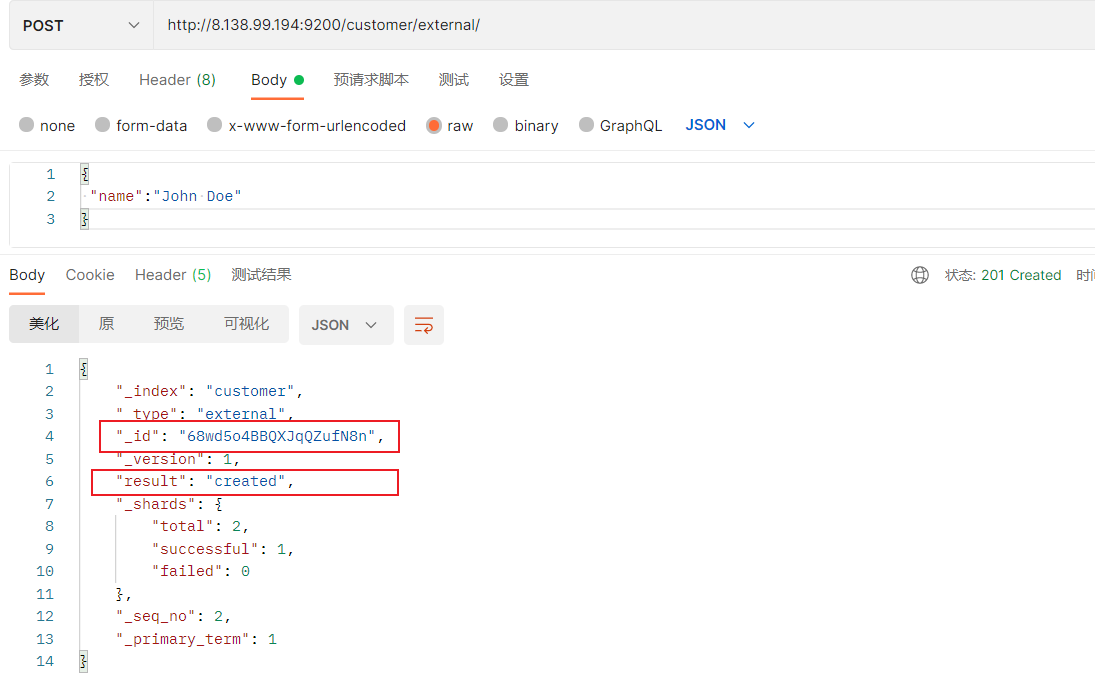
再次使用POST插入数据,仍然是新增的:
添加数据的时候,指定ID,会使用该id,并且类型是新增:
再次使用POST插入数据,类型为updated
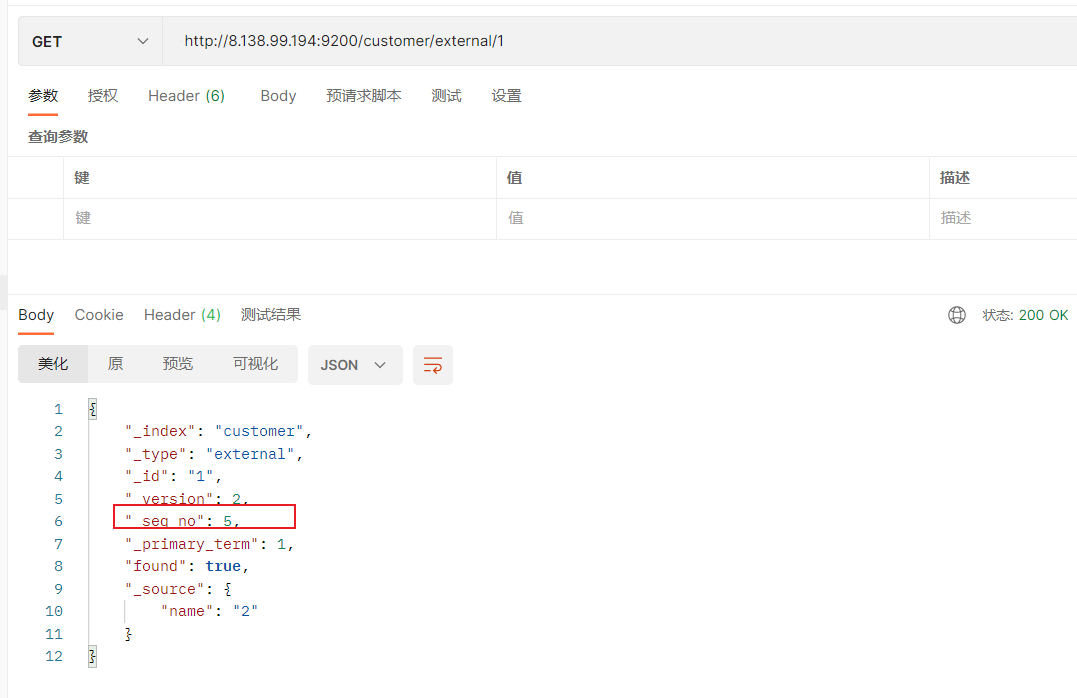
3)查询文档 GET /customer/external/1
http://8.138.99.194:9200/customer/external/1
{ "_index" : "customer" , "_type" : "external" , "_id" : "1" , "_version" : 1 , "_seq_no" : 0 , "_primary_term" : 1 , "found" : true , "_source" : { "name" : "John Doe" } }
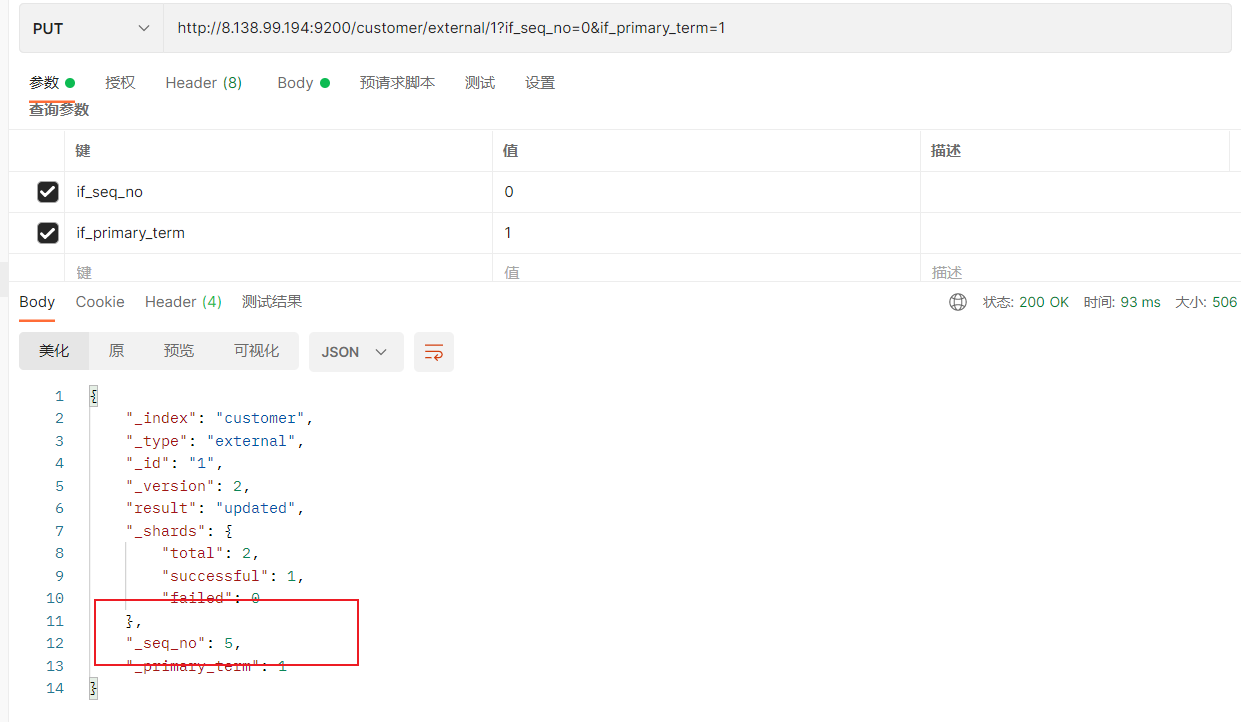
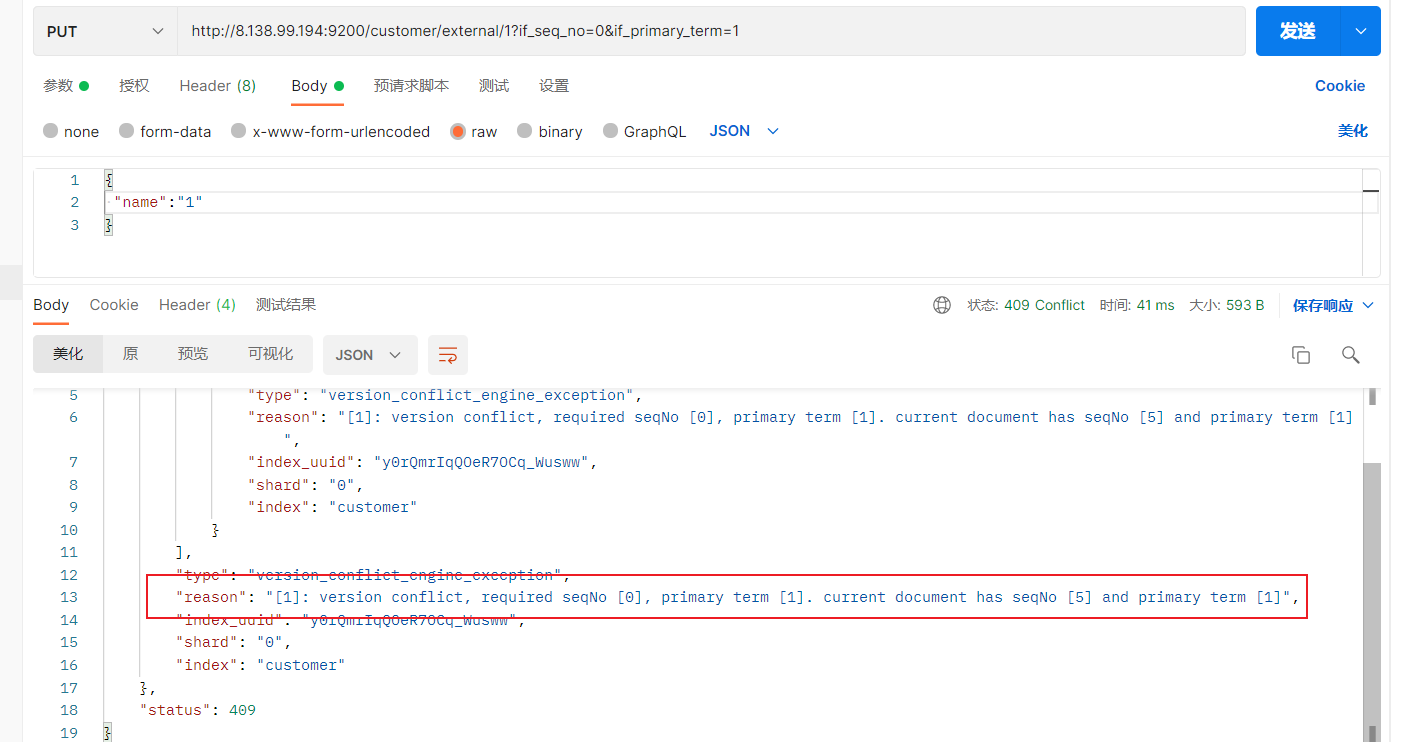
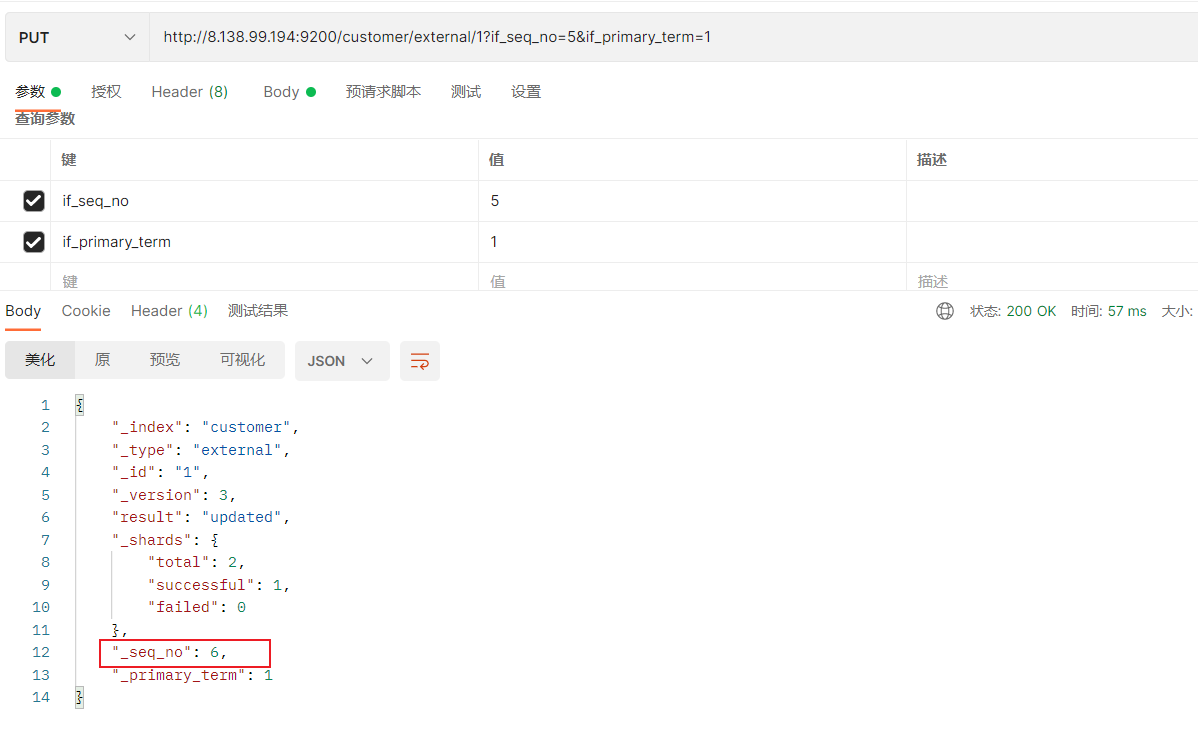
通过“if_seq_no=1&if_primary_term=1 ”,当序列号匹配的时候,才进行修改,否则不修改。
实例:将id=1的数据更新为name=1,然后再次更新为name=2,起始_seq_no=6,_primary_term=1
(1)将name更新为1
http://8.138.99.194:9200/customer/external/1?if_seq_no=1&if_primary_term=1
(2)将name更新为2,更新过程中使用seq_no=6
http://8.138.99.194:9200/customer/external/1?if_seq_no=6&if_primary_term=1
出现更新错误。
(3)查询新的数据
http://8.138.99.194:9200/customer/external/1
能够看到_seq_no变为5。
(4)再次更新,更新成功,并且_seq_no值变为6
http://8.138.99.194:9200/customer/external/1?if_seq_no=5&if_primary_term=1
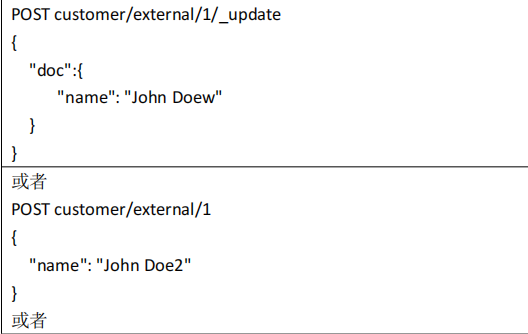
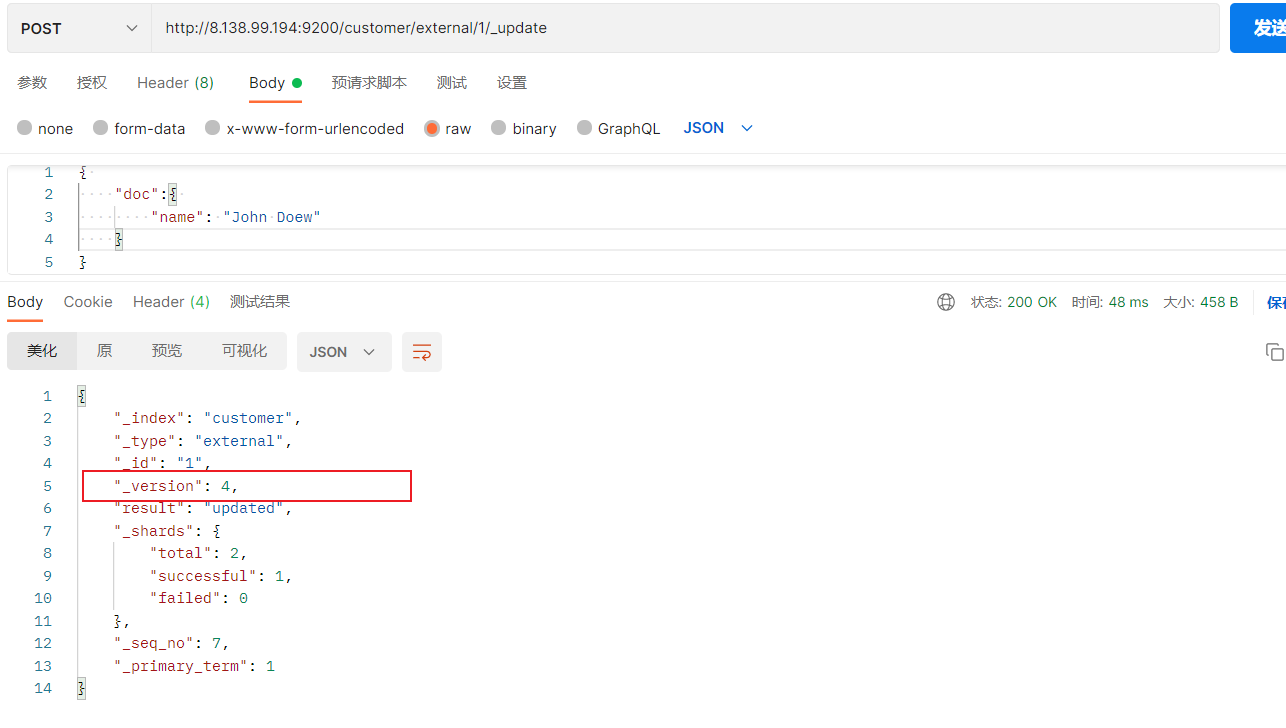
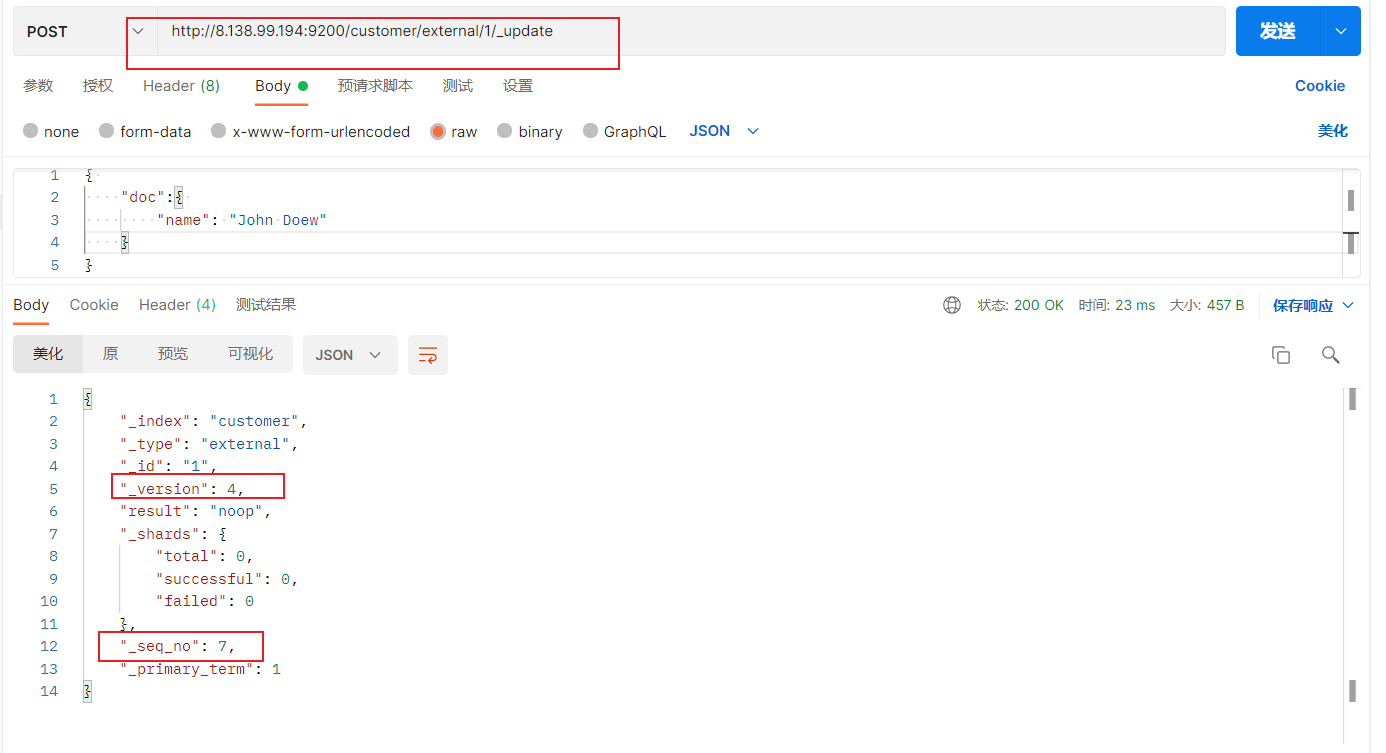
4)更新文档
(1)POST更新文档,带有_update
http://8.138.99.194:9200/customer/external/1/_update
如果再次执行更新,则不执行任何操作,序列号也不发生变化
POST更新方式,会对比原来的数据,和原来的相同,则不执行任何操作(version和_seq_no)都不变。
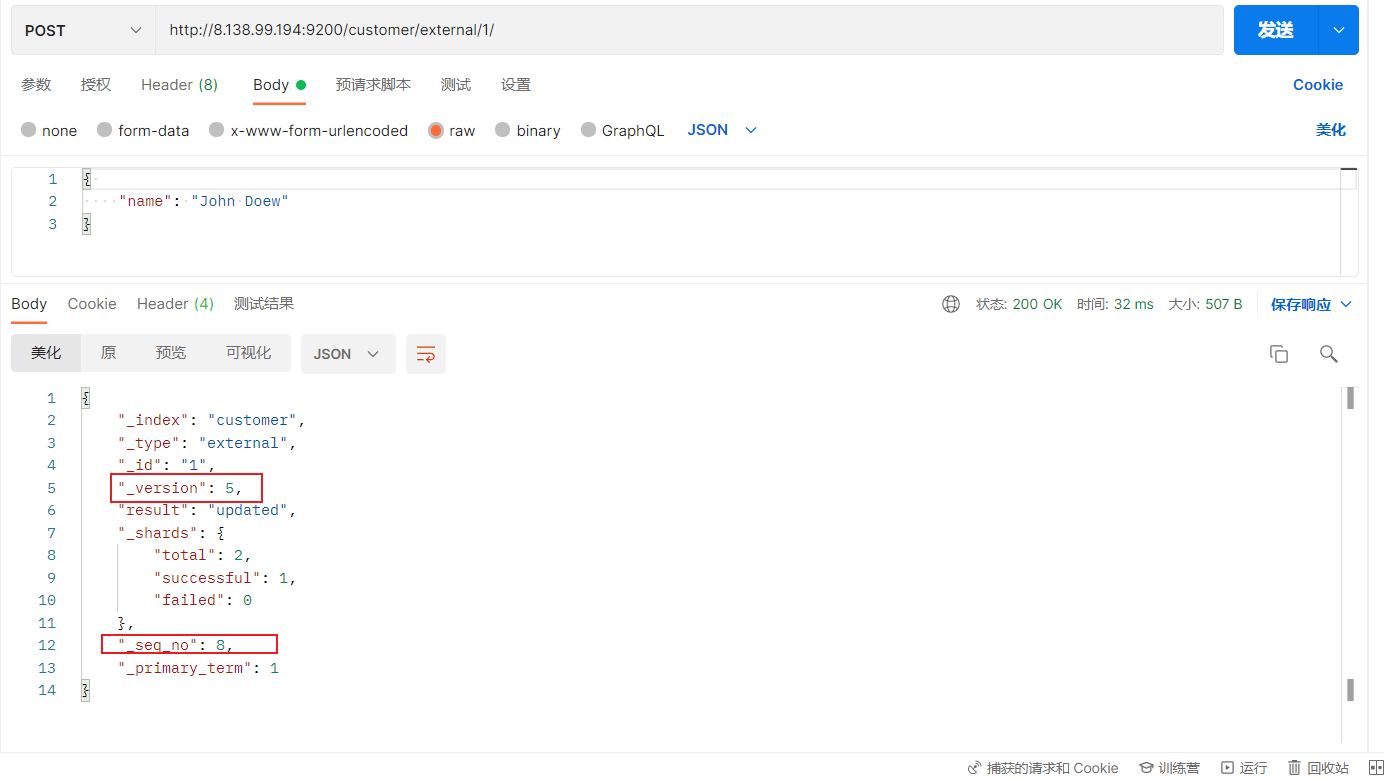
(2)POST更新文档,不带_update和“doc”,不会检查原数据是否相同
在更新过程中,重复执行更新操作,数据也能够更新成功,不会和原来的数据进行对比。
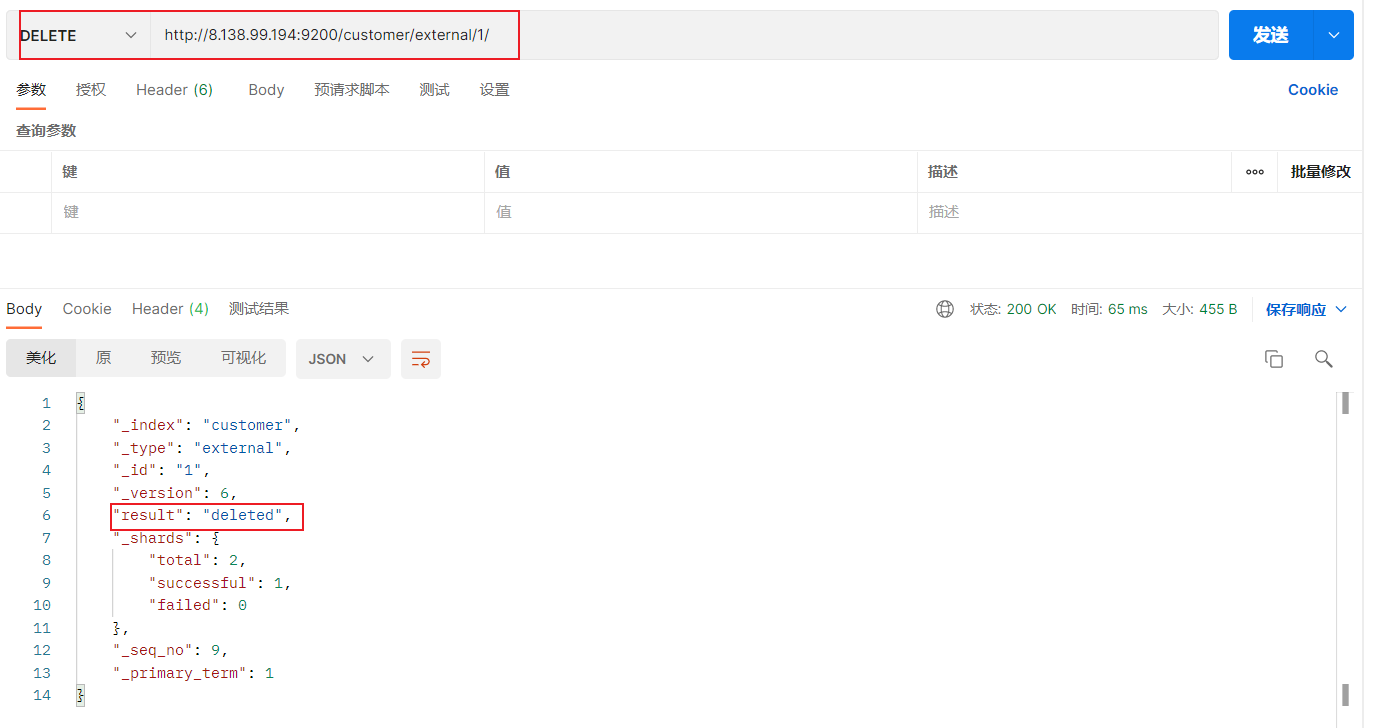
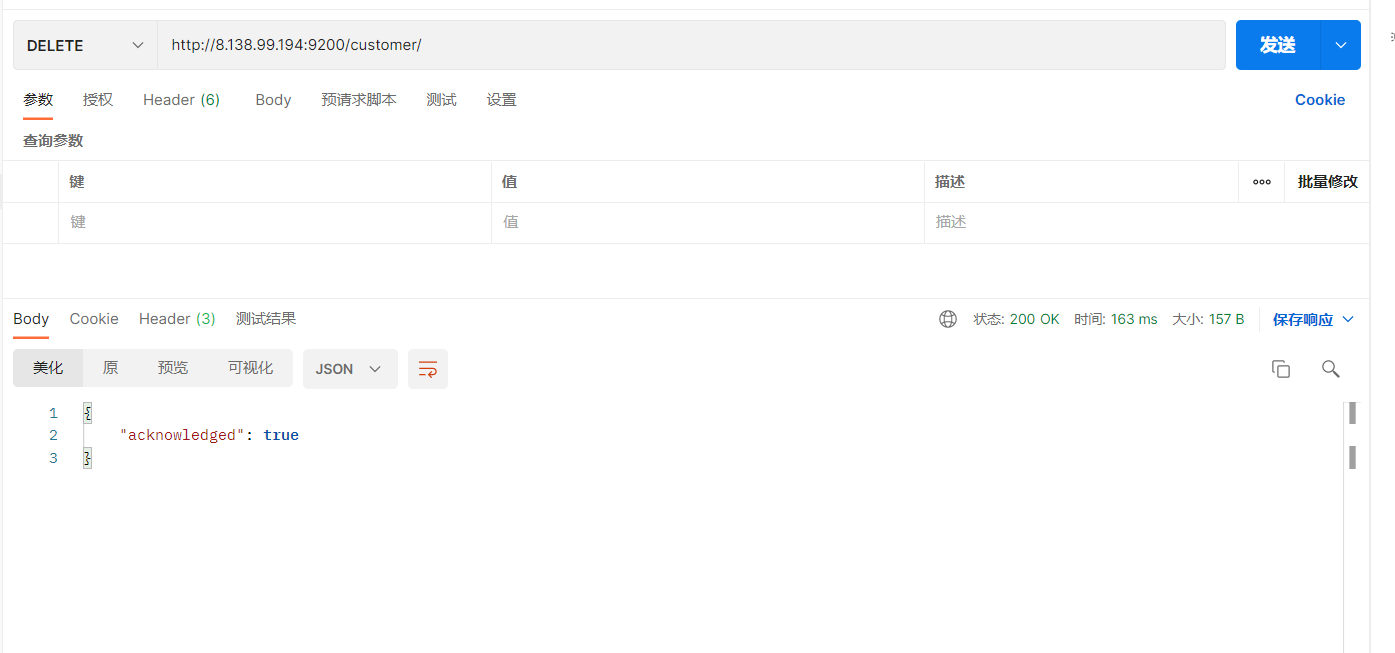
5)删除文档或索引 DELETE customer/external/1 DELETE customer
注:elasticsearch并没有提供删除类型的操作,只提供了删除索引和文档的操作。
实例:删除id=1的数据,删除后继续查询
实例:删除整个costomer索引数据
删除前,所有的索引
green open .kibana_task_manager_1 QIdIVwseSQOA89j9YCsRwQ 1 0 2 0 43.5 kb 43.5 kb green open .apm-agent-configuration 7 sfl0GqhS6qsFKYPLq_kgg 1 0 0 0 283 b 283 b green open .kibana_1 g2pECUCxRJKbDR9fW7J9zA 1 0 7 0 34.6 kb 34.6 kb yellow open customer y0rQmrIqQOeR7OCq_Wusww 1 1 4 1 11 kb 11 kb
删除“ customer ”索引
删除后,所有的索引
green open .kibana_task_manager_1 QIdIVwseSQOA89j9YCsRwQ 1 0 2 0 43.5 kb 43.5 kb green open .apm-agent-configuration 7 sfl0GqhS6qsFKYPLq_kgg 1 0 0 0 283 b 283 b green open .kibana_1 g2pECUCxRJKbDR9fW7J9zA 1 0 7 0 34.6 kb 34.6 kb
6)eleasticsearch的批量操作——bulk POST customer/external/_bulk
{ "index" : { "_id" : "1" } } { "name" : "John Doe" } { "index" : { "_id" : "2" } } { "name" : "Jane Doe" }
语法格式:
{ action: { metadata } } \n { request body } \n{ action: { metadata } } \n{ request body } \n
复杂实例:
POST /_bulk
{ "delete" : { "_index" : "website" , "_type" : "blog" , "_id" : "123" } } { "create" : { "_index" : "website" , "_type" : "blog" , "_id" : "123" } } { "title" : "My first blog post" } { "index" : { "_index" : "website" , "_type" : "blog" } } { "title" : "My second blog post" } { "update" : { "_index" : "website" , "_type" : "blog" , "_id" : "123" , "_retry_on_conflict" : 3 } } { "doc" : { "title" : "My updated blog post" } }
这里的批量操作,当发生某一条执行发生失败时,其他的数据仍然能够接着执行,也就是说彼此之间是独立的。
bulk api以此按顺序执行所有的action(动作)。如果一个单个的动作因任何原因失败,它将继续处理它后面剩余的动作。当bulk api返回时,它将提供每个动作的状态(与发送的顺序相同),所以您可以检查是否一个指定的动作是否失败了。
实例1: 执行多条数据 (postman 报错,在kibana中的Dev_tools中执行)
POST /customer/external/_bulk { "index" : { "_id" : "1" } } { "name" : "John Doe" } { "index" : { "_id" : "2" } } { "name" : "John Doe" }
执行结果,每个结果独立存在,互不影响
#! Deprecation: [ types removal] Specifying types in bulk requests is deprecated. { "took" : 390 , "errors" : false , "items" : [ { "index" : { "_index" : "customer" , "_type" : "external" , "_id" : "1" , "_version" : 1 , "result" : "created" , "_shards" : { "total" : 2 , "successful" : 1 , "failed" : 0 } , "_seq_no" : 0 , "_primary_term" : 1 , "status" : 201 } } , { "index" : { "_index" : "customer" , "_type" : "external" , "_id" : "2" , "_version" : 1 , "result" : "created" , "_shards" : { "total" : 2 , "successful" : 1 , "failed" : 0 } , "_seq_no" : 1 , "_primary_term" : 1 , "status" : 201 } } ] }
实例2:对于整个索引执行批量操作
POST /_bulk { "delete" : { "_index" : "website" , "_type" : "blog" , "_id" : "123" } } { "create" : { "_index" : "website" , "_type" : "blog" , "_id" : "123" } } { "title" : "my first blog post" } { "index" : { "_index" : "website" , "_type" : "blog" } } { "title" : "my second blog post" } { "update" : { "_index" : "website" , "_type" : "blog" , "_id" : "123" } } { "doc" : { "title" : "my updated blog post" } }
运行结果:(即使删除操作有问题其他操作依旧正常执行)
#! Deprecation: [ types removal] Specifying types in bulk requests is deprecated. { "took" : 495 , "errors" : false , "items" : [ { "delete" : { "_index" : "website" , "_type" : "blog" , "_id" : "123" , "_version" : 1 , "result" : "not_found" , "_shards" : { "total" : 2 , "successful" : 1 , "failed" : 0 } , "_seq_no" : 0 , "_primary_term" : 1 , "status" : 404 } } , { "create" : { "_index" : "website" , "_type" : "blog" , "_id" : "123" , "_version" : 2 , "result" : "created" , "_shards" : { "total" : 2 , "successful" : 1 , "failed" : 0 } , "_seq_no" : 1 , "_primary_term" : 1 , "status" : 201 } } , { "index" : { "_index" : "website" , "_type" : "blog" , "_id" : "7MxF5o4BBQXJqQZuUd8Q" , "_version" : 1 , "result" : "created" , "_shards" : { "total" : 2 , "successful" : 1 , "failed" : 0 } , "_seq_no" : 2 , "_primary_term" : 1 , "status" : 201 } } , { "update" : { "_index" : "website" , "_type" : "blog" , "_id" : "123" , "_version" : 3 , "result" : "updated" , "_shards" : { "total" : 2 , "successful" : 1 , "failed" : 0 } , "_seq_no" : 3 , "_primary_term" : 1 , "status" : 200 } } ] }
7)样本测试数据 准备了一份顾客银行账户信息的虚构的JSON文档样本。每个文档都有下列的schema(模式)。
{ "account_number" : 1 , "balance" : 39225 , "firstname" : "Amber" , "lastname" : "Duke" , "age" : 32 , "gender" : "M" , "address" : "880 Holmes Lane" , "employer" : "Pyrami" , "email" : "amberduke@pyrami.com" , "city" : "Brogan" , "state" : "IL" }
https://github.com/elastic/elasticsearch/blob/7.4/docs/src/test/resources/accounts.json,导入测试数据,
POST bank/account/_bulk
查看索引新增成功
yellow open bank ngitcn8cS-KYZLCVQGCb9g 1 1 1000 0 427.5 kb 427.5 kb yellow open website BbOV7BpFSvKTzyRuKg1phQ 1 1 2 2 8.6 kb 8.6 kb green open .kibana_task_manager_1 QIdIVwseSQOA89j9YCsRwQ 1 0 2 0 43.5 kb 43.5 kb green open .apm-agent-configuration 7 sfl0GqhS6qsFKYPLq_kgg 1 0 0 0 283 b 283 b green open .kibana_1 g2pECUCxRJKbDR9fW7J9zA 1 0 9 0 37.3 kb 37.3 kb yellow open customer BGQLiYnaR7221GrvY4Sd1A 1 1 2 0 3.5 kb 3.5 kb
4、elasticSearch进阶检索 按照7.6的官方文档进行测试
https://www.elastic.co/guide/en/elasticsearch/reference/7.6/getting-started-search.html
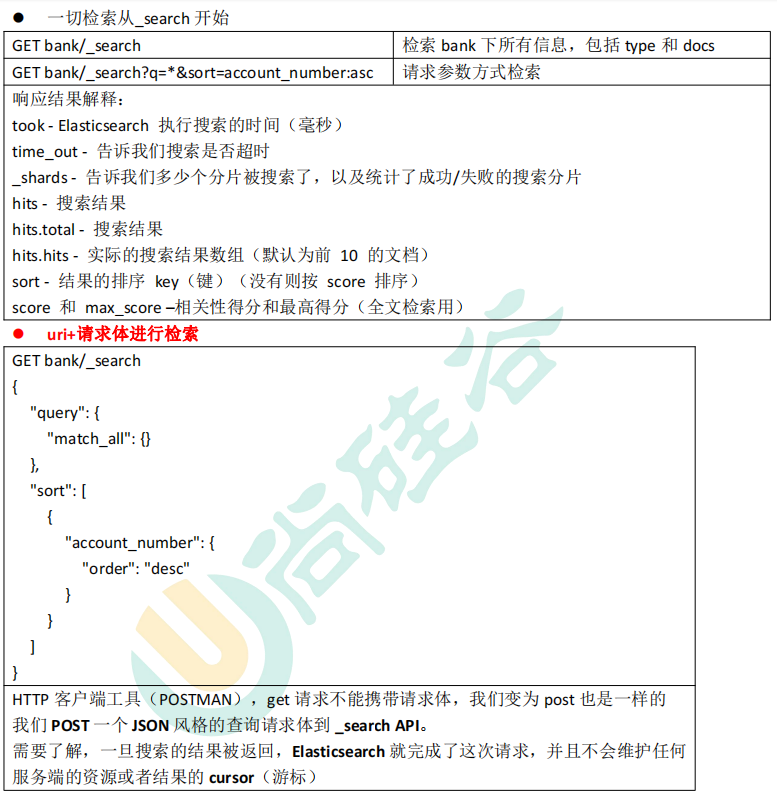
1)search Api ES支持两种基本方式检索;
通过REST request uri 发送搜索参数 (uri +检索参数);
GET bank/_search?q=*&sort=account_number:asc
通过REST request body 来发送它们(uri+请求体);
GET bank/_search
{
请求体
}
信息检索
uri+请求体进行检索
GET /bank/_search { "query" : { "match_all" : { } } , "sort" : [ { "account_number" : "asc" } , { "balance" : "desc" } ] }
HTTP客户端工具(),get请求不能够携带请求体,
GET bank/_search?q=*&sort=account_number:asc
返回结果:
{ "took" : 235 , "timed_out" : false , "_shards" : { "total" : 1 , "successful" : 1 , "skipped" : 0 , "failed" : 0 } , "hits" : { "total" : { "value" : 1000 , "relation" : "eq" } , "max_score" : null , "hits" : [ { "_index" : "bank" , "_type" : "account" , "_id" : "0" , "_score" : null , "_source" : { "account_number" : 0 , "balance" : 16623 , "firstname" : "Bradshaw" , "lastname" : "Mckenzie" , "age" : 29 , "gender" : "F" , "address" : "244 Columbus Place" , "employer" : "Euron" , "email" : "bradshawmckenzie@euron.com" , "city" : "Hobucken" , "state" : "CO" } , "sort" : [ 0 ] } , { "_index" : "bank" , "_type" : "account" , "_id" : "1" , "_score" : null , "_source" : { "account_number" : 1 , "balance" : 39225 , "firstname" : "Amber" , "lastname" : "Duke" , "age" : 32 , "gender" : "M" , "address" : "880 Holmes Lane" , "employer" : "Pyrami" , "email" : "amberduke@pyrami.com" , "city" : "Brogan" , "state" : "IL" } , "sort" : [ 1 ] } , { "_index" : "bank" , "_type" : "account" , "_id" : "2" , "_score" : null , "_source" : { "account_number" : 2 , "balance" : 28838 , "firstname" : "Roberta" , "lastname" : "Bender" , "age" : 22 , "gender" : "F" , "address" : "560 Kingsway Place" , "employer" : "Chillium" , "email" : "robertabender@chillium.com" , "city" : "Bennett" , "state" : "LA" } , "sort" : [ 2 ] } , { "_index" : "bank" , "_type" : "account" , "_id" : "3" , "_score" : null , "_source" : { "account_number" : 3 , "balance" : 44947 , "firstname" : "Levine" , "lastname" : "Burks" , "age" : 26 , "gender" : "F" , "address" : "328 Wilson Avenue" , "employer" : "Amtap" , "email" : "levineburks@amtap.com" , "city" : "Cochranville" , "state" : "HI" } , "sort" : [ 3 ] } , { "_index" : "bank" , "_type" : "account" , "_id" : "4" , "_score" : null , "_source" : { "account_number" : 4 , "balance" : 27658 , "firstname" : "Rodriquez" , "lastname" : "Flores" , "age" : 31 , "gender" : "F" , "address" : "986 Wyckoff Avenue" , "employer" : "Tourmania" , "email" : "rodriquezflores@tourmania.com" , "city" : "Eastvale" , "state" : "HI" } , "sort" : [ 4 ] } , { "_index" : "bank" , "_type" : "account" , "_id" : "5" , "_score" : null , "_source" : { "account_number" : 5 , "balance" : 29342 , "firstname" : "Leola" , "lastname" : "Stewart" , "age" : 30 , "gender" : "F" , "address" : "311 Elm Place" , "employer" : "Diginetic" , "email" : "leolastewart@diginetic.com" , "city" : "Fairview" , "state" : "NJ" } , "sort" : [ 5 ] } , { "_index" : "bank" , "_type" : "account" , "_id" : "6" , "_score" : null , "_source" : { "account_number" : 6 , "balance" : 5686 , "firstname" : "Hattie" , "lastname" : "Bond" , "age" : 36 , "gender" : "M" , "address" : "671 Bristol Street" , "employer" : "Netagy" , "email" : "hattiebond@netagy.com" , "city" : "Dante" , "state" : "TN" } , "sort" : [ 6 ] } , { "_index" : "bank" , "_type" : "account" , "_id" : "7" , "_score" : null , "_source" : { "account_number" : 7 , "balance" : 39121 , "firstname" : "Levy" , "lastname" : "Richard" , "age" : 22 , "gender" : "M" , "address" : "820 Logan Street" , "employer" : "Teraprene" , "email" : "levyrichard@teraprene.com" , "city" : "Shrewsbury" , "state" : "MO" } , "sort" : [ 7 ] } , { "_index" : "bank" , "_type" : "account" , "_id" : "8" , "_score" : null , "_source" : { "account_number" : 8 , "balance" : 48868 , "firstname" : "Jan" , "lastname" : "Burns" , "age" : 35 , "gender" : "M" , "address" : "699 Visitation Place" , "employer" : "Glasstep" , "email" : "janburns@glasstep.com" , "city" : "Wakulla" , "state" : "AZ" } , "sort" : [ 8 ] } , { "_index" : "bank" , "_type" : "account" , "_id" : "9" , "_score" : null , "_source" : { "account_number" : 9 , "balance" : 24776 , "firstname" : "Opal" , "lastname" : "Meadows" , "age" : 39 , "gender" : "M" , "address" : "963 Neptune Avenue" , "employer" : "Cedward" , "email" : "opalmeadows@cedward.com" , "city" : "Olney" , "state" : "OH" } , "sort" : [ 9 ] } ] } }
(1)只有9条数据,这是因为存在分页查询;
(2)详细的字段信息,参照: https://www.elastic.co/guide/en/elasticsearch/reference/current/getting-started-search.html
The response also provides the following information about the search request:
took – how long it took Elasticsearch to run the query, in millisecondstimed_out – whether or not the search request timed out_shards – how many shards were searched and a breakdown of how many shards succeeded, failed, or were skipped.max_score – the score of the most relevant document foundhits.total.value - how many matching documents were foundhits.sort - the document’s sort position (when not sorting by relevance score)hits._score - the document’s relevance score (not applicable when using match_all)
2)Query DSL (1)基本语法格式 Elasticsearch提供了一个可以执行查询的Json风格的DSL。这个被称为Query DSL,该查询语言非常全面。
一个查询语句的典型结构
QUERY_NAME: { ARGUMENT: VALUE, ARGUMENT: VALUE, ... }
如果针对于某个字段,那么它的结构如下:
{ QUERY_NAME: { FIELD_NAME: { ARGUMENT: VALUE, ARGUMENT: VALUE, ... } } }
GET bank/_search { "query" : { "match_all" : { } } , "from" : 0 , "size" : 5 , "sort" : [ { "account_number" : { "order" : "desc" } } ] }
query定义如何查询;
match_all查询类型【代表查询所有的所有】,es中可以在query中组合非常多的查询类型完成复杂查询;
除了query参数之外,我们可也传递其他的参数以改变查询结果,如sort,size;
from+size限定,完成分页功能;
sort排序,多字段排序,会在前序字段相等时后续字段内部排序,否则以前序为准;
(2)返回部分字段“_source”:[“”,””] GET bank/_search { "query" : { "match_all" : { } } , "from" : 0 , "size" : 5 , "sort" : [ { "account_number" : { "order" : "desc" } } ] , "_source" : [ "balance" , "firstname" ] }
查询结果:
{ "took" : 18 , "timed_out" : false , "_shards" : { "total" : 1 , "successful" : 1 , "skipped" : 0 , "failed" : 0 } , "hits" : { "total" : { "value" : 1000 , "relation" : "eq" } , "max_score" : null , "hits" : [ { "_index" : "bank" , "_type" : "account" , "_id" : "999" , "_score" : null , "_source" : { "firstname" : "Dorothy" , "balance" : 6087 } , "sort" : [ 999 ] } , { "_index" : "bank" , "_type" : "account" , "_id" : "998" , "_score" : null , "_source" : { "firstname" : "Letha" , "balance" : 16869 } , "sort" : [ 998 ] } , { "_index" : "bank" , "_type" : "account" , "_id" : "997" , "_score" : null , "_source" : { "firstname" : "Combs" , "balance" : 25311 } , "sort" : [ 997 ] } , { "_index" : "bank" , "_type" : "account" , "_id" : "996" , "_score" : null , "_source" : { "firstname" : "Andrews" , "balance" : 17541 } , "sort" : [ 996 ] } , { "_index" : "bank" , "_type" : "account" , "_id" : "995" , "_score" : null , "_source" : { "firstname" : "Phelps" , "balance" : 21153 } , "sort" : [ 995 ] } ] } }
(3)match匹配查询
基本类型(非字符串),”account_number”: 20 可加可不加“ ” 不加就是精确匹配
GET bank/_search { "query" : { "match" : { "account_number" : "20" } } }
match返回account_number=20的数据。
查询结果:
{ "took" : 1 , "timed_out" : false , "_shards" : { "total" : 1 , "successful" : 1 , "skipped" : 0 , "failed" : 0 } , "hits" : { "total" : { "value" : 1 , "relation" : "eq" } , "max_score" : 1.0 , "hits" : [ { "_index" : "bank" , "_type" : "account" , "_id" : "20" , "_score" : 1.0 , "_source" : { "account_number" : 20 , "balance" : 16418 , "firstname" : "Elinor" , "lastname" : "Ratliff" , "age" : 36 , "gender" : "M" , "address" : "282 Kings Place" , "employer" : "Scentric" , "email" : "elinorratliff@scentric.com" , "city" : "Ribera" , "state" : "WA" } } ] } }
GET bank/_search { "query" : { "match" : { "address" : "kings" } } }
全文检索,最终会按照评分进行排序,会对检索条件进行分词匹配。
查询结果:
{ "took" : 30 , "timed_out" : false , "_shards" : { "total" : 1 , "successful" : 1 , "skipped" : 0 , "failed" : 0 } , "hits" : { "total" : { "value" : 2 , "relation" : "eq" } , "max_score" : 5.990829 , "hits" : [ { "_index" : "bank" , "_type" : "account" , "_id" : "20" , "_score" : 5.990829 , "_source" : { "account_number" : 20 , "balance" : 16418 , "firstname" : "Elinor" , "lastname" : "Ratliff" , "age" : 36 , "gender" : "M" , "address" : "282 Kings Place" , "employer" : "Scentric" , "email" : "elinorratliff@scentric.com" , "city" : "Ribera" , "state" : "WA" } } , { "_index" : "bank" , "_type" : "account" , "_id" : "722" , "_score" : 5.990829 , "_source" : { "account_number" : 722 , "balance" : 27256 , "firstname" : "Roberts" , "lastname" : "Beasley" , "age" : 34 , "gender" : "F" , "address" : "305 Kings Hwy" , "employer" : "Quintity" , "email" : "robertsbeasley@quintity.com" , "city" : "Hayden" , "state" : "PA" } } ] } }
(4) match_phrase [短句匹配] 将需要匹配的值当成一整个单词(不分词)进行检索
GET bank/_search { "query" : { "match_phrase" : { "address" : "mill road" } } }
查处address中包含mill_road的所有记录,并给出相关性得分
查看结果:
{ "took" : 32 , "timed_out" : false , "_shards" : { "total" : 1 , "successful" : 1 , "skipped" : 0 , "failed" : 0 } , "hits" : { "total" : { "value" : 1 , "relation" : "eq" } , "max_score" : 8.926605 , "hits" : [ { "_index" : "bank" , "_type" : "account" , "_id" : "970" , "_score" : 8.926605 , "_source" : { "account_number" : 970 , "balance" : 19648 , "firstname" : "Forbes" , "lastname" : "Wallace" , "age" : 28 , "gender" : "M" , "address" : "990 Mill Road" , "employer" : "Pheast" , "email" : "forbeswallace@pheast.com" , "city" : "Lopezo" , "state" : "AK" } } ] } }
match_phrase和match的区别,观察如下实例:
match_phrase是做短语匹配
match是分词匹配,例如990 Mill匹配含有990或者Mill 的结果
GET bank/_search { "query" : { "match_phrase" : { "address" : "990 Mill" } } }
查询结果:
{ "took" : 0 , "timed_out" : false , "_shards" : { "total" : 1 , "successful" : 1 , "skipped" : 0 , "failed" : 0 } , "hits" : { "total" : { "value" : 1 , "relation" : "eq" } , "max_score" : 10.806405 , "hits" : [ { "_index" : "bank" , "_type" : "account" , "_id" : "970" , "_score" : 10.806405 , "_source" : { "account_number" : 970 , "balance" : 19648 , "firstname" : "Forbes" , "lastname" : "Wallace" , "age" : 28 , "gender" : "M" , "address" : "990 Mill Road" , "employer" : "Pheast" , "email" : "forbeswallace@pheast.com" , "city" : "Lopezo" , "state" : "AK" } } ] } }
使用match的keyword
GET bank/_search { "query" : { "match" : { "address.keyword" : "990 Mill" } } }
查询结果,一条也未匹配到
{ "took" : 0 , "timed_out" : false , "_shards" : { "total" : 1 , "successful" : 1 , "skipped" : 0 , "failed" : 0 } , "hits" : { "total" : { "value" : 0 , "relation" : "eq" } , "max_score" : null , "hits" : [ ] } }
修改匹配条件为“990 Mill Road”
GET bank/_search { "query" : { "match" : { "address.keyword" : "990 Mill Road" } } }
查询出一条数据
{ "took" : 1 , "timed_out" : false , "_shards" : { "total" : 1 , "successful" : 1 , "skipped" : 0 , "failed" : 0 } , "hits" : { "total" : { "value" : 1 , "relation" : "eq" } , "max_score" : 6.5032897 , "hits" : [ { "_index" : "bank" , "_type" : "account" , "_id" : "970" , "_score" : 6.5032897 , "_source" : { "account_number" : 970 , "balance" : 19648 , "firstname" : "Forbes" , "lastname" : "Wallace" , "age" : 28 , "gender" : "M" , "address" : "990 Mill Road" , "employer" : "Pheast" , "email" : "forbeswallace@pheast.com" , "city" : "Lopezo" , "state" : "AK" } } ] } }
文本字段的匹配,使用keyword,匹配的条件就是要显示字段的全部值,要进行精确匹配的。
match_phrase是做短语匹配,只要文本中包含匹配条件既包含这个短语,就能匹配到。
(5)multi_math【多字段匹配】会分词 GET bank/_search { "query" : { "multi_match" : { "query" : "mill" , "fields" : [ "state" , "address" ] } } }
state或者address中包含mill,并且在查询过程中,会对于查询条件进行分词 。
查询结果:
{ "took" : 28 , "timed_out" : false , "_shards" : { "total" : 1 , "successful" : 1 , "skipped" : 0 , "failed" : 0 } , "hits" : { "total" : { "value" : 4 , "relation" : "eq" } , "max_score" : 5.4032025 , "hits" : [ { "_index" : "bank" , "_type" : "account" , "_id" : "970" , "_score" : 5.4032025 , "_source" : { "account_number" : 970 , "balance" : 19648 , "firstname" : "Forbes" , "lastname" : "Wallace" , "age" : 28 , "gender" : "M" , "address" : "990 Mill Road" , "employer" : "Pheast" , "email" : "forbeswallace@pheast.com" , "city" : "Lopezo" , "state" : "AK" } } , { "_index" : "bank" , "_type" : "account" , "_id" : "136" , "_score" : 5.4032025 , "_source" : { "account_number" : 136 , "balance" : 45801 , "firstname" : "Winnie" , "lastname" : "Holland" , "age" : 38 , "gender" : "M" , "address" : "198 Mill Lane" , "employer" : "Neteria" , "email" : "winnieholland@neteria.com" , "city" : "Urie" , "state" : "IL" } } , { "_index" : "bank" , "_type" : "account" , "_id" : "345" , "_score" : 5.4032025 , "_source" : { "account_number" : 345 , "balance" : 9812 , "firstname" : "Parker" , "lastname" : "Hines" , "age" : 38 , "gender" : "M" , "address" : "715 Mill Avenue" , "employer" : "Baluba" , "email" : "parkerhines@baluba.com" , "city" : "Blackgum" , "state" : "KY" } } , { "_index" : "bank" , "_type" : "account" , "_id" : "472" , "_score" : 5.4032025 , "_source" : { "account_number" : 472 , "balance" : 25571 , "firstname" : "Lee" , "lastname" : "Long" , "age" : 32 , "gender" : "F" , "address" : "288 Mill Street" , "employer" : "Comverges" , "email" : "leelong@comverges.com" , "city" : "Movico" , "state" : "MT" } } ] } }
(6)bool用来做复合查询 复合语句可以合并,任何其他查询语句,包括符合语句。这也就意味着,复合语句之间
must:必须达到must所列举的所有条件
GET bank/_search { "query" : { "bool" : { "must" : [ { "match" : { "address" : "mill" } } , { "match" : { "gender" : "M" } } ] } } }
must_not,必须不匹配must_not所列举的所有条件。
should,应该满足should所列举的条件。
实例:查询gender=m,并且address=mill的数据
GET bank/_search { "query" : { "bool" : { "must" : [ { "match" : { "gender" : "M" } } , { "match" : { "address" : "mill" } } ] } } }
查询结果:
{ "took" : 1 , "timed_out" : false , "_shards" : { "total" : 1 , "successful" : 1 , "skipped" : 0 , "failed" : 0 } , "hits" : { "total" : { "value" : 3 , "relation" : "eq" } , "max_score" : 6.0824604 , "hits" : [ { "_index" : "bank" , "_type" : "account" , "_id" : "970" , "_score" : 6.0824604 , "_source" : { "account_number" : 970 , "balance" : 19648 , "firstname" : "Forbes" , "lastname" : "Wallace" , "age" : 28 , "gender" : "M" , "address" : "990 Mill Road" , "employer" : "Pheast" , "email" : "forbeswallace@pheast.com" , "city" : "Lopezo" , "state" : "AK" } } , { "_index" : "bank" , "_type" : "account" , "_id" : "136" , "_score" : 6.0824604 , "_source" : { "account_number" : 136 , "balance" : 45801 , "firstname" : "Winnie" , "lastname" : "Holland" , "age" : 38 , "gender" : "M" , "address" : "198 Mill Lane" , "employer" : "Neteria" , "email" : "winnieholland@neteria.com" , "city" : "Urie" , "state" : "IL" } } , { "_index" : "bank" , "_type" : "account" , "_id" : "345" , "_score" : 6.0824604 , "_source" : { "account_number" : 345 , "balance" : 9812 , "firstname" : "Parker" , "lastname" : "Hines" , "age" : 38 , "gender" : "M" , "address" : "715 Mill Avenue" , "employer" : "Baluba" , "email" : "parkerhines@baluba.com" , "city" : "Blackgum" , "state" : "KY" } } ] } }
must_not:必须不是指定的情况
实例:查询gender=m,并且address=mill的数据,但是age不等于38的
GET bank/_search { "query" : { "bool" : { "must" : [ { "match" : { "gender" : "M" } } , { "match" : { "address" : "mill" } } ] , "must_not" : [ { "match" : { "age" : "38" } } ] } }
查询结果:
{ "took" : 4 , "timed_out" : false , "_shards" : { "total" : 1 , "successful" : 1 , "skipped" : 0 , "failed" : 0 } , "hits" : { "total" : { "value" : 1 , "relation" : "eq" } , "max_score" : 6.0824604 , "hits" : [ { "_index" : "bank" , "_type" : "account" , "_id" : "970" , "_score" : 6.0824604 , "_source" : { "account_number" : 970 , "balance" : 19648 , "firstname" : "Forbes" , "lastname" : "Wallace" , "age" : 28 , "gender" : "M" , "address" : "990 Mill Road" , "employer" : "Pheast" , "email" : "forbeswallace@pheast.com" , "city" : "Lopezo" , "state" : "AK" } } ] } }
should:应该达到should列举的条件,如果到达会增加相关文档的评分,并不会改变查询的结果。如果query中只有should且只有一种匹配规则,那么should的条件就会被作为默认匹配条件二区改变查询结果。
实例:匹配lastName应该等于Wallace的数据
GET bank/_search { "query" : { "bool" : { "must" : [ { "match" : { "gender" : "M" } } , { "match" : { "address" : "mill" } } ] , "must_not" : [ { "match" : { "age" : "18" } } ] , "should" : [ { "match" : { "lastname" : "Wallace" } } ] } } }
查询结果:
{ "took" : 5 , "timed_out" : false , "_shards" : { "total" : 1 , "successful" : 1 , "skipped" : 0 , "failed" : 0 } , "hits" : { "total" : { "value" : 3 , "relation" : "eq" } , "max_score" : 12.585751 , "hits" : [ { "_index" : "bank" , "_type" : "account" , "_id" : "970" , "_score" : 12.585751 , "_source" : { "account_number" : 970 , "balance" : 19648 , "firstname" : "Forbes" , "lastname" : "Wallace" , "age" : 28 , "gender" : "M" , "address" : "990 Mill Road" , "employer" : "Pheast" , "email" : "forbeswallace@pheast.com" , "city" : "Lopezo" , "state" : "AK" } } , { "_index" : "bank" , "_type" : "account" , "_id" : "136" , "_score" : 6.0824604 , "_source" : { "account_number" : 136 , "balance" : 45801 , "firstname" : "Winnie" , "lastname" : "Holland" , "age" : 38 , "gender" : "M" , "address" : "198 Mill Lane" , "employer" : "Neteria" , "email" : "winnieholland@neteria.com" , "city" : "Urie" , "state" : "IL" } } , { "_index" : "bank" , "_type" : "account" , "_id" : "345" , "_score" : 6.0824604 , "_source" : { "account_number" : 345 , "balance" : 9812 , "firstname" : "Parker" , "lastname" : "Hines" , "age" : 38 , "gender" : "M" , "address" : "715 Mill Avenue" , "employer" : "Baluba" , "email" : "parkerhines@baluba.com" , "city" : "Blackgum" , "state" : "KY" } } ] } }
能够看到相关度越高,得分也越高。
(7)Filter【结果过滤】 并不是所有的查询都需要产生分数,特别是哪些仅用于filtering过滤的文档。为了不计算分数,elasticsearch会自动检查场景并且优化查询的执行。
GET bank/_search { "query" : { "bool" : { "must" : [ { "match" : { "address" : "mill" } } ] , "filter" : { "range" : { "balance" : { "gte" : "10000" , "lte" : "20000" } } } } } }
这里先是查询所有匹配address=mill的文档,然后再根据10000<=balance<=20000进行过滤查询结果
查询结果:
{ "took" : 2 , "timed_out" : false , "_shards" : { "total" : 1 , "successful" : 1 , "skipped" : 0 , "failed" : 0 } , "hits" : { "total" : { "value" : 1 , "relation" : "eq" } , "max_score" : 5.4032025 , "hits" : [ { "_index" : "bank" , "_type" : "account" , "_id" : "970" , "_score" : 5.4032025 , "_source" : { "account_number" : 970 , "balance" : 19648 , "firstname" : "Forbes" , "lastname" : "Wallace" , "age" : 28 , "gender" : "M" , "address" : "990 Mill Road" , "employer" : "Pheast" , "email" : "forbeswallace@pheast.com" , "city" : "Lopezo" , "state" : "AK" } } ] } }
Each must, should, and must_not element in a Boolean query is referred to as a query clause. How well a document meets the criteria in each must or should clause contributes to the document’s relevance score . The higher the score, the better the document matches your search criteria. By default, Elasticsearch returns documents ranked by these relevance scores.
在boolean查询中,must, should 和must_not 元素都被称为查询子句 。 文档是否符合每个“must”或“should”子句中的标准,决定了文档的“相关性得分”。 得分越高,文档越符合您的搜索条件。 默认情况下,Elasticsearch返回根据这些相关性得分排序的文档。
The criteria in a must_not clause is treated as a filter . It affects whether or not the document is included in the results, but does not contribute to how documents are scored. You can also explicitly specify arbitrary filters to include or exclude documents based on structured data.
“must_not”子句中的条件被视为“过滤器”。 它影响文档是否包含在结果中, 但不影响文档的评分方式 。 还可以显式地指定任意过滤器来包含或排除基于结构化数据的文档。
filter在使用过程中,并不会计算相关性得分_score:
GET bank/_search { "query" : { "bool" : { "must" : [ { "match" : { "address" : "mill" } } ] , "filter" : { "range" : { "balance" : { "gte" : "10000" , "lte" : "20000" } } } } } }
查询结果:
{ "took" : 1 , "timed_out" : false , "_shards" : { "total" : 1 , "successful" : 1 , "skipped" : 0 , "failed" : 0 } , "hits" : { "total" : { "value" : 213 , "relation" : "eq" } , "max_score" : 0.0 , "hits" : [ { "_index" : "bank" , "_type" : "account" , "_id" : "20" , "_score" : 0.0 , "_source" : { "account_number" : 20 , "balance" : 16418 , "firstname" : "Elinor" , "lastname" : "Ratliff" , "age" : 36 , "gender" : "M" , "address" : "282 Kings Place" , "employer" : "Scentric" , "email" : "elinorratliff@scentric.com" , "city" : "Ribera" , "state" : "WA" } } , { "_index" : "bank" , "_type" : "account" , "_id" : "37" , "_score" : 0.0 , "_source" : { "account_number" : 37 , "balance" : 18612 , "firstname" : "Mcgee" , "lastname" : "Mooney" , "age" : 39 , "gender" : "M" , "address" : "826 Fillmore Place" , "employer" : "Reversus" , "email" : "mcgeemooney@reversus.com" , "city" : "Tooleville" , "state" : "OK" } } , { "_index" : "bank" , "_type" : "account" , "_id" : "51" , "_score" : 0.0 , "_source" : { "account_number" : 51 , "balance" : 14097 , "firstname" : "Burton" , "lastname" : "Meyers" , "age" : 31 , "gender" : "F" , "address" : "334 River Street" , "employer" : "Bezal" , "email" : "burtonmeyers@bezal.com" , "city" : "Jacksonburg" , "state" : "MO" } } , { "_index" : "bank" , "_type" : "account" , "_id" : "56" , "_score" : 0.0 , "_source" : { "account_number" : 56 , "balance" : 14992 , "firstname" : "Josie" , "lastname" : "Nelson" , "age" : 32 , "gender" : "M" , "address" : "857 Tabor Court" , "employer" : "Emtrac" , "email" : "josienelson@emtrac.com" , "city" : "Sunnyside" , "state" : "UT" } } , { "_index" : "bank" , "_type" : "account" , "_id" : "121" , "_score" : 0.0 , "_source" : { "account_number" : 121 , "balance" : 19594 , "firstname" : "Acevedo" , "lastname" : "Dorsey" , "age" : 32 , "gender" : "M" , "address" : "479 Nova Court" , "employer" : "Netropic" , "email" : "acevedodorsey@netropic.com" , "city" : "Islandia" , "state" : "CT" } } , { "_index" : "bank" , "_type" : "account" , "_id" : "176" , "_score" : 0.0 , "_source" : { "account_number" : 176 , "balance" : 18607 , "firstname" : "Kemp" , "lastname" : "Walters" , "age" : 28 , "gender" : "F" , "address" : "906 Howard Avenue" , "employer" : "Eyewax" , "email" : "kempwalters@eyewax.com" , "city" : "Why" , "state" : "KY" } } , { "_index" : "bank" , "_type" : "account" , "_id" : "183" , "_score" : 0.0 , "_source" : { "account_number" : 183 , "balance" : 14223 , "firstname" : "Hudson" , "lastname" : "English" , "age" : 26 , "gender" : "F" , "address" : "823 Herkimer Place" , "employer" : "Xinware" , "email" : "hudsonenglish@xinware.com" , "city" : "Robbins" , "state" : "ND" } } , { "_index" : "bank" , "_type" : "account" , "_id" : "222" , "_score" : 0.0 , "_source" : { "account_number" : 222 , "balance" : 14764 , "firstname" : "Rachelle" , "lastname" : "Rice" , "age" : 36 , "gender" : "M" , "address" : "333 Narrows Avenue" , "employer" : "Enaut" , "email" : "rachellerice@enaut.com" , "city" : "Wright" , "state" : "AZ" } } , { "_index" : "bank" , "_type" : "account" , "_id" : "227" , "_score" : 0.0 , "_source" : { "account_number" : 227 , "balance" : 19780 , "firstname" : "Coleman" , "lastname" : "Berg" , "age" : 22 , "gender" : "M" , "address" : "776 Little Street" , "employer" : "Exoteric" , "email" : "colemanberg@exoteric.com" , "city" : "Eagleville" , "state" : "WV" } } , { "_index" : "bank" , "_type" : "account" , "_id" : "272" , "_score" : 0.0 , "_source" : { "account_number" : 272 , "balance" : 19253 , "firstname" : "Lilly" , "lastname" : "Morgan" , "age" : 25 , "gender" : "F" , "address" : "689 Fleet Street" , "employer" : "Biolive" , "email" : "lillymorgan@biolive.com" , "city" : "Sunbury" , "state" : "OH" } } ] } }
能看到所有文档的 “_score” : 0.0。
(8)term 和match一样。匹配某个属性的值。全文检索字段用match,其他非text字段 匹配用term。
Avoid using the term query for text
避免对文本字段使用“term”查询
By default, Elasticsearch changes the values of text fields as part of analysis . This can make finding exact matches for text field values difficult.
默认情况下,Elasticsearch作为analysis 的一部分更改’ text ‘字段的值。这使得为“text”字段值寻找精确匹配变得困难。
To search text field values, use the match.
要搜索“text”字段值,请使用匹配。
https://www.elastic.co/guide/en/elasticsearch/reference/7.6/query-dsl-term-query.html
使用term匹配查询
GET bank/_search { "query" : { "term" : { "age" : "28" } } }
如果是text则查不到:
GET bank/_search
{
  "query": {
    "term": {
      "gender" : "F"
    }
  }
}
{ "took" : 0 , "timed_out" : false , "_shards" : { "total" : 1 , "successful" : 1 , "skipped" : 0 , "failed" : 0 } , "hits" : { "total" : { "value" : 0 , "relation" : "eq" } , "max_score" : null , "hits" : [ ] } }
一条也没有匹配到
而更换为match匹配时,能够匹配到32个文档
也就是说,全文检索字段用match,其他非text字段匹配用term 。
(9)Aggregation(执行聚合) 聚合提供了从数据中分组和提取数据的能力。最简单的聚合方法大致等于SQL Group by和SQL聚合函数。在elasticsearch中,执行搜索返回this(命中结果),并且同时返回聚合结果,把以响应中的所有hits(命中结果)分隔开的能力。这是非常强大且有效的,你可以执行查询和多个聚合,并且在一次使用中得到各自的(任何一个的)返回结果,使用一次简洁和简化的API啦避免网络往返。
“size”:0
size:0不显示搜索数据
"aggs" : { "aggs_name这次聚合的名字,方便展示在结果集中" : { "AGG_TYPE聚合的类型(avg,term,terms)" : { } } } ,
搜索address中包含mill的所有人的年龄分布以及平均年龄,但不显示这些人的详情
GET bank/_search { "query" : { "match" : { "address" : "Mill" } } , "aggs" : { "ageAgg" : { "terms" : { "field" : "age" , "size" : 10 } } , "ageAvg" : { "avg" : { "field" : "age" } } , "balanceAvg" : { "avg" : { "field" : "balance" } } } , "size" : 0 }
查询结果:
{ "took" : 2 , "timed_out" : false , "_shards" : { "total" : 1 , "successful" : 1 , "skipped" : 0 , "failed" : 0 } , "hits" : { "total" : { "value" : 4 , "relation" : "eq" } , "max_score" : null , "hits" : [ ] } , "aggregations" : { "ageAgg" : { "doc_count_error_upper_bound" : 0 , "sum_other_doc_count" : 0 , "buckets" : [ { "key" : 38 , "doc_count" : 2 } , { "key" : 28 , "doc_count" : 1 } , { "key" : 32 , "doc_count" : 1 } ] } , "ageAvg" : { "value" : 34.0 } , "balanceAvg" : { "value" : 25208.0 } } }
复杂:
GET bank/_search { "query" : { "match_all" : { } } , "aggs" : { "ageAgg" : { "terms" : { "field" : "age" , "size" : 100 } , "aggs" : { "ageAvg" : { "avg" : { "field" : "balance" } } } } } , "size" : 0 }
输出结果:
{ "took" : 49 , "timed_out" : false , "_shards" : { "total" : 1 , "successful" : 1 , "skipped" : 0 , "failed" : 0 } , "hits" : { "total" : { "value" : 1000 , "relation" : "eq" } , "max_score" : null , "hits" : [ ] } , "aggregations" : { "ageAgg" : { "doc_count_error_upper_bound" : 0 , "sum_other_doc_count" : 0 , "buckets" : [ { "key" : 31 , "doc_count" : 61 , "ageAvg" : { "value" : 28312.918032786885 } } , { "key" : 39 , "doc_count" : 60 , "ageAvg" : { "value" : 25269.583333333332 } } , { "key" : 26 , "doc_count" : 59 , "ageAvg" : { "value" : 23194.813559322032 } } , { "key" : 32 , "doc_count" : 52 , "ageAvg" : { "value" : 23951.346153846152 } } , { "key" : 35 , "doc_count" : 52 , "ageAvg" : { "value" : 22136.69230769231 } } , { "key" : 36 , "doc_count" : 52 , "ageAvg" : { "value" : 22174.71153846154 } } , { "key" : 22 , "doc_count" : 51 , "ageAvg" : { "value" : 24731.07843137255 } } , { "key" : 28 , "doc_count" : 51 , "ageAvg" : { "value" : 28273.882352941175 } } , { "key" : 33 , "doc_count" : 50 , "ageAvg" : { "value" : 25093.94 } } , { "key" : 34 , "doc_count" : 49 , "ageAvg" : { "value" : 26809.95918367347 } } , { "key" : 30 , "doc_count" : 47 , "ageAvg" : { "value" : 22841.106382978724 } } , { "key" : 21 , "doc_count" : 46 , "ageAvg" : { "value" : 26981.434782608696 } } , { "key" : 40 , "doc_count" : 45 , "ageAvg" : { "value" : 27183.17777777778 } } , { "key" : 20 , "doc_count" : 44 , "ageAvg" : { "value" : 27741.227272727272 } } , { "key" : 23 , "doc_count" : 42 , "ageAvg" : { "value" : 27314.214285714286 } } , { "key" : 24 , "doc_count" : 42 , "ageAvg" : { "value" : 28519.04761904762 } } , { "key" : 25 , "doc_count" : 42 , "ageAvg" : { "value" : 27445.214285714286 } } , { "key" : 37 , "doc_count" : 42 , "ageAvg" : { "value" : 27022.261904761905 } } , { "key" : 27 , "doc_count" : 39 , "ageAvg" : { "value" : 21471.871794871793 } } , { "key" : 38 , "doc_count" : 39 , "ageAvg" : { "value" : 26187.17948717949 } } , { "key" : 29 , "doc_count" : 35 , "ageAvg" : { "value" : 29483.14285714286 } } ] } } }
查出所有年龄分布,并且这些年龄段中M的平均薪资和F的平均薪资以及这个年龄段的总体平均薪资
GET bank/_search { "query" : { "match_all" : { } } , "aggs" : { "ageAgg" : { "terms" : { "field" : "age" , "size" : 100 } , "aggs" : { "genderAgg" : { "terms" : { "field" : "gender.keyword" } , "aggs" : { "balanceAvg" : { "avg" : { "field" : "balance" } } } } , "ageBalanceAvg" : { "avg" : { "field" : "balance" } } } } } , "size" : 0 }
输出结果:
{ "took" : 119 , "timed_out" : false , "_shards" : { "total" : 1 , "successful" : 1 , "skipped" : 0 , "failed" : 0 } , "hits" : { "total" : { "value" : 1000 , "relation" : "eq" } , "max_score" : null , "hits" : [ ] } , "aggregations" : { "ageAgg" : { "doc_count_error_upper_bound" : 0 , "sum_other_doc_count" : 0 , "buckets" : [ { "key" : 31 , "doc_count" : 61 , "genderAgg" : { "doc_count_error_upper_bound" : 0 , "sum_other_doc_count" : 0 , "buckets" : [ { "key" : "M" , "doc_count" : 35 , "balanceAvg" : { "value" : 29565.628571428573 } } , { "key" : "F" , "doc_count" : 26 , "balanceAvg" : { "value" : 26626.576923076922 } } ] } , "ageBalanceAvg" : { "value" : 28312.918032786885 } } ] ....... } } }
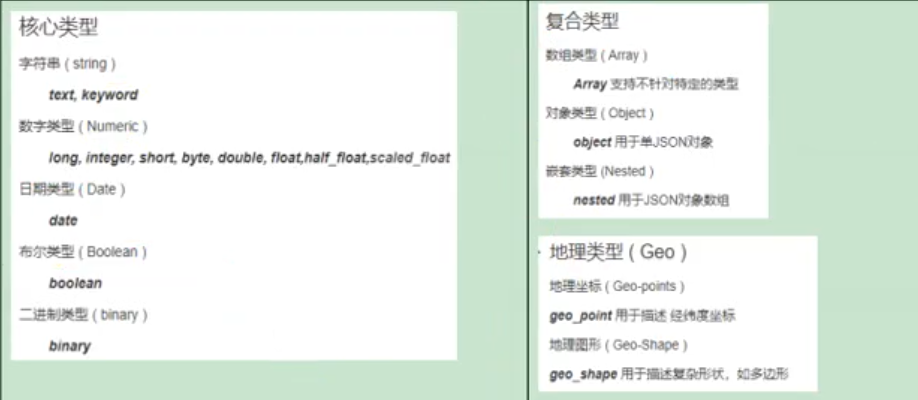
3)Mapping (1)字段类型
(2)映射 Mapping(映射)
(3)新版本改变 ElasticSearch7-去掉type概念
关系型数据库中两个数据表示是独立的,即使他们里面有相同名称的列也不影响使用,但ES中不是这样的。elasticsearch是基于Lucene开发的搜索引擎,而ES中不同type下名称相同的filed最终在Lucene中的处理方式是一样的。
两个不同type下的两个user_name,在ES同一个索引下其实被认为是同一个filed,你必须在两个不同的type中定义相同的filed映射。否则,不同type中的相同字段名称就会在处理中出现冲突的情况,导致Lucene处理效率下降。
去掉type就是为了提高ES处理数据的效率。
Elasticsearch 7.x URL中的type参数为可选。比如,索引一个文档不再要求提供文档类型。
Elasticsearch 8.x 不再支持URL中的type参数。
解决:
将已存在的索引下的类型数据,全部迁移到指定位置即可。详见数据迁移
Elasticsearch 7.x
Specifying types in requests is deprecated. For instance, indexing a document no longer requires a document type. The new index APIs are PUT {index}/_doc/{id} in case of explicit ids and POST {index}/_doc for auto-generated ids. Note that in 7.0, _doc is a permanent part of the path, and represents the endpoint name rather than the document type.
The include_type_name parameter in the index creation, index template, and mapping APIs will default to false. Setting the parameter at all will result in a deprecation warning.
The _default_ mapping type is removed.
Elasticsearch 8.x
Specifying types in requests is no longer supported.
The include_type_name parameter is removed.
创建映射 创建索引并指定属性的映射规则(相当于新建表并制定字段和字段类型 )
PUT /my_index { "mappings" : { "properties" : { "age" : { "type" : "integer" } , "email" : { "type" : "keyword" } , "name" : { "type" : "text" } } } }
输出:
{ "acknowledged" : true , "shards_acknowledged" : true , "index" : "my_index" }
查看映射 输出结果:
{ "my_index" : { "aliases" : { } , "mappings" : { "properties" : { "age" : { "type" : "integer" } , "email" : { "type" : "keyword" } , "employee-id" : { "type" : "keyword" , "index" : false } , "name" : { "type" : "text" } } } , "settings" : { "index" : { "creation_date" : "1588410780774" , "number_of_shards" : "1" , "number_of_replicas" : "1" , "uuid" : "ua0lXhtkQCOmn7Kh3iUu0w" , "version" : { "created" : "7060299" } , "provided_name" : "my_index" } } } }
添加新的字段映射 PUT /my_index/_mapping { "properties" : { "employee-id" : { "type" : "keyword" , "index" : false } } }
这里的 “index”: false,表明新增的字段不能被检索,只是一个冗余字段。
更新映射 对于已经存在的字段映射,我们不能更新。更新必须创建新的索引,进行数据迁移。
数据迁移 先创建new_twitter的正确映射。然后使用如下方式进行数据迁移。
POST reindex [ 固定写法] { "source" : { "index" : "twitter" } , "dest" : { "index" : "new_twitters" } }
将旧索引的type下的数据进行迁移
POST reindex [ 固定写法] { "source" : { "index" : "twitter" , "twitter" : "twitter" } , "dest" : { "index" : "new_twitters" } }
更多详情见: https://www.elastic.co/guide/en/elasticsearch/reference/7.6/docs-reindex.html
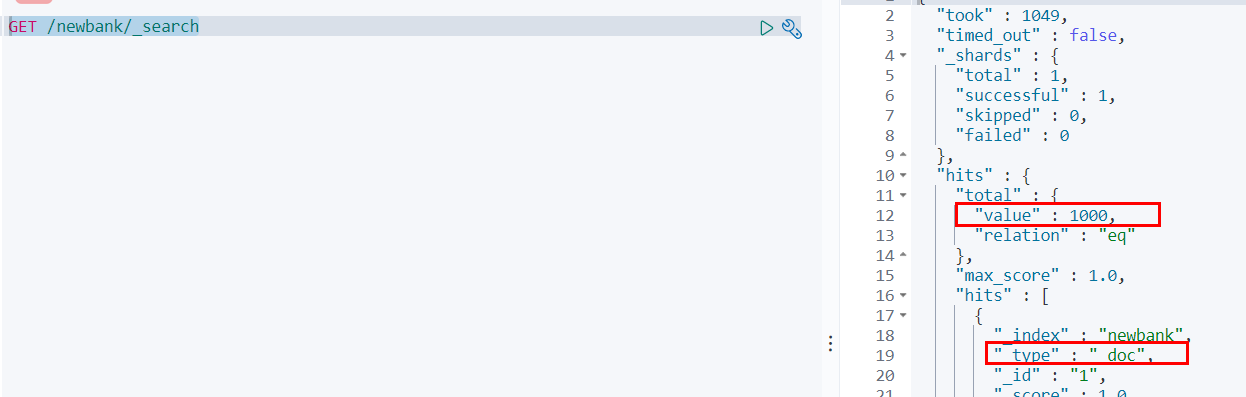
GET /bank/_search
{ "took" : 0 , "timed_out" : false , "_shards" : { "total" : 1 , "successful" : 1 , "skipped" : 0 , "failed" : 0 } , "hits" : { "total" : { "value" : 1000 , "relation" : "eq" } , "max_score" : 1.0 , "hits" : [ { "_index" : "bank" , "_type" : "account" , "_id" : "1" , "_score" : 1.0 , "_source" : { "account_number" : 1 , "balance" : 39225 , "firstname" : "Amber" , "lastname" : "Duke" , "age" : 32 , "gender" : "M" , "address" : "880 Holmes Lane" , "employer" : "Pyrami" , "email" : "amberduke@pyrami.com" , "city" : "Brogan" , "state" : "IL" } } , ...
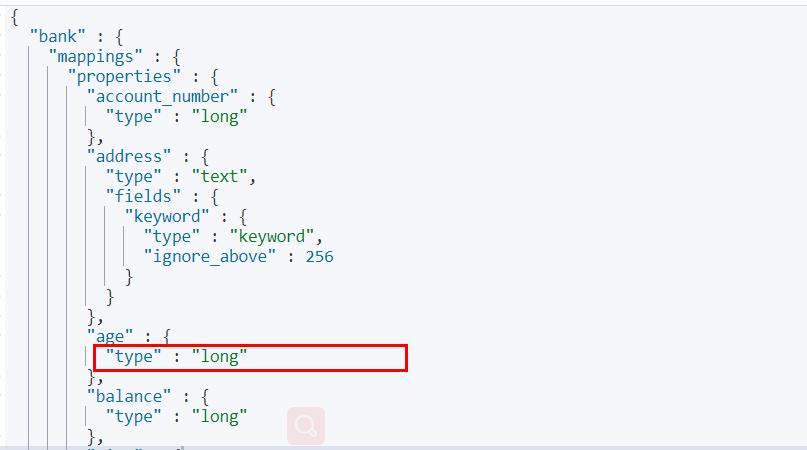
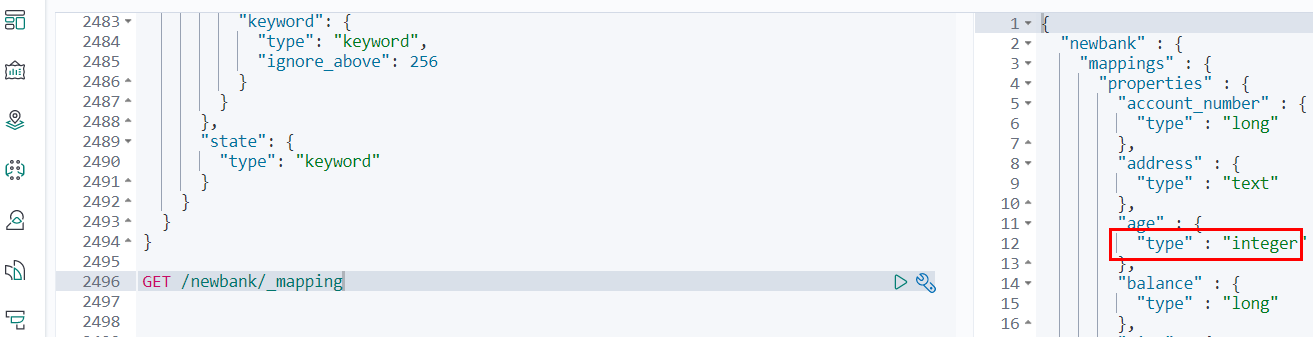
想要将年龄修改为integer
PUT /newbank { "mappings" : { "properties" : { "account_number" : { "type" : "long" } , "address" : { "type" : "text" } , "age" : { "type" : "integer" } , "balance" : { "type" : "long" } , "city" : { "type" : "keyword" } , "email" : { "type" : "keyword" } , "employer" : { "type" : "keyword" } , "firstname" : { "type" : "text" } , "gender" : { "type" : "keyword" } , "lastname" : { "type" : "text" , "fields" : { "keyword" : { "type" : "keyword" , "ignore_above" : 256 } } } , "state" : { "type" : "keyword" } } } }
查看“newbank”的映射:
GET /newbank/_mapping
能够看到age的映射类型被修改为了integer.
将bank中的数据迁移到newbank中
POST _reindex { "source" : { "index" : "bank" , "type" : "account" } , "dest" : { "index" : "newbank" } }
运行输出:
#! Deprecation: [ types removal] Specifying types in reindex requests is deprecated. { "took" : 768 , "timed_out" : false , "total" : 1000 , "updated" : 0 , "created" : 1000 , "deleted" : 0 , "batches" : 1 , "version_conflicts" : 0 , "noops" : 0 , "retries" : { "bulk" : 0 , "search" : 0 } , "throttled_millis" : 0 , "requests_per_second" : -1.0 , "throttled_until_millis" : 0 , "failures" : [ ] }
查看newbank中的数据
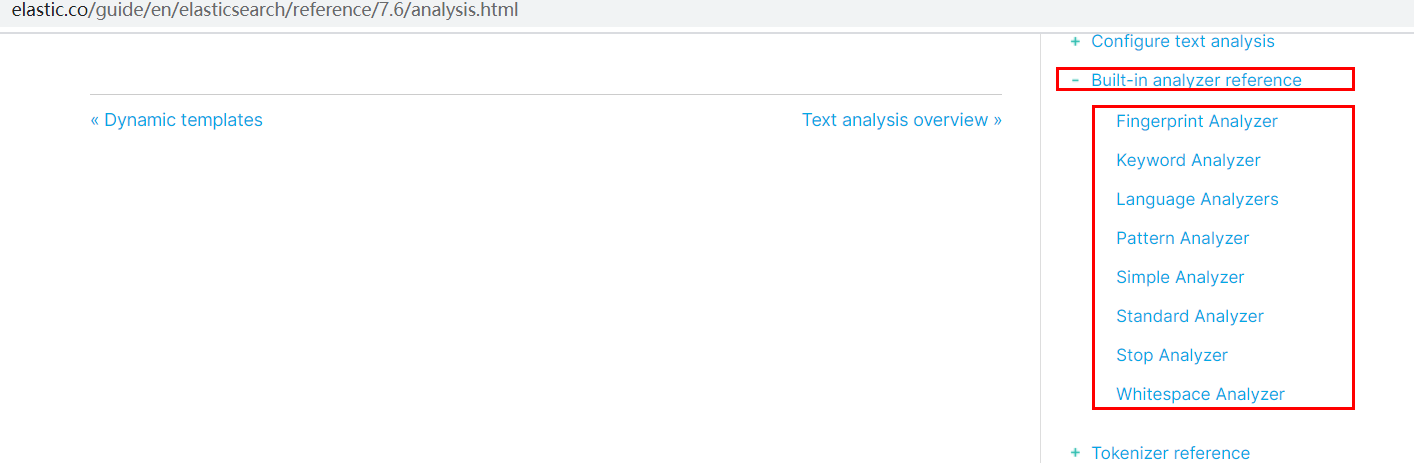
4)分词 一个tokenizer(分词器)接收一个字符流,将之分割为独立的tokens(词元,通常是独立的单词),然后输出tokens流。
例如:whitespace tokenizer遇到空白字符时分割文本。它会将文本“Quick brown fox!”分割为[Quick,brown,fox!]。
该tokenizer(分词器)还负责记录各个terms(词条)的顺序或position位置(用于phrase短语和word proximity词近邻查询),以及term(词条)所代表的原始word(单词)的start(起始)和end(结束)的character offsets(字符串偏移量)(用于高亮显示搜索的内容)。
elasticsearch提供了很多内置的分词器,可以用来构建custom analyzers(自定义分词器)。
关于分词器: https://www.elastic.co/guide/en/elasticsearch/reference/7.6/analysis.html
POST _analyze { "analyzer" : "standard" , "text" : "The 2 QUICK Brown-Foxes jumped over the lazy dog's bone." }
执行结果:
{ "tokens" : [ { "token" : "the" , "start_offset" : 0 , "end_offset" : 3 , "type" : "<ALPHANUM>" , "position" : 0 } , { "token" : "2" , "start_offset" : 4 , "end_offset" : 5 , "type" : "<NUM>" , "position" : 1 } , { "token" : "quick" , "start_offset" : 6 , "end_offset" : 11 , "type" : "<ALPHANUM>" , "position" : 2 } , { "token" : "brown" , "start_offset" : 12 , "end_offset" : 17 , "type" : "<ALPHANUM>" , "position" : 3 } , { "token" : "foxes" , "start_offset" : 18 , "end_offset" : 23 , "type" : "<ALPHANUM>" , "position" : 4 } , { "token" : "jumped" , "start_offset" : 24 , "end_offset" : 30 , "type" : "<ALPHANUM>" , "position" : 5 } , { "token" : "over" , "start_offset" : 31 , "end_offset" : 35 , "type" : "<ALPHANUM>" , "position" : 6 } , { "token" : "the" , "start_offset" : 36 , "end_offset" : 39 , "type" : "<ALPHANUM>" , "position" : 7 } , { "token" : "lazy" , "start_offset" : 40 , "end_offset" : 44 , "type" : "<ALPHANUM>" , "position" : 8 } , { "token" : "dog's" , "start_offset" : 45 , "end_offset" : 50 , "type" : "<ALPHANUM>" , "position" : 9 } , { "token" : "bone" , "start_offset" : 51 , "end_offset" : 55 , "type" : "<ALPHANUM>" , "position" : 10 } ] }
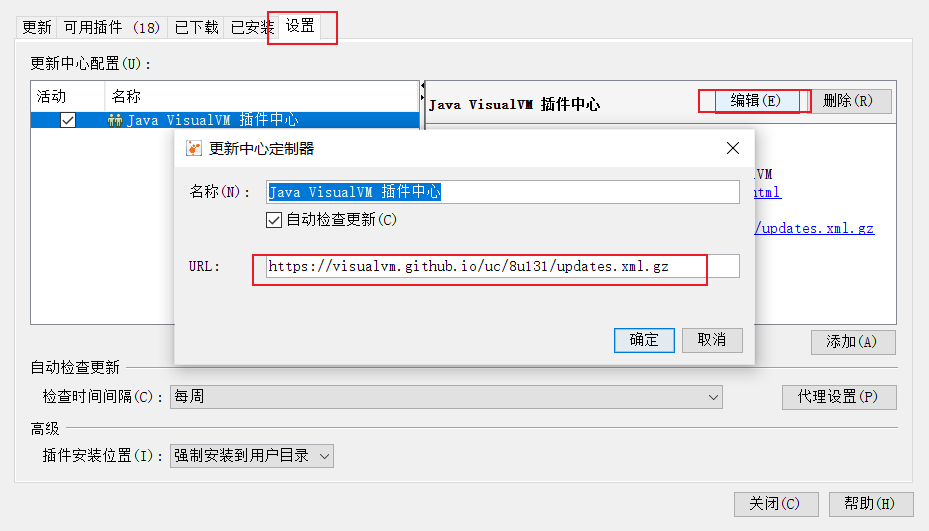
(1)安装ik分词器
所有的语言分词,默认使用的都是“Standard Analyzer”,但是这些分词器针对于中文的分词,并不友好。为此需要安装中文的分词器。
注意:不能用默认elasticsearch-plugin install xxx.zip 进行自动安装https://github.com/medcl/elasticsearch-analysis-ik/releases/download 对应es版本安装
在前面安装的elasticsearch时,我们已经将elasticsearch容器的“/usr/share/elasticsearch/plugins”目录,映射到宿主机的“ /mydata/elasticsearch/plugins”目录下,所以比较方便的做法就是下载“/elasticsearch-analysis-ik-7.6.2.zip”文件,然后解压到该文件夹下即可。安装完毕后,需要重启elasticsearch容器。
如果不嫌麻烦,还可以采用如下的方式。
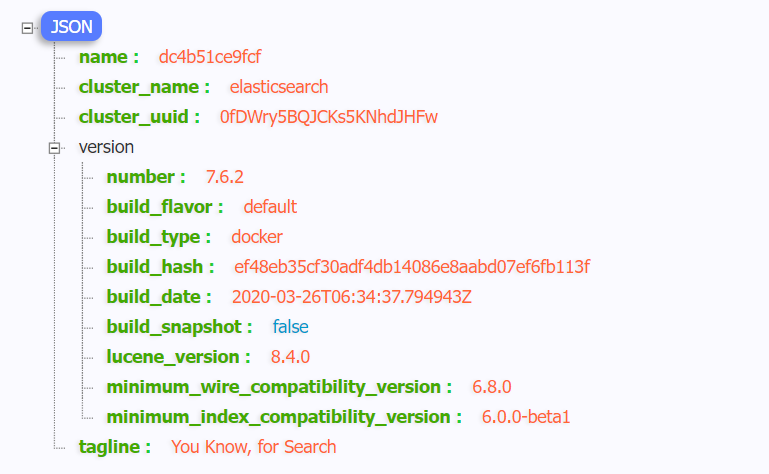
(1)查看elasticsearch版本号: [root@hadoop-104 ~]# curl http://localhost:9200 { "name" : "0adeb7852e00", "cluster_name" : "elasticsearch", "cluster_uuid" : "9gglpP0HTfyOTRAaSe2rIg", "version" : { "number" : "7.6.2", #版本号为7.6.2 "build_flavor" : "default", "build_type" : "docker", "build_hash" : "ef48eb35cf30adf4db14086e8aabd07ef6fb113f", "build_date" : "2020-03-26T06:34:37.794943Z", "build_snapshot" : false, "lucene_version" : "8.4.0", "minimum_wire_compatibility_version" : "6.8.0", "minimum_index_compatibility_version" : "6.0.0-beta1" }, "tagline" : "You Know, for Search" } [root@hadoop-104 ~]#
(2)进入es容器内部plugin目录
docker exec -it 容器id /bin/bash
[root@hadoop-104 ~]# docker exec -it elasticsearch /bin/bash
[root@0adeb7852e00 elasticsearch]#
[root@0adeb7852e00 elasticsearch]# pwd /usr/share/elasticsearch # 下载ik7.6.2 [root@0adeb7852e00 elasticsearch]# wget https://github.com/medcl/elasticsearch-analysis-ik/releases/download/v7.6.2/elasticsearch-analysis-ik-7.6.2.zip
[root@0adeb7852e00 elasticsearch]# unzip elasticsearch-analysis-ik-7.6.2.zip -d ink Archive: elasticsearch-analysis-ik-7.6.2.zip creating: ik/config/ inflating: ik/config/main.dic inflating: ik/config/quantifier.dic inflating: ik/config/extra_single_word_full.dic inflating: ik/config/IKAnalyzer.cfg.xml inflating: ik/config/surname.dic inflating: ik/config/suffix.dic inflating: ik/config/stopword.dic inflating: ik/config/extra_main.dic inflating: ik/config/extra_stopword.dic inflating: ik/config/preposition.dic inflating: ik/config/extra_single_word_low_freq.dic inflating: ik/config/extra_single_word.dic inflating: ik/elasticsearch-analysis-ik-7.6.2.jar inflating: ik/httpclient-4.5.2.jar inflating: ik/httpcore-4.4.4.jar inflating: ik/commons-logging-1.2.jar inflating: ik/commons-codec-1.9.jar inflating: ik/plugin-descriptor.properties inflating: ik/plugin-security.policy [root@0adeb7852e00 elasticsearch]# # 移动到plugins目录下 [root@0adeb7852e00 elasticsearch]# mv ik plugins/
[root@0adeb7852e00 elasticsearch]# rm -rf elasticsearch-analysis-ik-7.6.2.zip
确认是否安装好了分词器
(2)ik分词器测试 使用默认
GET my_index/_analyze { "text" : "我是中国人" }
请观察执行结果:
{ "tokens" : [ { "token" : "我" , "start_offset" : 0 , "end_offset" : 1 , "type" : "<IDEOGRAPHIC>" , "position" : 0 } , { "token" : "是" , "start_offset" : 1 , "end_offset" : 2 , "type" : "<IDEOGRAPHIC>" , "position" : 1 } , { "token" : "中" , "start_offset" : 2 , "end_offset" : 3 , "type" : "<IDEOGRAPHIC>" , "position" : 2 } , { "token" : "国" , "start_offset" : 3 , "end_offset" : 4 , "type" : "<IDEOGRAPHIC>" , "position" : 3 } , { "token" : "人" , "start_offset" : 4 , "end_offset" : 5 , "type" : "<IDEOGRAPHIC>" , "position" : 4 } ] }
GET my_index/_analyze { "analyzer" : "ik_smart" , "text" : "我是中国人" }
输出结果:
{ "tokens" : [ { "token" : "我" , "start_offset" : 0 , "end_offset" : 1 , "type" : "CN_CHAR" , "position" : 0 } , { "token" : "是" , "start_offset" : 1 , "end_offset" : 2 , "type" : "CN_CHAR" , "position" : 1 } , { "token" : "中国人" , "start_offset" : 2 , "end_offset" : 5 , "type" : "CN_WORD" , "position" : 2 } ] }
GET my_index/_analyze { "analyzer" : "ik_max_word" , "text" : "我是中国人" }
输出结果:
{ "tokens" : [ { "token" : "我" , "start_offset" : 0 , "end_offset" : 1 , "type" : "CN_CHAR" , "position" : 0 } , { "token" : "是" , "start_offset" : 1 , "end_offset" : 2 , "type" : "CN_CHAR" , "position" : 1 } , { "token" : "中国人" , "start_offset" : 2 , "end_offset" : 5 , "type" : "CN_WORD" , "position" : 2 } , { "token" : "中国" , "start_offset" : 2 , "end_offset" : 4 , "type" : "CN_WORD" , "position" : 3 } , { "token" : "国人" , "start_offset" : 3 , "end_offset" : 5 , "type" : "CN_WORD" , "position" : 4 } ] }
(3)自定义词库
修改/usr/share/elasticsearch/plugins/ik/config中的IKAnalyzer.cfg.xml
<?xml version="1.0" encoding="UTF-8" ?> <!DOCTYPE properties SYSTEM "http://java.sun.com/dtd/properties.dtd" > <properties > <comment > IK Analyzer 扩展配置</comment > <entry key ="ext_dict" > </entry > <entry key ="ext_stopwords" > </entry > <entry key ="remote_ext_dict" > http://8.138.99.194/es/fenci.txt</entry > </properties >
重启elasticsearch容器。
测试
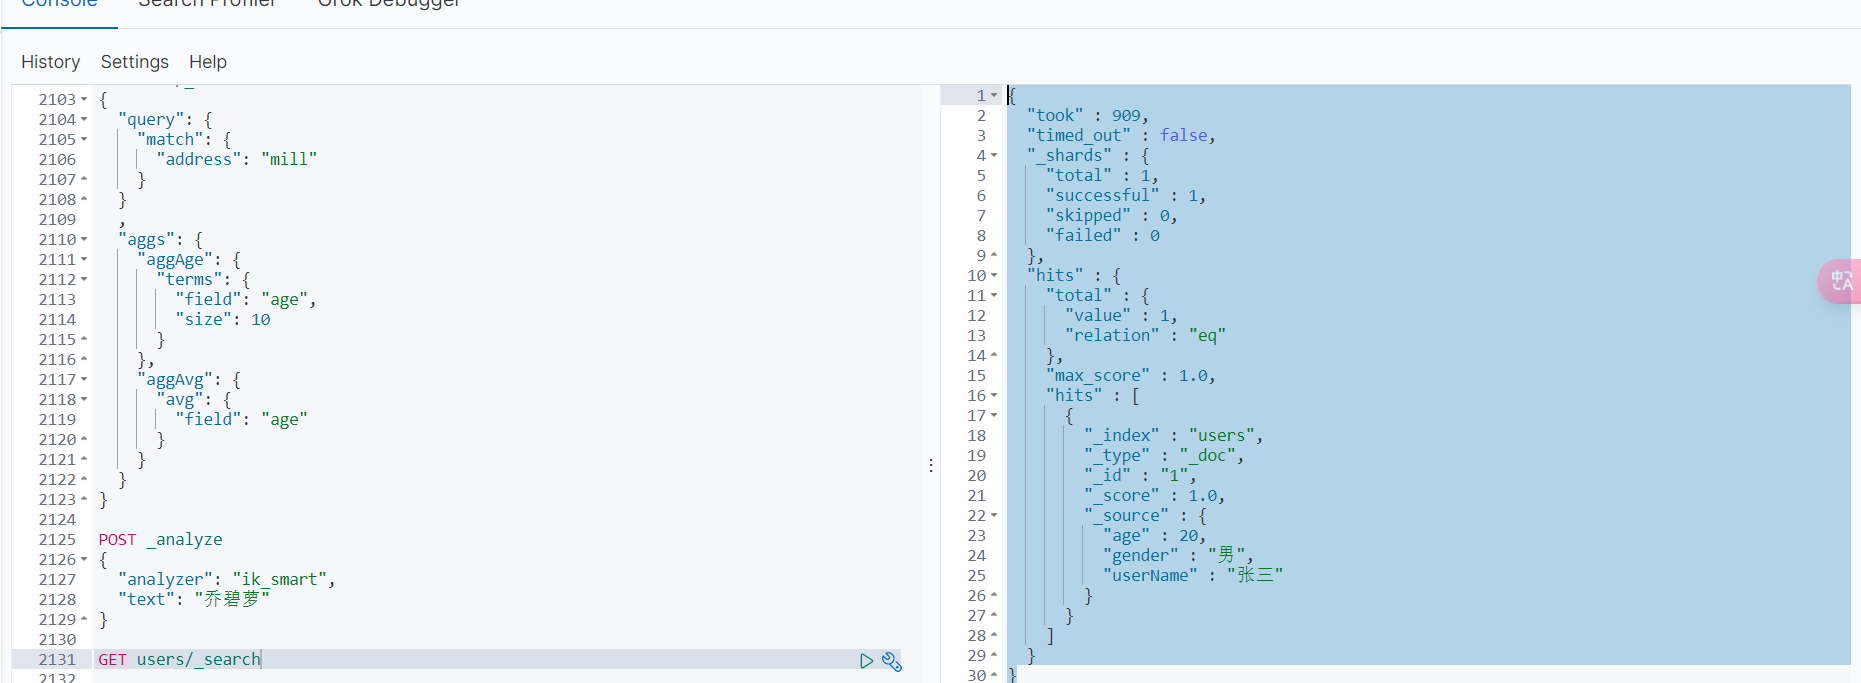
POST _analyze
{
  "analyzer": "ik_smart",
  "text": "乔碧萝"
}
{ "tokens" : [ { "token" : "乔碧萝" , "start_offset" : 0 , "end_offset" : 3 , "type" : "CN_WORD" , "position" : 0 } ] }
更新完成后,es只会对于新增的数据用更新分词。历史数据是不会重新分词的。如果想要历史数据重新分词,需要执行:
POST my_index/_update_by_query?conflicts=proceed
http://8.138.99.194:8081/es/fenci.txt,这个是nginx上资源的访问路径
在运行下面实例之前,需要安装nginx(安装方法见安装nginx),然后创建“fenci.txt”文件,内容如下:
echo "樱桃萨其马,带你甜蜜入夏" > /mydata/nginx/html/fenci.txt
测试效果:
GET my_index/_analyze { "analyzer" : "ik_max_word" , "text" : "樱桃萨其马,带你甜蜜入夏" }
输出结果:
{ "tokens" : [ { "token" : "樱桃" , "start_offset" : 0 , "end_offset" : 2 , "type" : "CN_WORD" , "position" : 0 } , { "token" : "萨其马" , "start_offset" : 2 , "end_offset" : 5 , "type" : "CN_WORD" , "position" : 1 } , { "token" : "带你" , "start_offset" : 6 , "end_offset" : 8 , "type" : "CN_WORD" , "position" : 2 } , { "token" : "甜蜜" , "start_offset" : 8 , "end_offset" : 10 , "type" : "CN_WORD" , "position" : 3 } , { "token" : "入夏" , "start_offset" : 10 , "end_offset" : 12 , "type" : "CN_WORD" , "position" : 4 } ] }
5、elasticsearch-Rest-Client 1)9300: TCP
spring-data-elasticsearch:transport-api.jar;
springboot版本不同,ransport-api.jar不同,不能适配es版本
7.x已经不建议使用,8以后就要废弃
2)9200: HTTP
6、安装Nginx
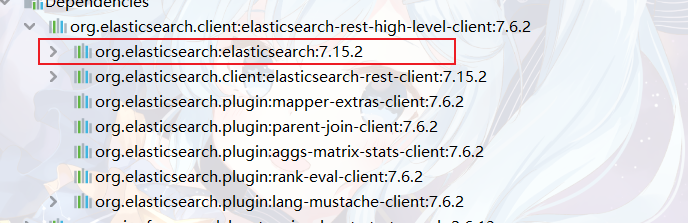
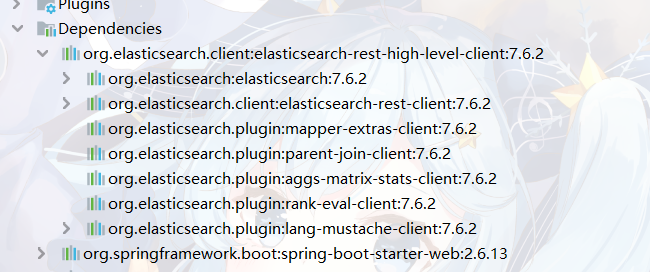
7、SpringBoot整合ElasticSearch 1、导入依赖 这里的版本要和所按照的ELK版本匹配。
<dependency > <groupId > org.elasticsearch.client</groupId > <artifactId > elasticsearch-rest-high-level-client</artifactId > <version > 7.6.2</version > </dependency > <dependency > <groupId > com.atguigu.gulimall</groupId > <artifactId > gulimall-common</artifactId > <version > 0.0.1-SNAPSHOT</version > </dependency > <dependency > <groupId > org.springframework.cloud</groupId > <artifactId > spring-cloud-loadbalancer</artifactId > <version > 3.1.5</version > </dependency > <dependency > <groupId > org.springframework.cloud</groupId > <artifactId > spring-cloud-starter-bootstrap</artifactId > <version > 3.1.5</version > </dependency > <dependency > <groupId > com.alibaba</groupId > <artifactId > fastjson</artifactId > <version > 1.2.79</version > </dependency >
在spring-boot-dependencies中所依赖的ELK版本位6.8.7
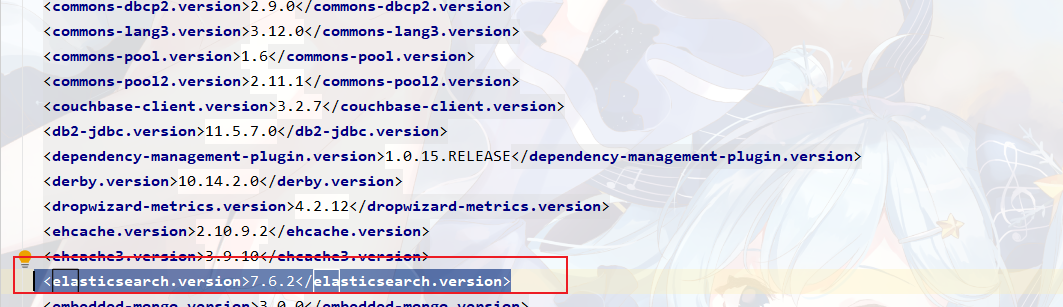
<elasticsearch.version > 7.15.2</elasticsearch.version >
需要在项目中将它改为7.6.2
因为我用的阿里云创建的项目,阿里云创建的项目通过dependencyManagement 管理依赖版本
<dependencyManagement > <dependencies > <dependency > <groupId > org.springframework.boot</groupId > <artifactId > spring-boot-dependencies</artifactId > <version > ${spring-boot.version}</version > <type > pom</type > <scope > import</scope > </dependency > </dependencies > </dependencyManagement >
直接在阿里云springboot-start的pom文件中将7.15.2改为7.6.2
2.编写配置–给容器注入RestHighLevelClient 因为用的是rest-high-level-client所以要手动配置com.atguigu.gulimall.search.config.GulimallElasticSearchConfig
es如果是集群,可以有多个httpHost分别对应不同端口。
@Configuration public class GulimallElasticSearchConfig { public static final RequestOptions COMMON_OPTIONS; static { RequestOptions.Builder builder = RequestOptions.DEFAULT.toBuilder(); COMMON_OPTIONS = builder.build(); } @Bean public RestHighLevelClient esRestClient () { RestHighLevelClient client = new RestHighLevelClient ( RestClient.builder( new HttpHost ("8.138.99.194" ,9200 ,"http" ) ) ); return client; } }
排除数据源报错
@SpringBootApplication(exclude = DataSourceAutoConfiguration.class)
3、编写测试类 1)测试保存数据 https://www.elastic.co/guide/en/elasticsearch/client/java-rest/7.6/java-rest-high-document-index.html
@Test public void indexData () throws IOException { IndexRequest indexRequest = new IndexRequest ("users" ); User user = new User (); user.setUserName("张三" ); user.setAge(20 ); user.setGender("男" ); String jsonString = JSON.toJSONString(user); indexRequest.source(jsonString, XContentType.JSON); IndexResponse index = client.index(indexRequest, GulimallElasticSearchConfig.COMMON_OPTIONS); System.out.println(index); }
测试后:
二、商城业务 1.商品上架 POST
/product/spuinfo/{spuId}/up
响应数据
{ "msg" : "success" , "code" : 0 }
1.com.atguigu.gulimall.product.controller.SpuInfoController
@PostMapping("/{spuId}/up") public R spuUp (@PathVariable Long spuId) { spuInfoService.up(spuId); return R.ok(); }
2.com.atguigu.gulimall.product.service.impl.SpuInfoServiceImpl
@Override public void up (Long spuId) { List<SkuInfoEntity> skus = skuInfoService.getSkuBySpuId(spuId); List<Long> skuIdList = skus.stream().map(SkuInfoEntity::getSkuId).collect(Collectors.toList()); List<ProductAttrValueEntity> baseAttrs = productAttrValueService.baseAttrlistforspu(spuId); List<Long> attrIds = baseAttrs.stream().map(attr -> { return attr.getAttrId(); }).collect(Collectors.toList()); List<Long> searchIds = attrService.selectSearchAttrs(attrIds); Set<Long> idSet = new HashSet <>(searchIds); List<SkuEsModel.Attrs> attrsList = baseAttrs.stream().filter(item -> { return idSet.contains(item.getAttrId()); }).map(item -> { SkuEsModel.Attrs attrs1 = new SkuEsModel .Attrs(); BeanUtils.copyProperties(item, attrs1); return attrs1; }).collect(Collectors.toList()); Map<Long, Boolean> stockMap = null ; try { R r = wareFeignService.getSkusHasStock(skuIdList); TypeReference<List<SkuHasStockVo>> typeReference = new TypeReference <List<SkuHasStockVo>>() { }; stockMap = r.getData(typeReference).stream().collect(Collectors.toMap(SkuHasStockVo::getSkuId, item -> item.getHasStock())); }catch (Exception e){ log.error("库存查询异常:原因{}" ,e); } Map<Long, Boolean> finalStockMap = stockMap; List<SkuEsModel> upProducts = skus.stream().map(sku -> { SkuEsModel esModel = new SkuEsModel (); BeanUtils.copyProperties(sku, esModel); esModel.setSkuPrice(sku.getPrice()); esModel.setSkuImg(sku.getSkuDefaultImg()); if (finalStockMap == null ){ finalStockMap.get(true ); }else { esModel.setHasStock(finalStockMap.get(sku.getSkuId())); } esModel.setHotScore(0L ); BrandEntity brandEntity = brandService.getById(sku.getBrandId()); esModel.setBrandName(brandEntity.getName()); esModel.setBrandImg(brandEntity.getLogo()); CategoryEntity categoryEntity = categoryService.getById(sku.getCatalogId()); esModel.setCatelogName(categoryEntity.getName()); esModel.setAttrs(attrsList); return esModel; }).collect(Collectors.toList()); R r = searchFeignService.productStatusUp(upProducts); if (r.getCode() == 0 ){ baseMapper.updateSpuStatus(spuId, ProductConstant.StatusEnum.SPU_UP.getCode()); }else { } }
3.search服务controller
@PostMapping("/product") public R productStatusUp (@RequestBody List<SkuEsModel> skuEsModels) { boolean b = false ; try { b = productSaveService.productStatusUp(skuEsModels); } catch (IOException e) { log.error("ElasticSaveController商品上架错误,{}," ,e); return R.error(BizCodeEnum.PRODUCT_UP_EXCEP.getCode(), BizCodeEnum.PRODUCT_UP_EXCEP.getMsg()); } if (!b) return R.ok(); else { return R.error(BizCodeEnum.PRODUCT_UP_EXCEP.getCode(), BizCodeEnum.PRODUCT_UP_EXCEP.getMsg()); } }
4.使用RestHighLevelClient保存到Es
@Override public boolean productStatusUp (List<SkuEsModel> skuEsModels) throws IOException { BulkRequest bulkRequest = new BulkRequest (); for (SkuEsModel model : skuEsModels) { IndexRequest indexRequest = new IndexRequest (EsConstant.PRODUCT_INDEX); indexRequest.id(model.getSpuId().toString()); String s = JSON.toJSONString(model); indexRequest.source(s, XContentType.JSON); bulkRequest.add(indexRequest); } BulkResponse bulk = restHighLevelClient.bulk(bulkRequest, GulimallElasticSearchConfig.COMMON_OPTIONS); boolean b = bulk.hasFailures(); List<String> collect = Arrays.stream(bulk.getItems()).map(item -> { return item.getId(); }).collect(Collectors.toList()); log.info("商品上架完成:{},返回数据,{}" ,collect,bulk.toString()); return b; }
2.首页-整合thymeleaf渲染首页
<dependency > <groupId > org.springframework.boot</groupId > <artifactId > spring-boot-starter-thymeleaf</artifactId > </dependency >
进行thymeleaf配置, yml关闭thymeleaf缓存
spring: thymeleaf: cache: false
启动服务:
3.开发首页跳转功能
3.1thymeleaf渲染商城首页一级分类
首先,html标签加上thymeleaf命名空间xmlns:th=”http://www.thymeleaf.org “, 加上命名空间后就行使用thymeleaf的语法
<html lang ="en" xmlns:th ="http://www.thymeleaf.org" >
页面修改不重启服务器实时更新ctrl+f9,然后刷新页面才可以
<dependency > <groupId > org.springframework.boot</groupId > <artifactId > spring-boot-devtools</artifactId > <optional > true</optional > </dependency >
并通过thymeleaf遍历渲染
<div class ="header_main" > <div class ="header_banner" > <div class ="header_main_left" > <ul > <li th:each ="category : ${categorys}" > <a href ="#" class ="header_main_left_a" th:attr ="ctg-data=${category.catId}" > <b th:text ="${category.name}" > 家用电器</b > </a > </li > </ul >
3.2首页渲染三级分类 @ResponseBody @GetMapping("/index/catalog.json") public Map<String, List<Catelog2Vo>> getCatelogJson () { Map<String, List<Catelog2Vo>> catelogJson = categoryService.getCatelogJson(); return catelogJson; }
@NoArgsConstructor @AllArgsConstructor @Data public class Catelog2Vo { private String catalog1Id; private List<Catelog3Vo> catalog3List; private String id; private String name; @NoArgsConstructor @AllArgsConstructor @Data public static class Catelog3Vo { private String catalog2Id; private String id; private String name; } }
修改catalogLoader.js代码
$.getJSON(“index/json/catalog.json”,改为$.getJSON(“index/catalog.json”,
@Override public Map<String, List<Catelog2Vo>> getCatelogJson () { List<CategoryEntity> level1Category = getLevel1Category(); Map<String, List<Catelog2Vo>> parent_cid = level1Category.stream().collect(Collectors.toMap(k -> k.getCatId().toString(), v -> { List<CategoryEntity> categoryEntities = baseMapper.selectList(new QueryWrapper <CategoryEntity>().eq("parent_cid" , v.getCatId())); List<Catelog2Vo> catelog2Vos = null ; if (categoryEntities != null ) { catelog2Vos = categoryEntities.stream().map(item -> { Catelog2Vo catelog2Vo = new Catelog2Vo (v.getCatId().toString(), null , item.getCatId().toString(), item.getName()); List<CategoryEntity> level3Catelog = baseMapper.selectList(new QueryWrapper <CategoryEntity>().eq("parent_cid" , item.getCatId())); if (level3Catelog != null ){ List<Catelog2Vo.Catelog3Vo> collect = level3Catelog.stream().map(l3 -> { Catelog2Vo.Catelog3Vo catelog3Vo = new Catelog2Vo .Catelog3Vo(item.getCatId().toString(),l3.getCatId().toString(),l3.getName()); return catelog3Vo; }).collect(Collectors.toList()); catelog2Vo.setCatalog3List(collect); } return catelog2Vo; }).collect(Collectors.toList()); } return catelog2Vos; })); return parent_cid; }
优化
1.将数据库的多次查询变为一次
@Override public Map<String, List<Catelog2Vo>> getCatelogJson () { List<CategoryEntity> selectList = baseMapper.selectList(null ); List<CategoryEntity> level1Category = getParent_cid(selectList,0L ); Map<String, List<Catelog2Vo>> parent_cid = level1Category.stream().collect(Collectors.toMap(k -> k.getCatId().toString(), v -> { List<CategoryEntity> categoryEntities = getParent_cid(selectList,v.getCatId()); List<Catelog2Vo> catelog2Vos = null ; if (categoryEntities != null ) { catelog2Vos = categoryEntities.stream().map(l2 -> { Catelog2Vo catelog2Vo = new Catelog2Vo (v.getCatId().toString(), null , l2.getCatId().toString(), l2.getName()); List<CategoryEntity> level3Catelog = getParent_cid(selectList,l2.getCatId()); if (level3Catelog != null ){ List<Catelog2Vo.Catelog3Vo> collect = level3Catelog.stream().map(l3 -> { Catelog2Vo.Catelog3Vo catelog3Vo = new Catelog2Vo .Catelog3Vo(l3.getCatId().toString(),l3.getCatId().toString(),l3.getName()); return catelog3Vo; }).collect(Collectors.toList()); catelog2Vo.setCatalog3List(collect); } return catelog2Vo; }).collect(Collectors.toList()); } return catelog2Vos; })); return parent_cid; }
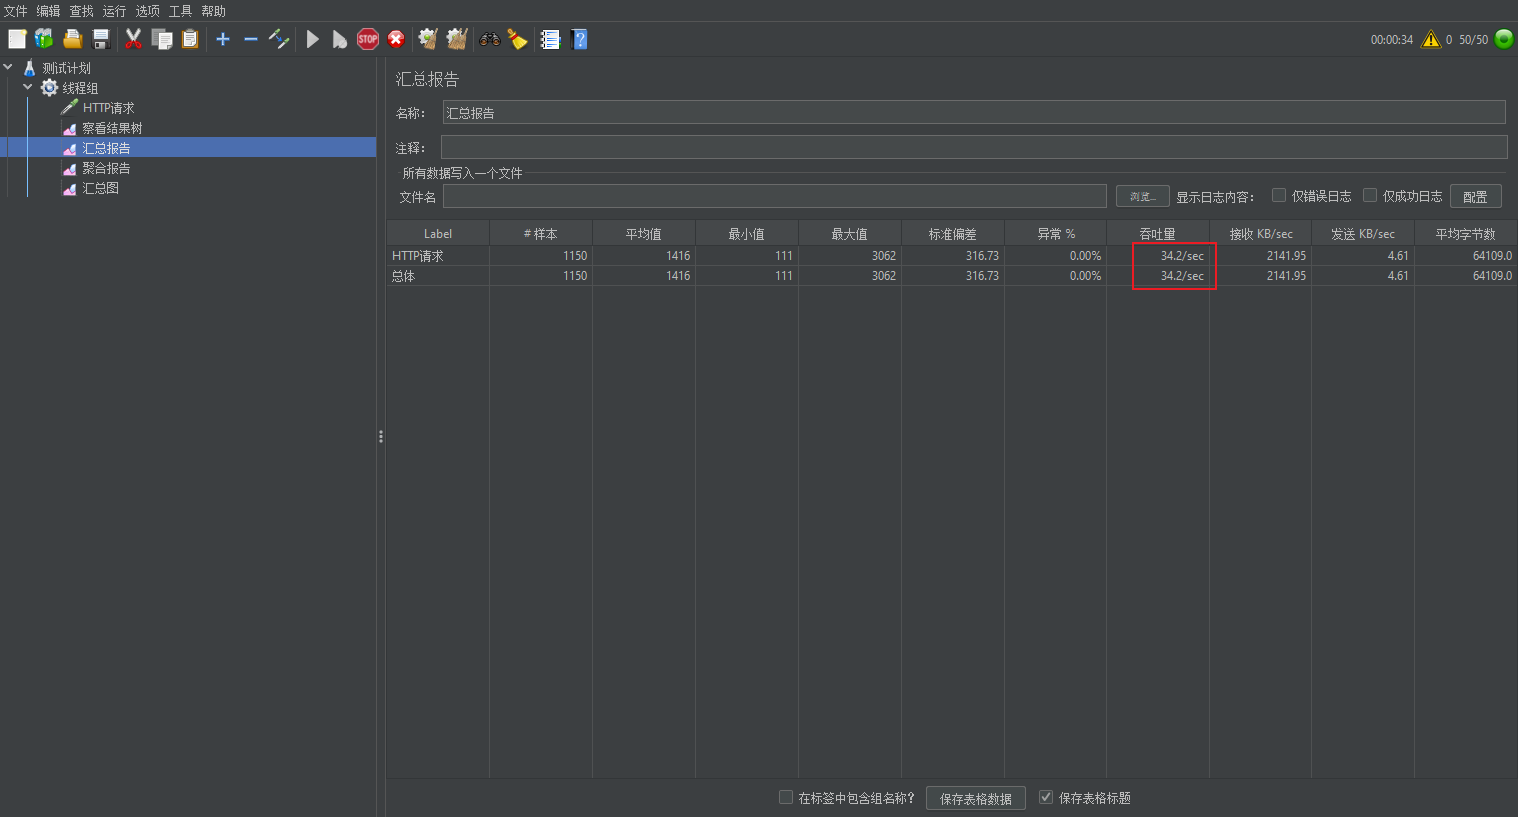
压力测试
吞吐量 34
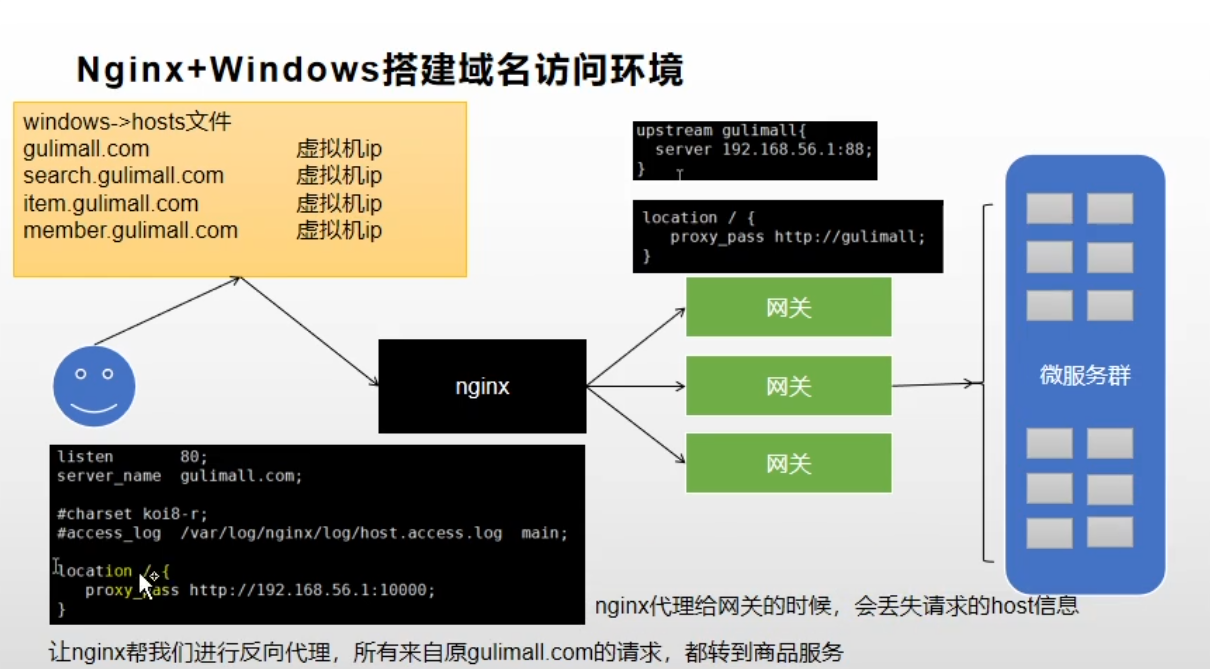
4.nginx搭建域名访问环境 1.搭建步骤
listen 80; server_name gulimall.com; # charset koi8-r; # access_log /var/log/nginx/log/host.access.log main; location / { proxy_pass http://127.0.0.1:10000; }
修改hosts文件C:\Windows\System32\drivers\etc
127.0.0.1       activate.navicat.com
192.168.188.1    gulimall.com
然后命令行输入ipconfig /flushdns
但是如果后期微服务实例增多,需要再进入配置文件进行修改,比较麻烦,所以配置上游服务器配置为网关,将所有匹配请求转发到网关,由网关再进行转发。
# 配置上游服务器
#再在gulimall.conf中将proxy_pass转发目的地址改为gulimall
#注意 Nginx代理给网关的时候,会丢失请求头的host信息
#解决方式 配置 proxy_set_header Host $host
upstream gulimall {
    server 192.168.188.1:88; # 网关
}

location / {
        proxy_set_header Host $host; # 添加header Host,内容为原来的host内容
        proxy_pass http://gulimall;
}
- id: gulimall_host_route uri: lb://gulimall-product predicates: - Host=**.gulimall.com,gulimall.com
2.域名映射效果
请求接口 gulimall.com
nginx直接代理给网关,网关判断
三、性能压测-性能与压力测试 1.基本介绍 1 性能指标
响应时间 (Response Time: ST)
响应时间指用户从客户端发起一个请求开始,到客户端接收到从服务器端返回的响应结束,整个过程所耗费的时间。
HPS(Hits Per Second):每秒点击次数,单位是次秘。
TPS(Transaction per Second):系统每秒处理交易数,单位是笔/秒。
QPS(Query per Second):系統每秒处理查询次数,单位是次/秒。
对于互联网业务中,如果某些业务有且仅有一个请求连接,那么TPS=QPS=HPS,一般情记下用 TPS 来衡量整个业务流程,用 QPS 来衡量接口查询次数,用 HPS 来表示对服务器单击请求。
无论TPS、QPS、HPS,此指标是衡量系统处理能力非常重要的指标,越大越好,根据经验,一般情况下:
    金融行业:1000TPS~50000TPS,不包括互联网化的活动
    保险行业:100TPS~100000TPS,不包括互联网化的活动
    制造行业:10TPS~5000TPS
    互联网电子商务:10000TPS~1000000TPS
    互联网中型网站:1000TPS~5000OTPS
    互联网小型网站:500TPS~10000TPS
最大响应时间(Max Response Time):指用户发出请求或者指令到系统做出反应(响应)的最大时间。
最少响应时间(Minimum Response Time):指用户发出请求或者指令到系统作出反应(响应)的最少时间。
90%响应时间(90% Response Time):是指所有用户的响应时间进行排序,第90%的响应时间。
从外部看,性能测试主要关注如下三个指标
    吞吐量:每秒钟系统能够处理的请求数、任务数
    响应时间:服务处理一个请求或一个任务的耗时
    错误率:一批请求种结果出错的请求所占比例
2.JMeter 我使用了5.4.1版本
启动点击D:\tool\apache\apache-jmeter-5.4.1\bin\jmeter.bat
结果分析:
有错误率同开发确认, 确定是否允许错误的发生或者错误率允许在多大的范围内;
Throughput 吞吐量每秒请求的数大于并发数, 则可以慢慢的往上面增加; 若在压测的机器性能很好的情况下, 出现吞吐量小于并发数, 说明并发数不能再增加了, 可以慢慢的往下减, 找到最佳的并发数;
压测结束, 登陆相应的 web 服务器查看 CPU 等性能指标, 进行数据的分析;
最大的 tps, 不断的增加并发数, 加到 tps 达到一定值开始出现下降, 那么那个值就是
最大的并发数: 最大的并发数和最大的 tps 是不同的概率, 一般不断增加并发数, 达到一个值后, 服务器出现请求超时, 则可认为该值为最大的并发数。
压测过程出现性能瓶颈, 若压力机任务管理器查看到的 cpu、 网络和 cpu 都正常, 未达 到 90%以上, 则可以说明服务器有问题, 压力机没有问题。
影响性能考虑点包括:数据库、 应用程序、 中间件(tomact、 Nginx) 、 网络和操作系统等方面
首先考虑自己的应用属于 CPU 密集型还是 IO 密集型
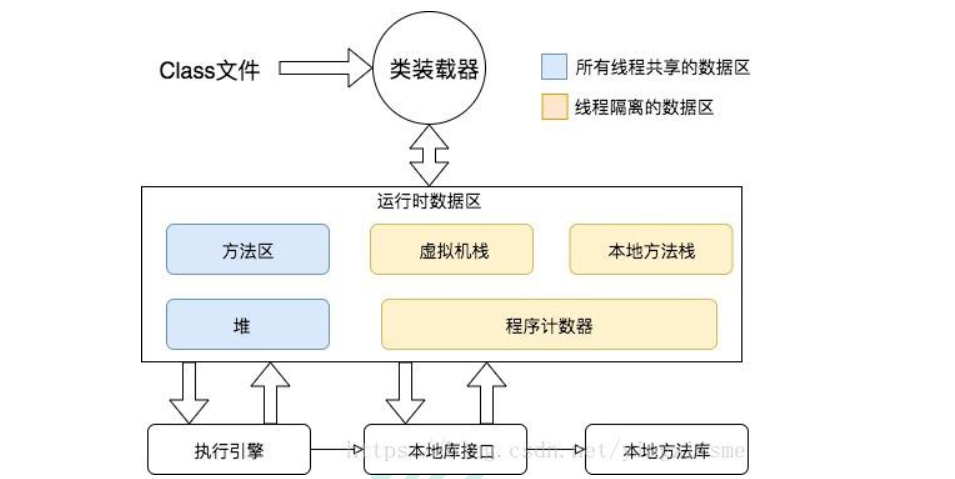
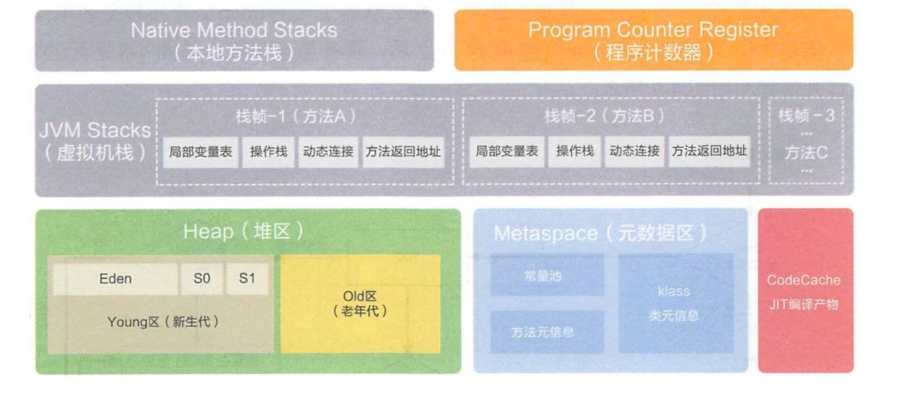
3.性能监控 3.1 jvm内存模型
程序计数器 Program Counter Register:
详细模型
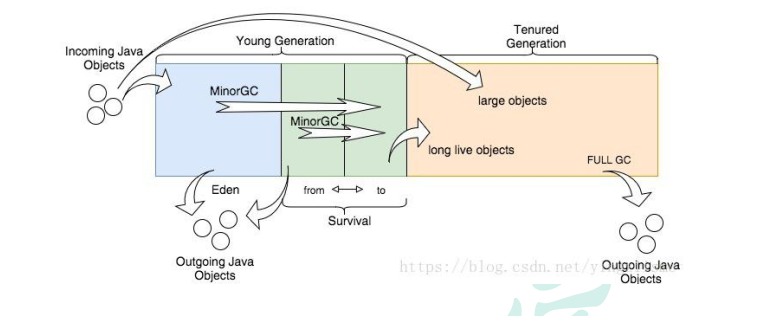
3.2 堆
所有的对象实例以及数组都要在堆上分配。 堆是垃圾收集器管理的主要区域, 也被称为“GC堆” ; 也是我们优化最多考虑的地方。
新生代
Eden 空间

From Survivor 空间

To Survivor 空间
老年代
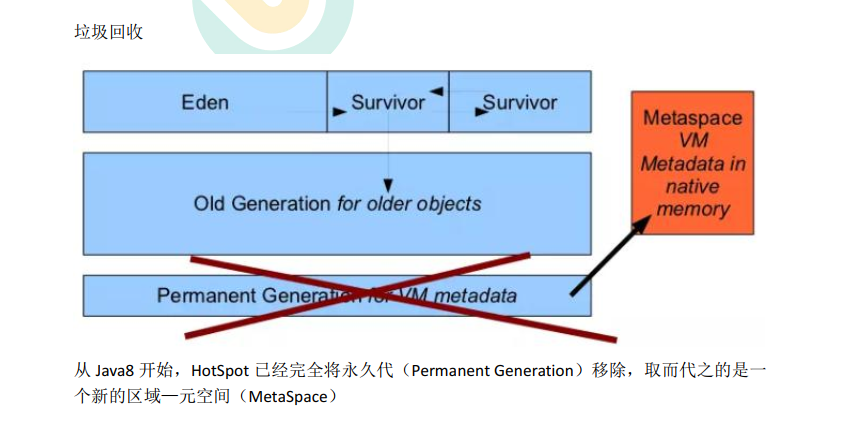
永久代/元空间

Java8 以前永久代, 受 jvm 管理, java8 以后元空间, 直接使用物理内存。 因此,默认情况下, 元空间的大小仅受本地内存限制。
3.2.1垃圾回收
详细流程
创建对象放到堆内存的流程:
旧对象:
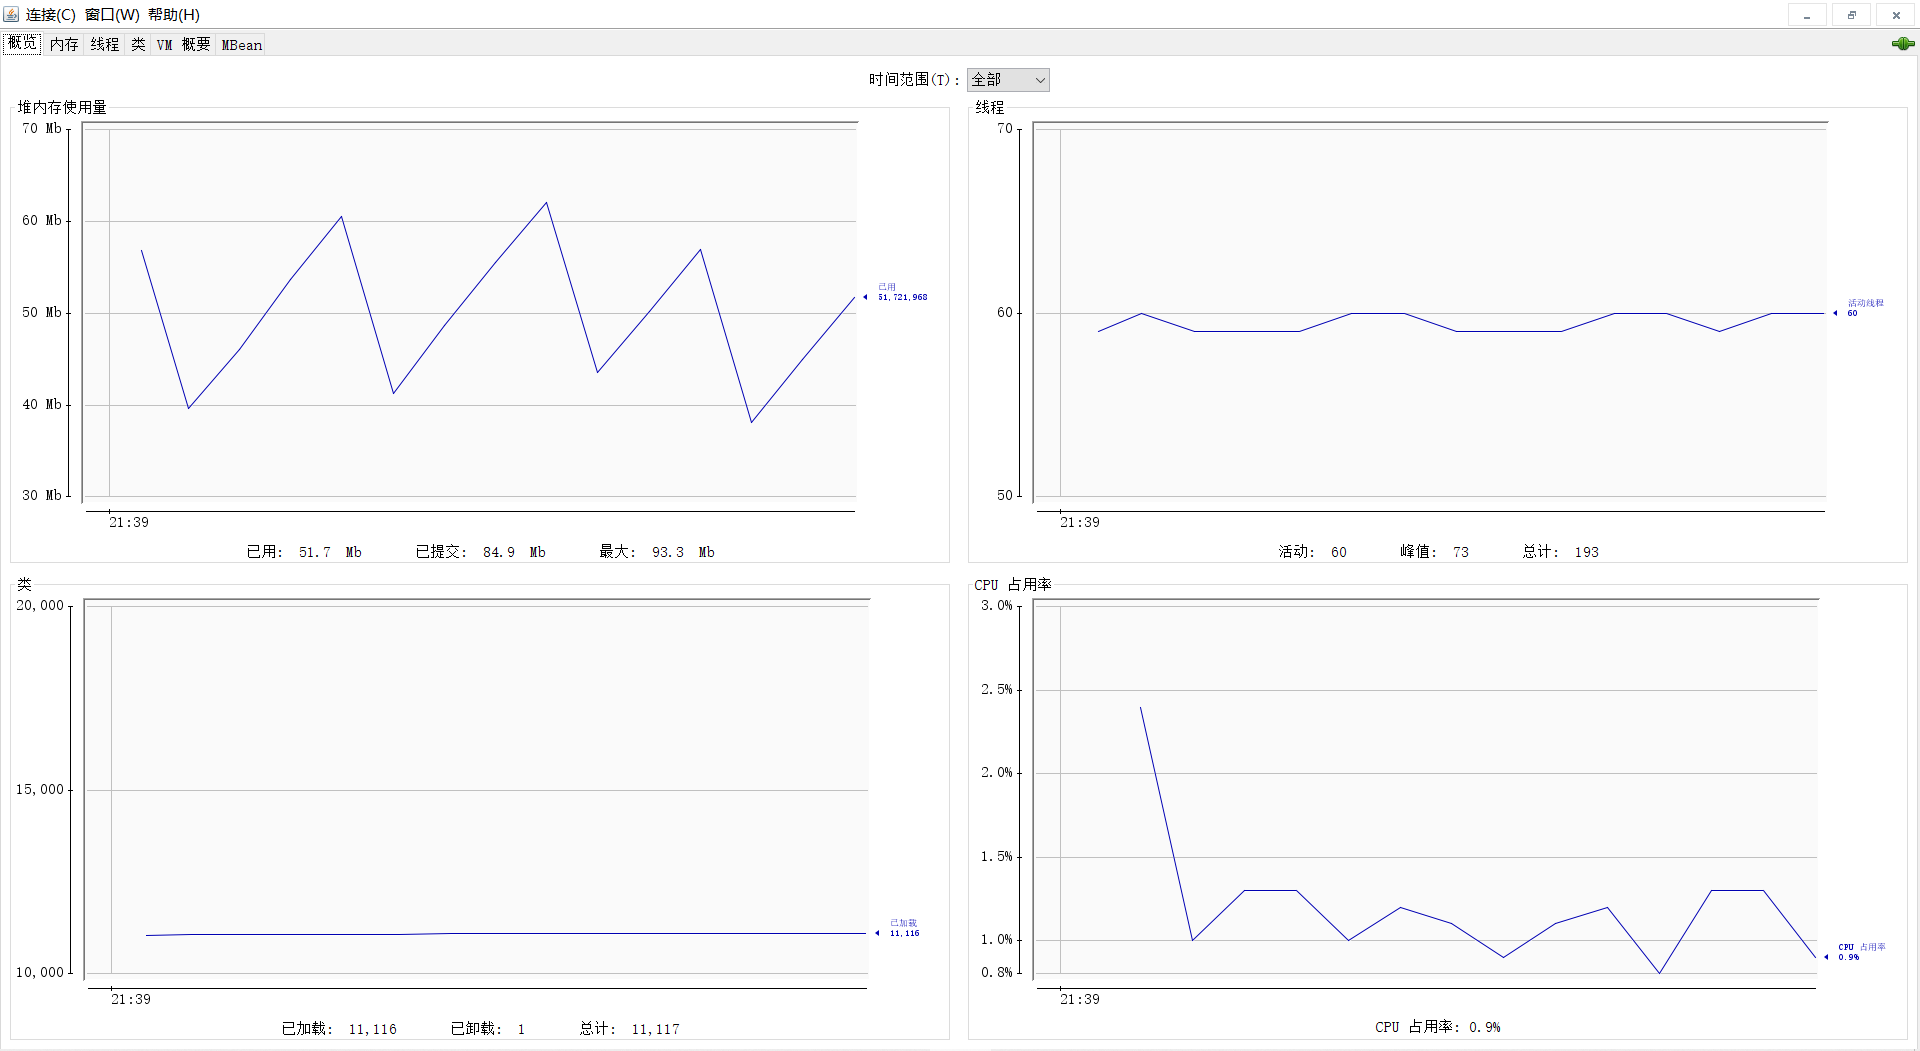
3.3 jconsole 与 jvisualvm(推荐) 3.3.1 jconsole
Jdk 的两个小工具 jconsole、 jvisualvm(升级版的 jconsole) ;通过命令行启动, 可监控本地和远程应用。 远程应用需要配置
1)直接cmd输入jconsole
进入jconsole页面选择需要查看的进程
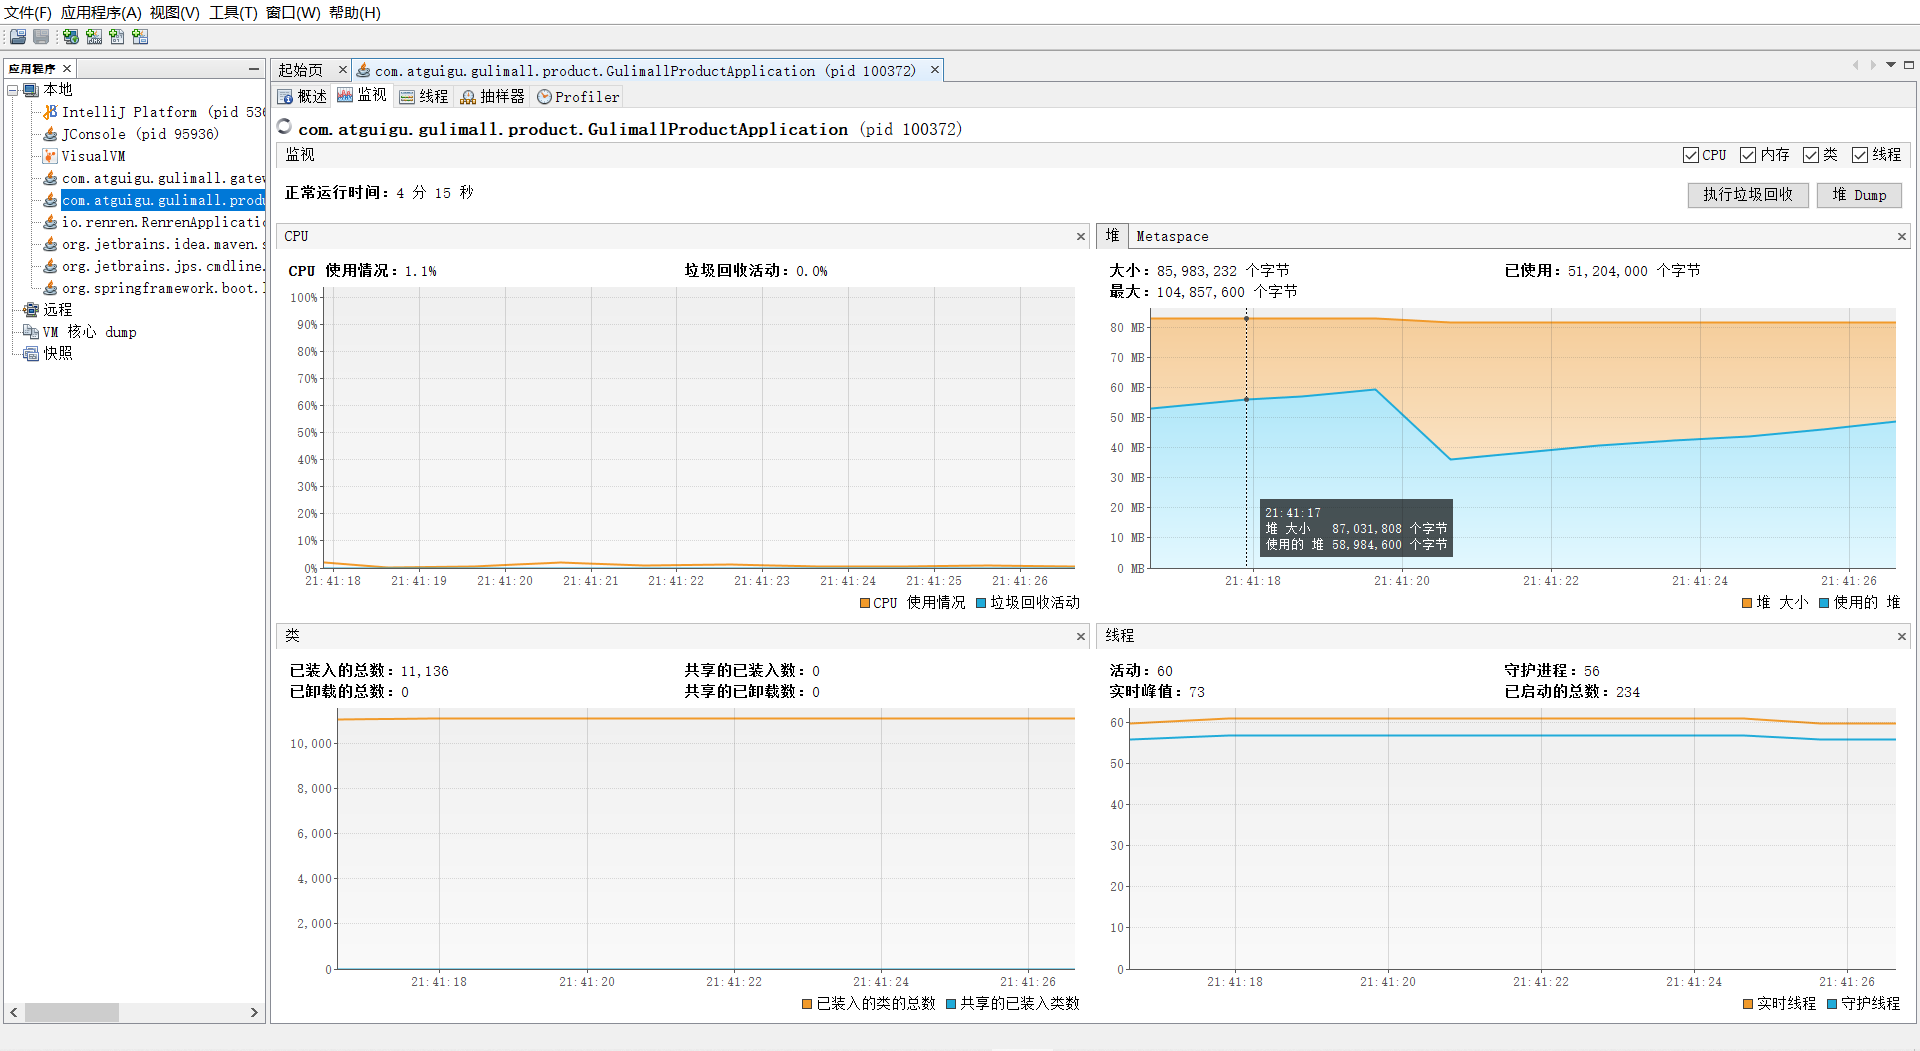
3.3.2jvisualvm
cmd输入jvisualvm
线程的状态
运行: 正在运行的
休眠: sleep
等待: wait
驻留: 线程池里面的空闲线程
监视: 阻塞的线程, 正在等待锁
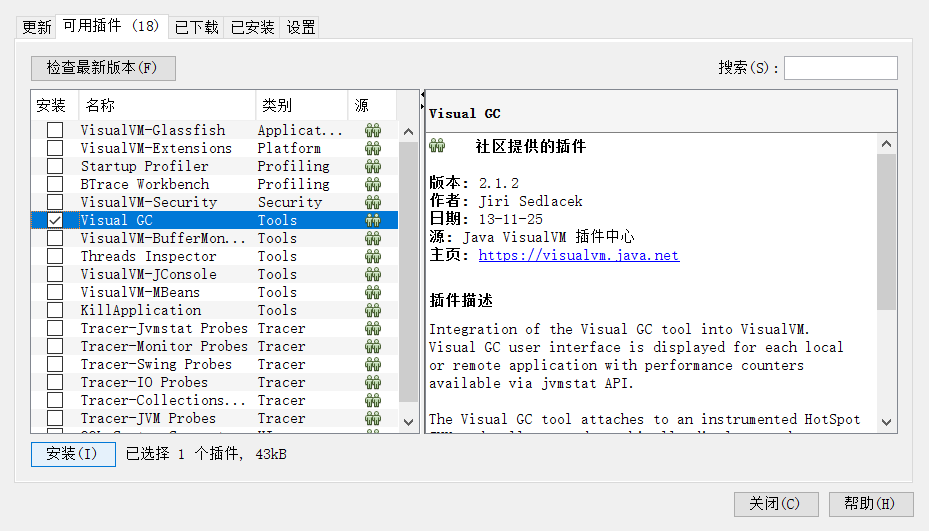
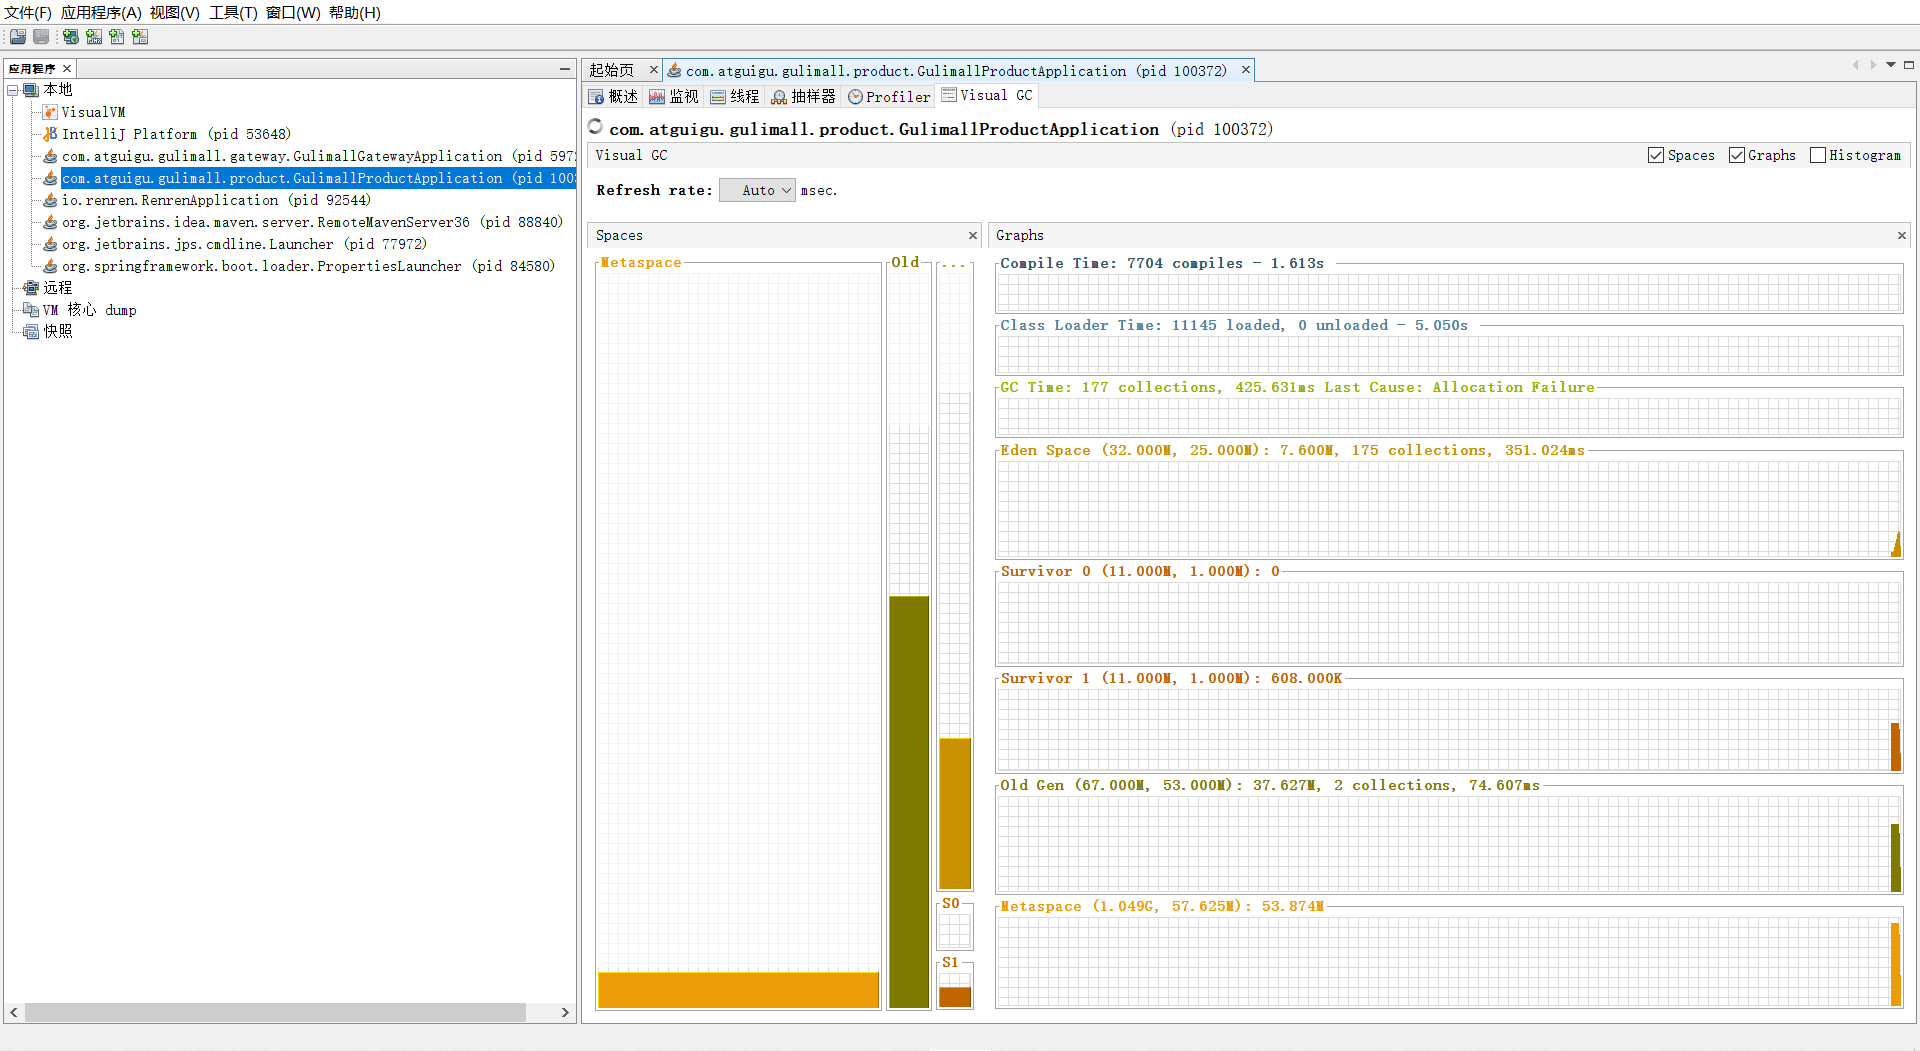
1)Visual GC插件安装
cmd 启动jvisualvm
安装 Visual GC
选择Visyal Gc下载,下完后重启一下
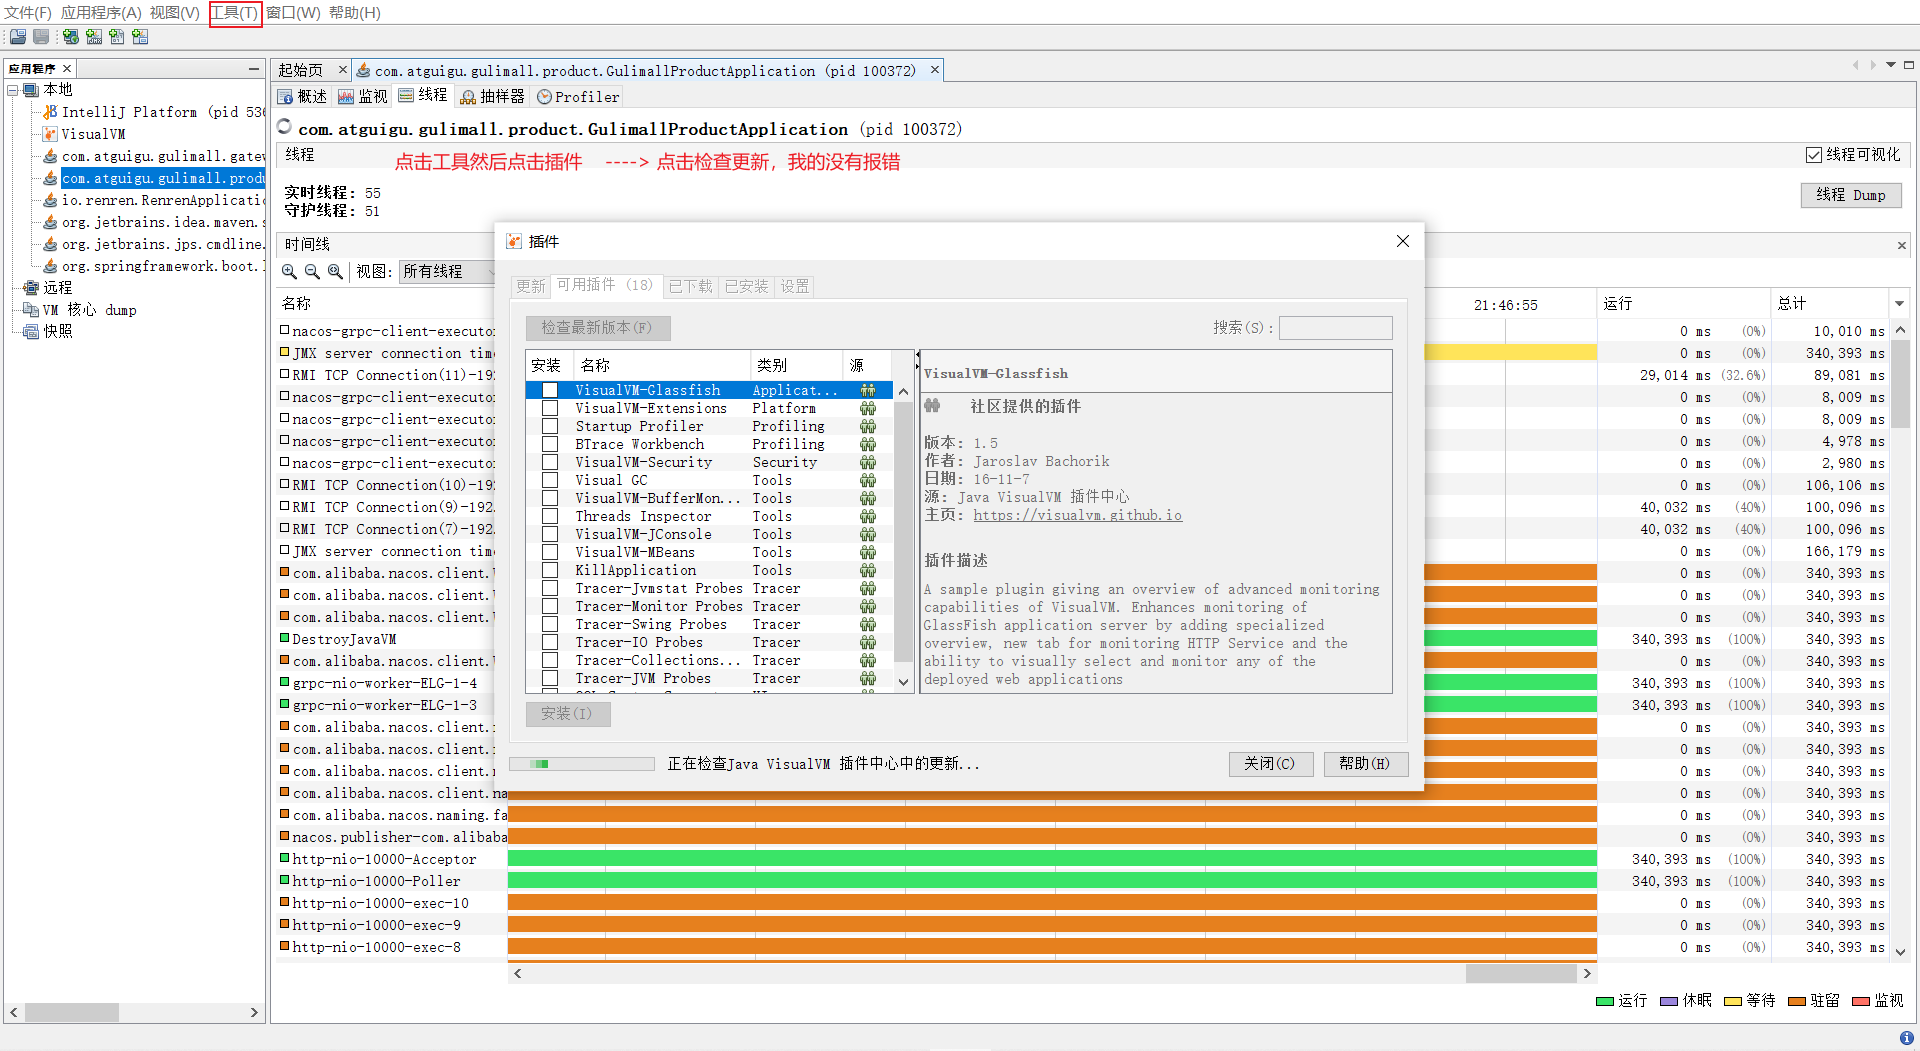
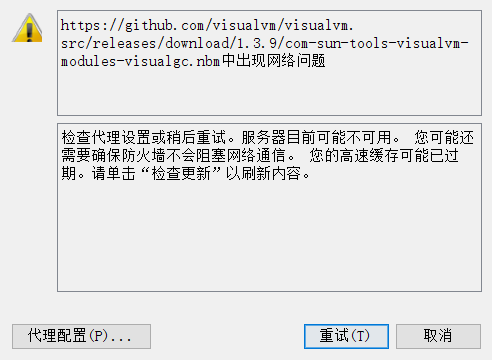
2).插件安装失败问题
原因:
可能是因为更新链接配置的版本不对
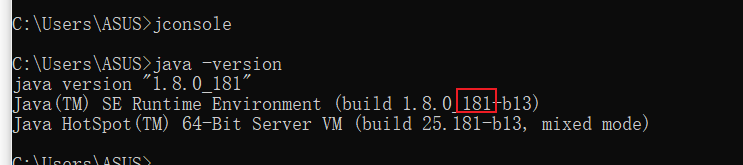
查看自己jdk版本
181版本
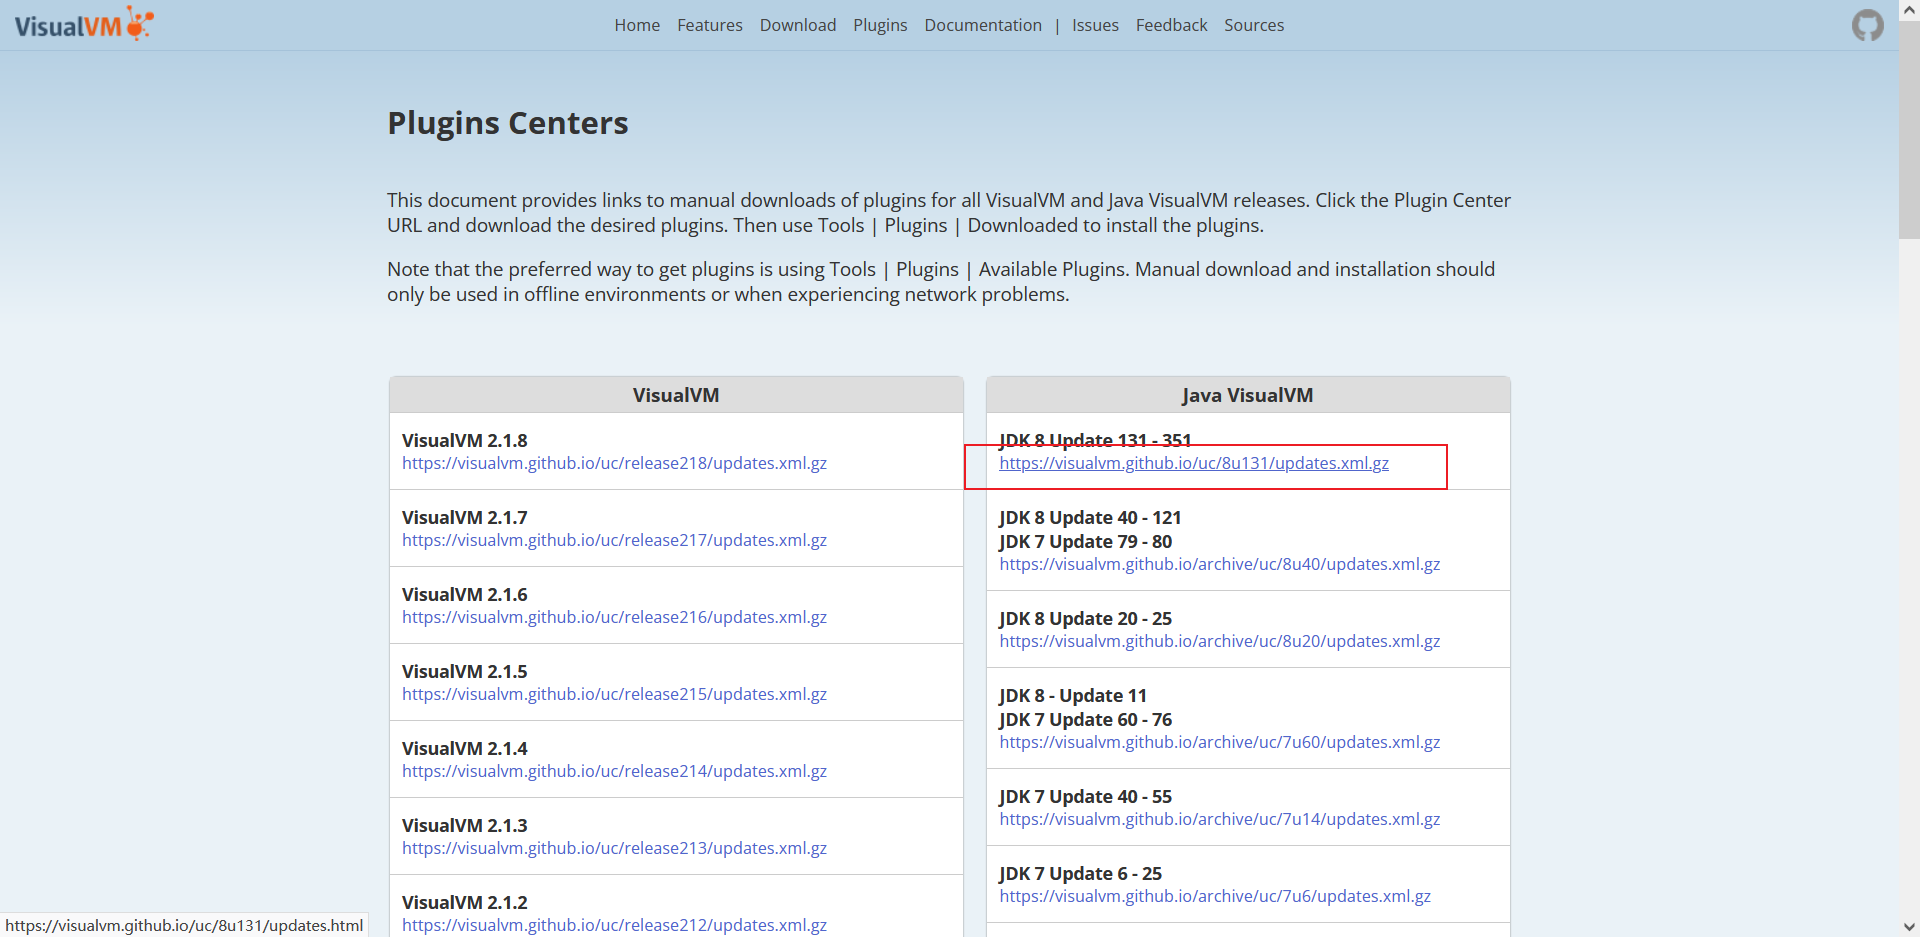
打开网址 https://visualvm.github.io/pluginscenters.html
找到对应的版本复制链接
https://visualvm.github.io/uc/8u131/updates.xml.gz
修改配置的链接
我的一直连接超时,就直接在官网下载到本地了D:\tool\apache\Visual Gc plugins
4.监控指标 1、中间件指标
当前正在运行的线程数不能超过设定的最大值。一般情况下系统性能较好的情况下,线
程数最小值设置 50 和最大值设置 200 比较合适。
当前运行的 JDBC 连接数不能超过设定的最大值。一般情况下系统性能较好的情况下,
JDBC 最小值设置 50 和最大值设置 200 比较合适。
GC频率不能频繁,特别是 FULL GC 更不能频繁,一般情况下系统性能较好的情况下,
JVM 最小堆大小和最大堆大小分别设置 1024M 比较合适。
2、数据库指标
SQL 耗时越小越好,一般情况下微秒级别。
命中率越高越好,一般情况下不能低于 95%。
锁等待次数越低越好,等待时间越短越好。
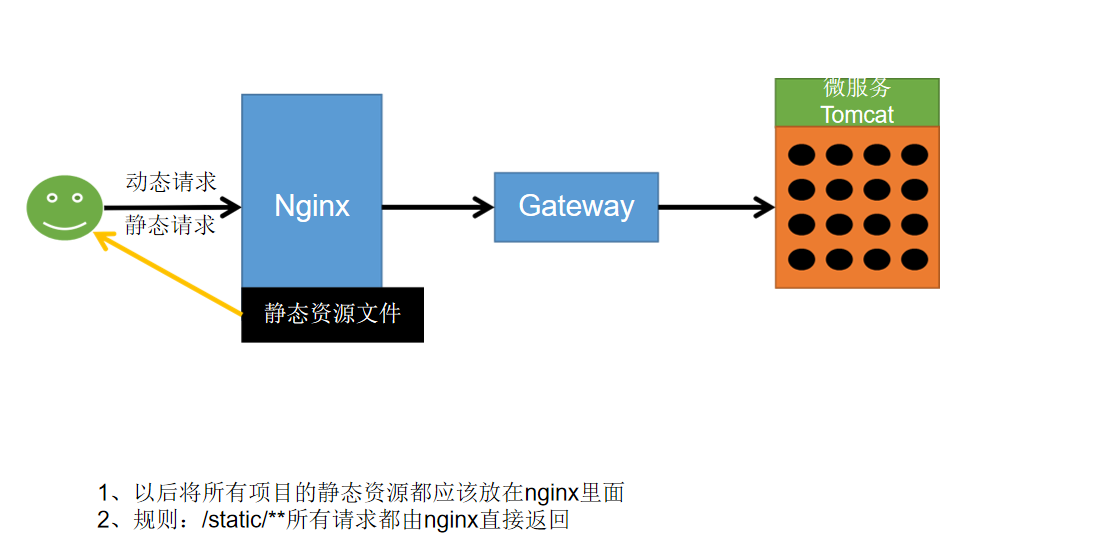
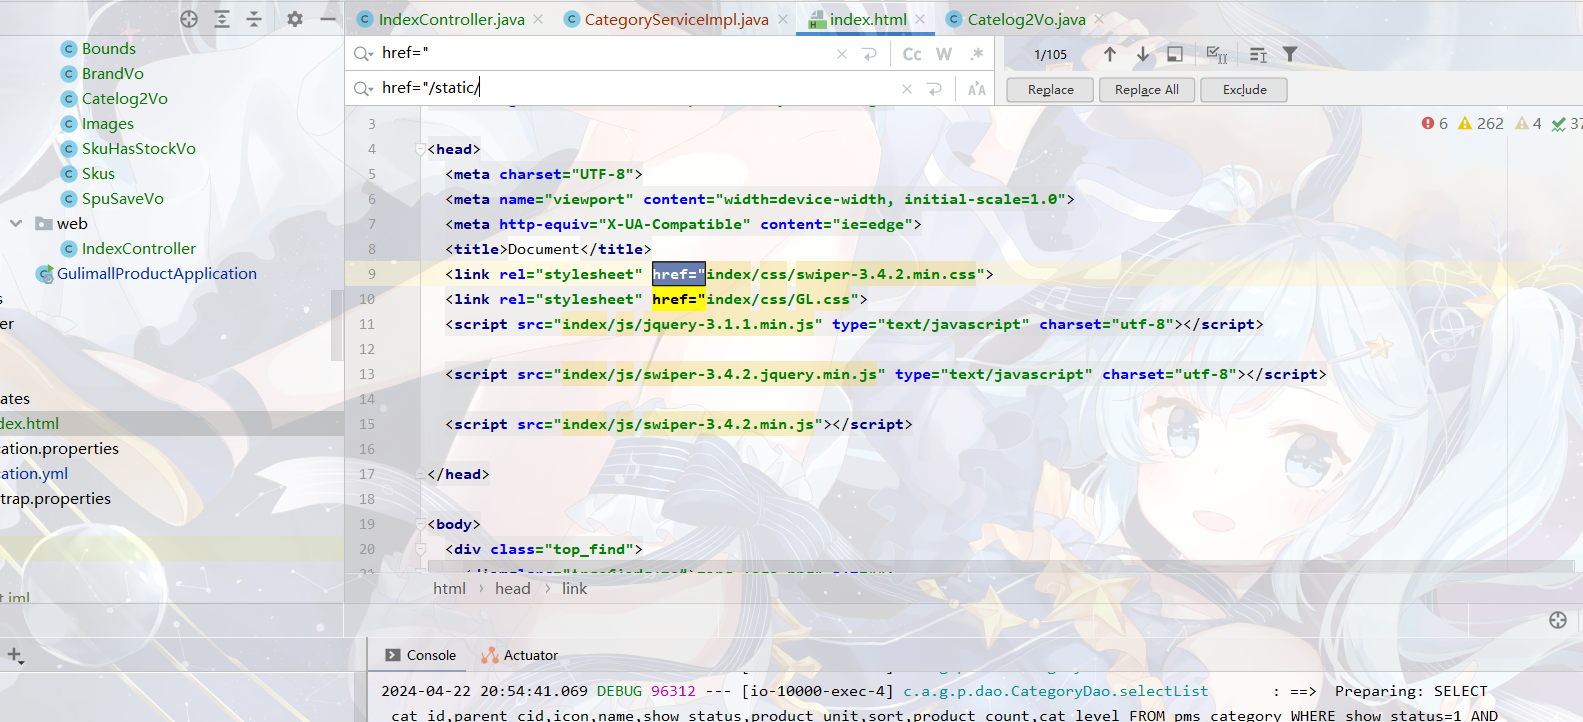
5.nginx动静分离 将静态的页面,css,js等放到nginx中,并在nginx中设置路径,实现动静分离。
每次访问主页时静态的页面由Nginx提供,而数据由本地服务提供。
1.放入nginx html文件夹的static文件夹里面
2.替换静态页面的资源路径
3.修改nginx配置文件
location /static/ {
	root /usr/share/nginx/html;
      }
      //所有的请求带static访问静态资源,其余的代理到上游服务

      location / {
	proxy_set_header Host $host;
          proxy_pass  http://gulimall;
      }
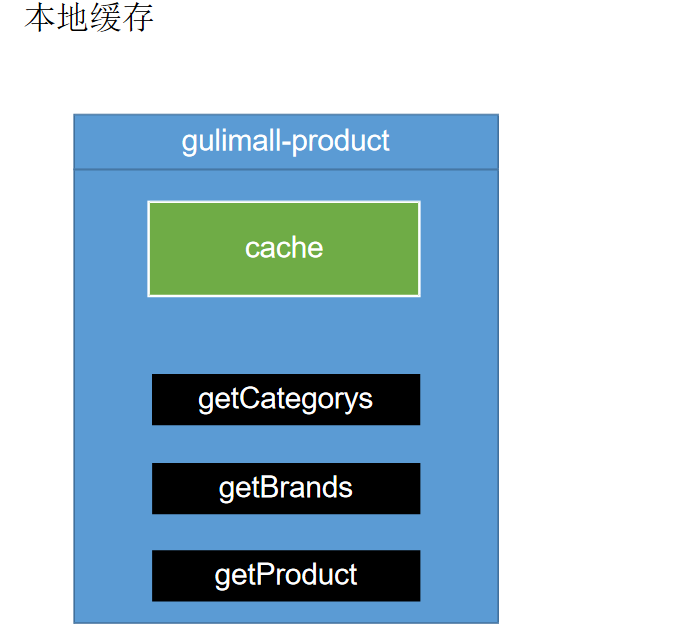
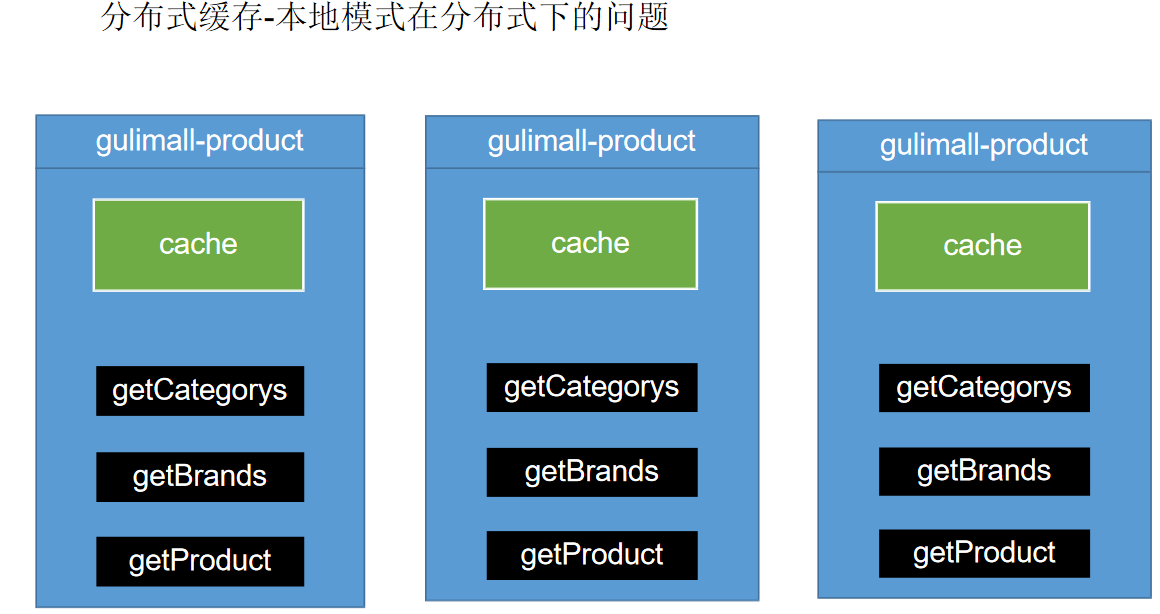
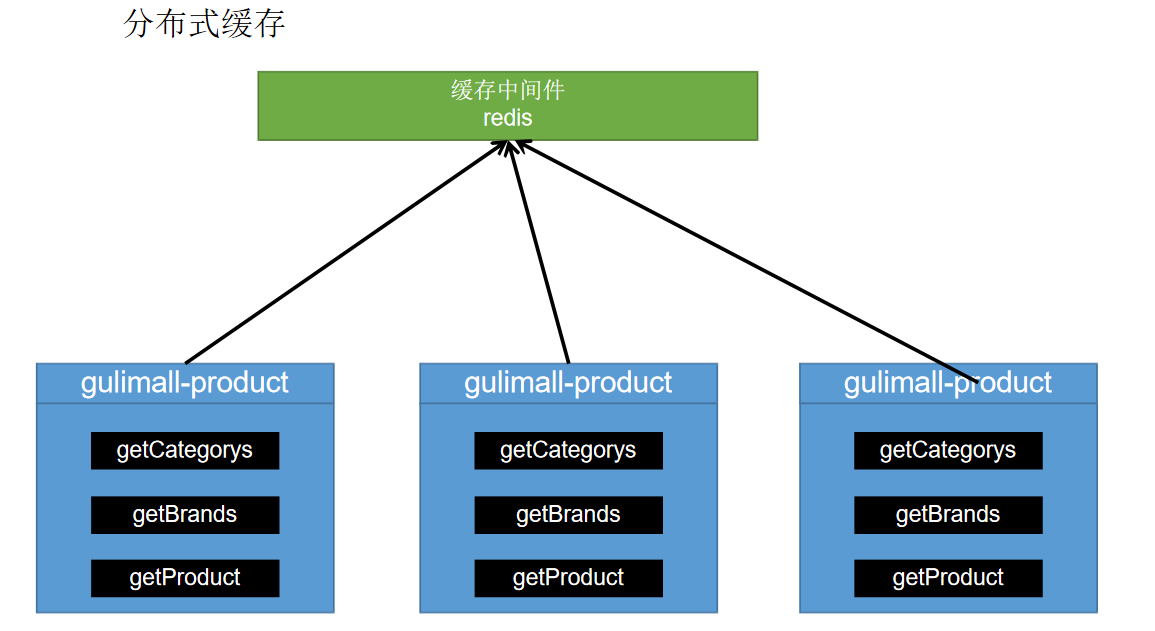
四、缓存—-Redis
每个线程都会有各自的缓存
解决:
哪些数据适合放入缓存?
即时性、数据一致性要求不高的
访问量大且更新频率不高的数据(读多,写少)
4.1Redis使用 1)引入依赖
<dependency > <groupId > org.springframework.boot</groupId > <artifactId > spring-boot-starter-data-redis</artifactId > </dependency >
2)在配置文件中配置redis的ip地址和端口号(默认端口号是6379)
redis: host: 8.138 .99 .194 port: 6379
3)Redis的自动配置类RedisAutoConfiguration已经为我们配置好了两种bean
RedisTemplate和StringRedisTemplate,直接注入使用
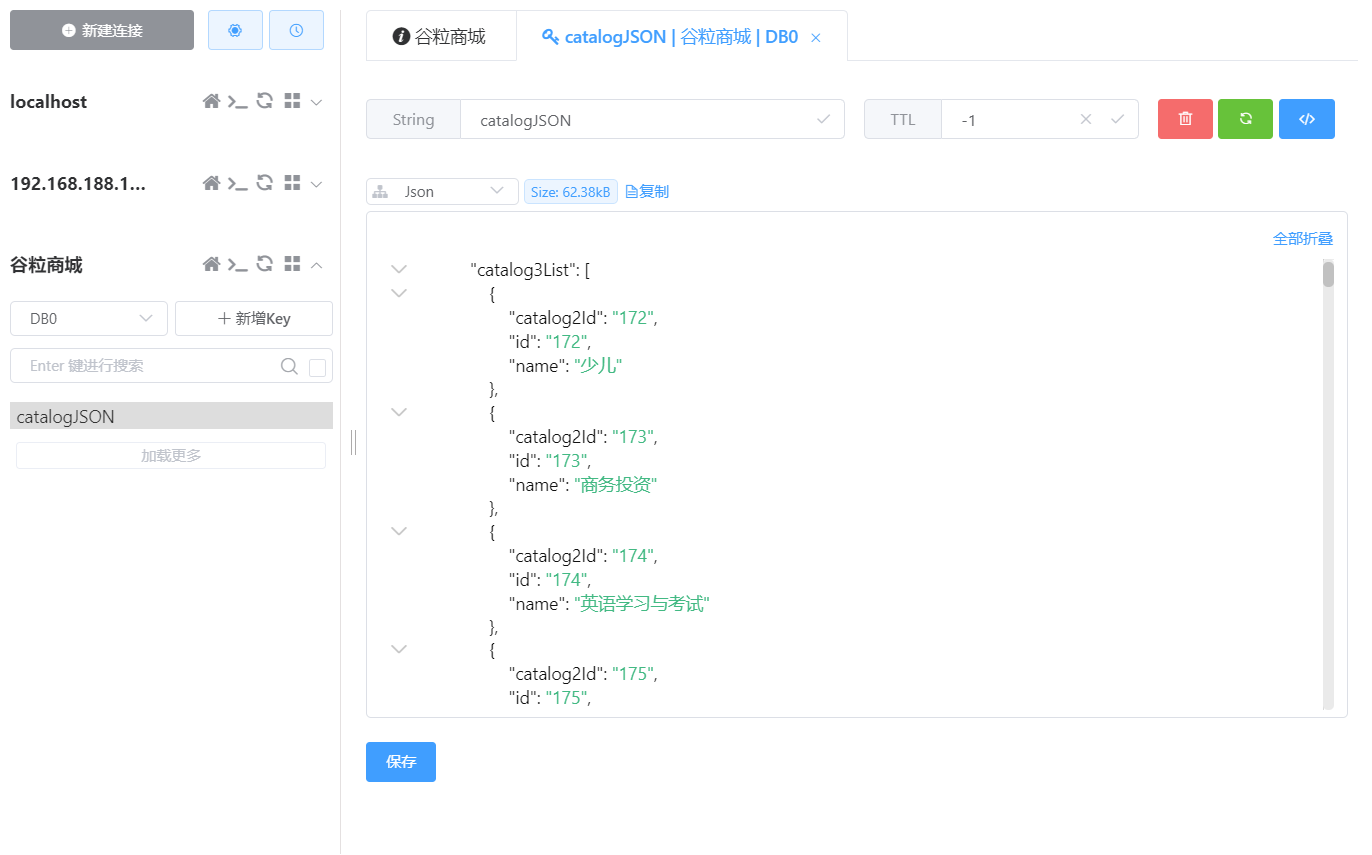
4.2使用Redis优化三级分类任务 @Override public Map<String, List<Catelog2Vo>> getCatelogJson () { String catalogJSON = stringRedisTemplate.opsForValue().get("catalogJSON" ); if (StringUtils.isEmpty(catalogJSON)){ Map<String, List<Catelog2Vo>> catelogJsonFromDb = getCatelogJsonFromDb(); String jsonString = JSON.toJSONString(catelogJsonFromDb); stringRedisTemplate.opsForValue().set("catalogJSON" ,jsonString); } Map<String, List<Catelog2Vo>> result = JSON.parseObject(catalogJSON, new TypeReference <Map<String, List<Catelog2Vo>>>() { }); return result; } public Map<String, List<Catelog2Vo>> getCatelogJsonFromDb () { }
1.成功保存到redis
2.压测
1.结果吞吐量59
吞吐量提升了,不知道为什么我的吞吐量比雷神差那么多,可能是因为阿里云服务器部署的redis吧。
2.压测出的内存泄露和解决
但是好像我没有出现这个。
4.3 高并发下缓存失效问题 (1) 缓存穿透
缓存穿透最直白的意思就是,我们的业务系统在接收到请求时在缓存中并没有查到数据,从而穿透到了后端数据库里面查数据的过程。或是指外来大量访问去查询缓存中不存在的值,最终导致需要不断的去查数据库,使数据库压力变大,最终导致程序异常。
缓存穿透是指查询一个一定不存在的数据,由于缓存是不命中,将去查询数据库,但是数据库也无此记录,我们没有将这次查询的 null 写入缓存,这将导致这个不存在的数据每次 请求都要到存储层去查询,失去了缓存的意义。
在流量大时,可能 DB 就挂掉了,要是有人利用不存在的 key 频繁攻击我们的应用,这就是漏洞。
解决:
缓存空对象、并且设置短的过期时间,布隆过滤。(2) 缓存雪崩
简要来讲是指缓存中的key大面积失效,同时有大量的请求过来获取数据,去查看缓存,但是缓存中的数据已经失效,就回去访问数据库,最终导致数据库压力变大。
缓存雪崩是指在我们设置缓存时采用了相同的过期时间,导致缓存在某一时刻同时失 效,请求全部转发到 DB,DB 瞬时压力过重雪崩。
解决:
原有的失效时间基础上增加一个随机值,比如 1-5 分钟随机,这样每一个缓存的过期时间的 重复率就会降低,就很难引发集体失效的事件等等。(3) 缓存击穿
缓存击穿是指缓存中没有但数据库中有的数据,当一个key非常热点(类似于爆款),在不停的扛着大并发,大并发集中对这一个点进行访问;当这个key在失效的瞬间,持续的大并发就穿破缓存,直接请求数据库,就像在一个屏障上凿开了一个洞。
对于一些设置了过期时间的 key,如果这些 key 可能会在某些时间点被超高并发地访问, 是一种非常“热点”的数据。
这个时候,需要考虑一个问题:如果这个 key 在大量请求同时进来前正好失效,那么所 有对这个 key 的数据查询都落到 db,我们称为缓存击穿
解决:
加互斥锁
1.使用本地锁(sychronized)
当大量请求全都访问这个数据时,发现缓存中没有,就会访问数据库进行查询,将访问数据库操作的方法使用sychronized加锁,那么这些请求就会排队访问。第一个请求执行完同步操作后会释放锁, 在释放锁之前会将查询到的数据存入缓存中,其他请求进入同步操作会先判断缓存中是否有相应的数据,就避免了多次查库的问题。
@Override public Map<String, List<Catelog2Vo>> getCatelogJson () { String catalogJSON = stringRedisTemplate.opsForValue().get("catalogJSON" ); if (StringUtils.isEmpty(catalogJSON)){ System.out.println("缓存未命中,查询数据库......" ); Map<String, List<Catelog2Vo>> catelogJsonFromDb = getCatelogJsonFromDb(); } System.out.println("缓存命中直接返回......" ); Map<String, List<Catelog2Vo>> result = JSON.parseObject(catalogJSON, new TypeReference <Map<String, List<Catelog2Vo>>>() { }); return result; } public Map<String, List<Catelog2Vo>> getCatelogJsonFromDb () { synchronized (this ){ String catalogJSON = stringRedisTemplate.opsForValue().get("catalogJSON" ); if (!StringUtils.isEmpty(catalogJSON)){ Map<String, List<Catelog2Vo>> result = JSON.parseObject(catalogJSON, new TypeReference <Map<String, List<Catelog2Vo>>>() { }); return result; } System.out.println("查询数据库" ); List<CategoryEntity> selectList = baseMapper.selectList(null ); List<CategoryEntity> level1Category = getParent_cid(selectList,0L ); Map<String, List<Catelog2Vo>> parent_cid = level1Category.stream().collect(Collectors.toMap(k -> k.getCatId().toString(), v -> { List<CategoryEntity> categoryEntities = getParent_cid(selectList,v.getCatId()); List<Catelog2Vo> catelog2Vos = null ; if (categoryEntities != null ) { catelog2Vos = categoryEntities.stream().map(l2 -> { Catelog2Vo catelog2Vo = new Catelog2Vo (v.getCatId().toString(), null , l2.getCatId().toString(), l2.getName()); List<CategoryEntity> level3Catelog = getParent_cid(selectList,l2.getCatId()); if (level3Catelog != null ){ List<Catelog2Vo.Catelog3Vo> collect = level3Catelog.stream().map(l3 -> { Catelog2Vo.Catelog3Vo catelog3Vo = new Catelog2Vo .Catelog3Vo(l3.getCatId().toString(),l3.getCatId().toString(),l3.getName()); return catelog3Vo; }).collect(Collectors.toList()); catelog2Vo.setCatalog3List(collect); } return catelog2Vo; }).collect(Collectors.toList()); } return catelog2Vos; })); String jsonString = JSON.toJSONString(parent_cid); stringRedisTemplate.opsForValue().set("catalogJSON" ,jsonString); return parent_cid; } }
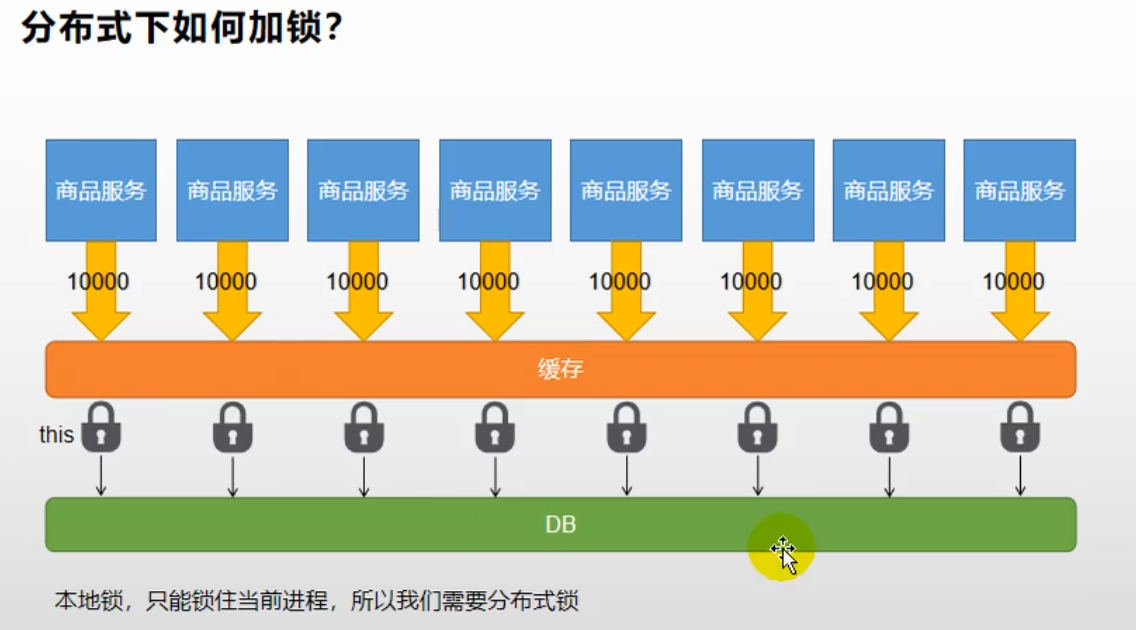
但是使用本地锁的方式在分布式的情景下就会出现问题:每一个服务都是锁住了当前进程,无法锁住其他进程。
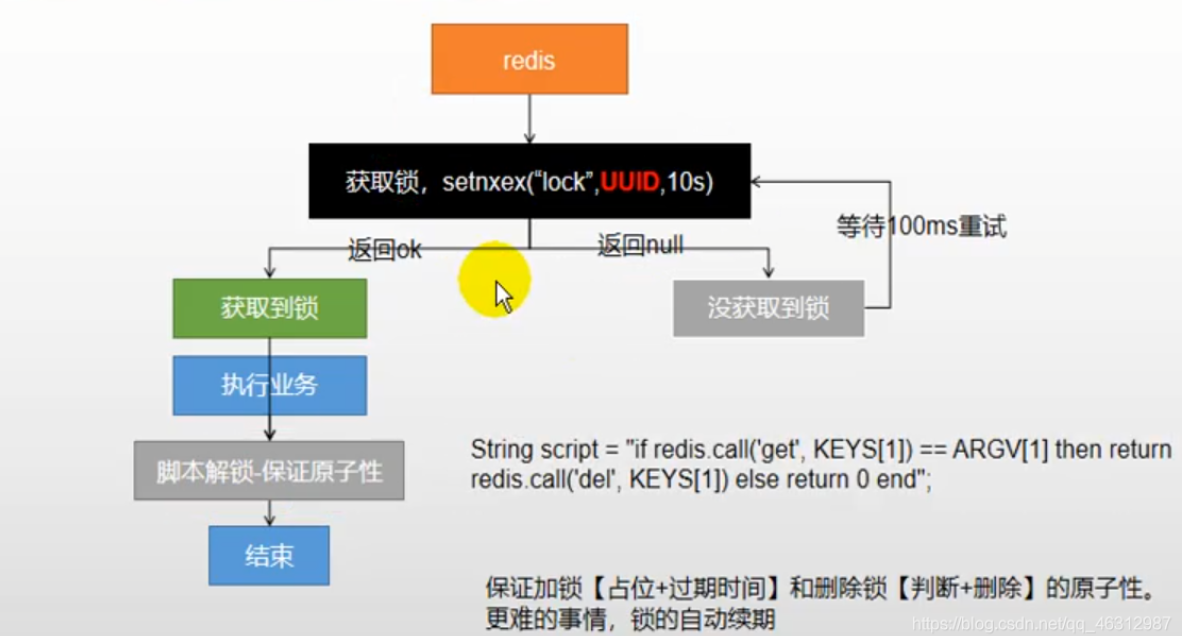
4.4分布式锁 4.4.1 setnxex 原理是使用redis中的setnx命令,根据官方文档 :
Redis Setnx( SET if Not eXists )命令在指定的 key 不存在时,为 key 设置指定的值,这种情况下等同 SET 命令。当 key存在时,什么也不做。
返回值
整数:
1 如果key被设置了
而在Java中对应方法是:
public Boolean setIfAbsent (K key, V value) { byte [] rawKey = this .rawKey(key); byte [] rawValue = this .rawValue(value); return (Boolean)this .execute((connection) -> { return connection.setNX(rawKey, rawValue); }, true ); } public Boolean setIfAbsent (K key, V value, long timeout, TimeUnit unit) { byte [] rawKey = this .rawKey(key); byte [] rawValue = this .rawValue(value); Expiration expiration = Expiration.from(timeout, unit); return (Boolean)this .execute((connection) -> { return connection.set(rawKey, rawValue, expiration, SetOption.ifAbsent()); }, true ); }
public Map<String, List<Catelog2Vo>> getCatelogJson () { String catalogJSON = stringRedisTemplate.opsForValue().get("catalogJSON" ); if (StringUtils.isEmpty(catalogJSON)){ System.out.println("缓存未命中,将要查询数据库..." ); Map<String, List<Catelog2Vo>> catelogJsonFromDb = getCatelogJsonFromDbWithRedisLock(); } System.out.println("缓存命中直接返回......" ); Map<String, List<Catelog2Vo>> result = JSON.parseObject(catalogJSON, new TypeReference <Map<String, List<Catelog2Vo>>>() { }); return result; } public Map<String, List<Catelog2Vo>> getCatelogJsonFromDbWithRedisLock () { String uuid = UUID.randomUUID().toString(); Boolean lock = stringRedisTemplate.opsForValue().setIfAbsent("catelog-lock" , uuid,300 , TimeUnit.SECONDS); if (lock){ Map<String, List<Catelog2Vo>> dataFromDb; try { dataFromDb = getDataFromDb(); }finally { String script = "if redis.call('get', KEYS[1]) == ARGV[1] then return redis.call('del', KEYS[1]) else return 0 end" ; stringRedisTemplate.execute(new DefaultRedisScript <Integer>(script,Integer.class),Arrays.asList("catelog-lock" ),uuid); } return dataFromDb; }else { try { Thread.sleep(100 ); } catch (InterruptedException e) { e.printStackTrace(); } return getCatelogJsonFromDbWithRedissonLock(); } } private Map<String, List<Catelog2Vo>> getDataFromDb () { String catalogJSON = stringRedisTemplate.opsForValue().get("catalogJSON" ); if (!StringUtils.isEmpty(catalogJSON)){ Map<String, List<Catelog2Vo>> result = JSON.parseObject(catalogJSON, new TypeReference <Map<String, List<Catelog2Vo>>>() { }); return result; } System.out.println("查询数据库" ); List<CategoryEntity> selectList = baseMapper.selectList(null ); List<CategoryEntity> level1Category = getParent_cid(selectList,0L ); Map<String, List<Catelog2Vo>> parent_cid = level1Category.stream().collect(Collectors.toMap(k -> k.getCatId().toString(), v -> { List<CategoryEntity> categoryEntities = getParent_cid(selectList,v.getCatId()); List<Catelog2Vo> catelog2Vos = null ; if (categoryEntities != null ) { catelog2Vos = categoryEntities.stream().map(l2 -> { Catelog2Vo catelog2Vo = new Catelog2Vo (v.getCatId().toString(), null , l2.getCatId().toString(), l2.getName()); List<CategoryEntity> level3Catelog = getParent_cid(selectList,l2.getCatId()); if (level3Catelog != null ){ List<Catelog2Vo.Catelog3Vo> collect = level3Catelog.stream().map(l3 -> { Catelog2Vo.Catelog3Vo catelog3Vo = new Catelog2Vo .Catelog3Vo(l3.getCatId().toString(),l3.getCatId().toString(),l3.getName()); return catelog3Vo; }).collect(Collectors.toList()); catelog2Vo.setCatalog3List(collect); } return catelog2Vo; }).collect(Collectors.toList()); } return catelog2Vos; })); String jsonString = JSON.toJSONString(parent_cid); stringRedisTemplate.opsForValue().set("catalogJSON" ,jsonString); return parent_cid; }
但是以上方案还有缺点,就是锁的自动续期功能没有实现,加入我设置锁的时间小于业务代码执行时间,就会出现在多线程同时获取到锁的情况。
4.3.2 Redisson (1) Redisson使用
1)Redisson相对于Jedis来讲,是一个功能更加强大的Redis客户端。
2)使用Redisson进行加锁的操作与JUC包下的API相近,使用也可以参考JUC相关文档。① 引入依赖
<dependency > <groupId > org.redisson</groupId > <artifactId > redisson</artifactId > <version > 3.12.0</version > </dependency >
② 编写Redssion配置类
更多详情参考官方文档
https://github.com/redisson/redisson/wiki/14.-Integration-with-frameworks
编写配置类
@Configuration public class MyRedissonConfig { @Bean(destroyMethod="shutdown") RedissonClient redisson () throws IOException { Config config = new Config (); config.useSingleServer().setAddress("redis://8.138.99.194:6379" ); return Redisson.create(config); } }
③ Redisson-lock锁测试
在配置了RedissonClient 就可以操作RedissonClient的实例进行各种加锁操作。
1)测试(看门狗原理)
@ResponseBody @GetMapping("/hello") public String hello () { RLock lock = redissonClient.getLock("my-lock" ); lock.lock(); try { System.out.println("加锁成功 执行业务" +Thread.currentThread().getId()); Thread.sleep(5000 ); }catch (Exception e){ }finally { System.out.println("释放锁" +Thread.currentThread().getId()); lock.unlock(); } return "hello" ; }
④ 读锁和写锁
为了保证一定能读取到数据,修改期间,写锁是一个排它锁(互斥锁、独享锁),而读锁是一个共享锁。
写锁没有释放就必须等待
总结:只要有写的存在,都需要等待。
测试代码:
@GetMapping("/write") @ResponseBody public String writeValue () { RReadWriteLock readWriteLock = redissonClient.getReadWriteLock("rw-lock" ); RLock writeLock = readWriteLock.writeLock(); String s = "" ; try { writeLock.lock(); System.out.println("写锁加锁成功..." +Thread.currentThread().getId()); s = UUID.randomUUID().toString(); Thread.sleep(30000 ); redisTemplate.opsForValue().set("writeValue" ,s); }catch (Exception e){ e.printStackTrace(); }finally { writeLock.unlock(); System.out.println("写锁释放..." +Thread.currentThread().getId()); } return s; } @GetMapping("/read") @ResponseBody public String readValue () { RReadWriteLock lock = redissonClient.getReadWriteLock("rw-lock" ); String s = "" ; RLock rLock = lock.readLock(); rLock.lock(); try { System.out.println("读锁加锁成功..." + Thread.currentThread().getName()); s = redisTemplate.opsForValue().get("writeValue" ); Thread.sleep(30000 ); } catch (Exception e) { e.printStackTrace(); }finally { rLock.unlock(); System.out.println("读锁释放..." + Thread.currentThread().getName()); } return s; }
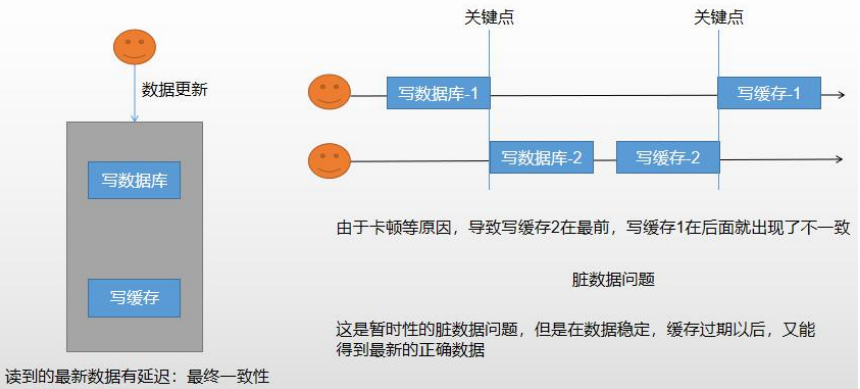
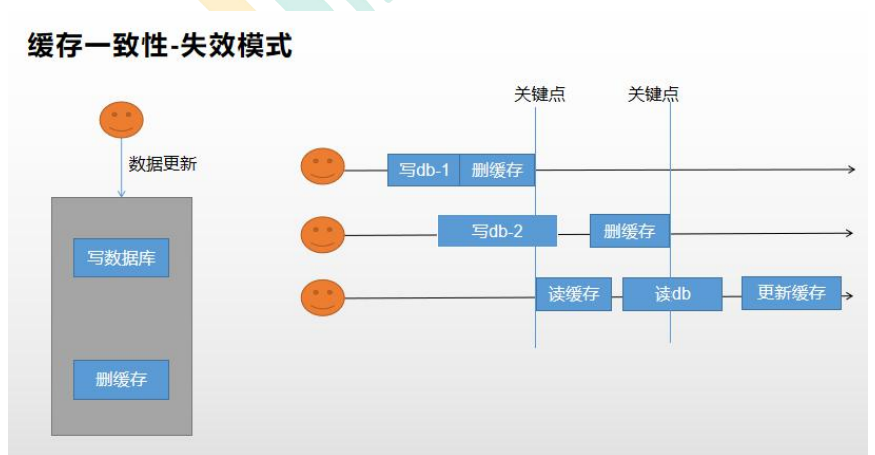
4.5 缓存数据一致性 保证一致性模式1.双写模式
先将数据写入数据库,然后再修改缓存。
2. 失效模式
只要更新数据库数据,在更新完成后就删除缓存中的数据,使缓存失效。
但是两种都会产出数据不一致的问题,那么如果一个数据经常修改我们就可以判断是否要放入缓存中。
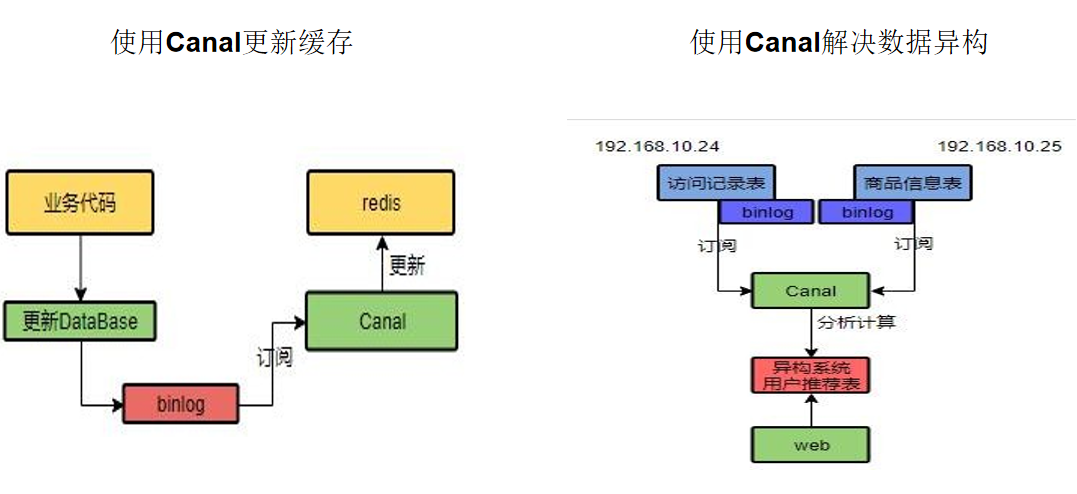
缓存数据一致性 - 解决方案:
无论是双写模式还是失效模式,都会导致缓存的不一致问题。即多个实例同时更新会出事。怎么办?alibaba的canal 订阅binlog的方式。cananl会记录数据库的更新,会将变动的信息记录到cananl中,然后对redis进行更新业务对于缓存的要求。
3、缓存数据+过期时间也足够解决大部分分布式读写锁 :通过加锁保证并发读写,写写的时候按顺序排好队。读读无所谓。所以适合使用读写锁。(业务不关心 脏数据,允许临时脏数据可忽略);
4.6 SpringCache 官网:https://docs.spring.io/spring-framework/docs/5.2.25.RELEASE/spring-framework-reference/integration.html#cache
为了简化加读写锁操作,引入了SpringCache。
4.6.1 简介
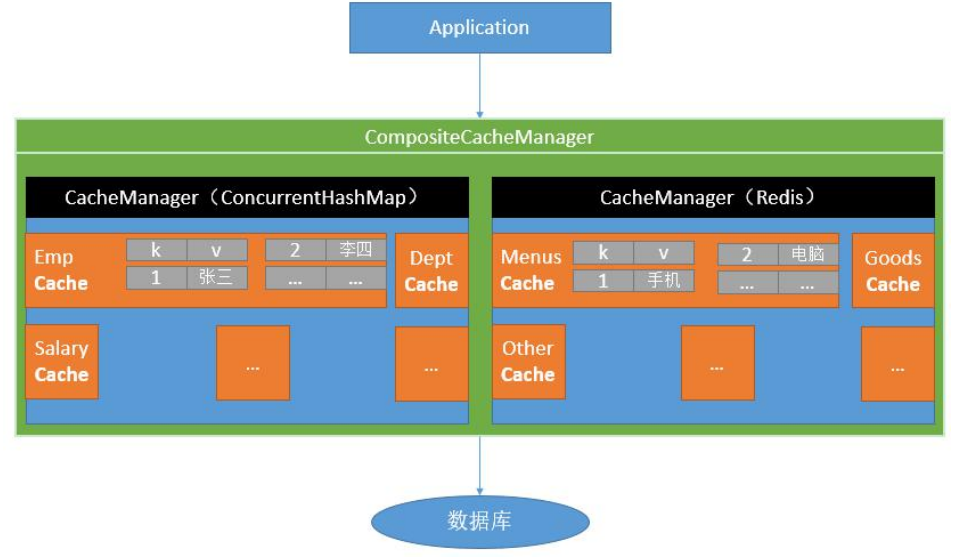
Spring 从 3.1 开始定义了 org.springframework.cache.Cache和 org.springframework.cache.CacheManager 接口来统一不同的缓存技术;并支持使用 JCache(JSR-107)注解简化我们开发; Cache 接口为缓存的组件规范定义,包含缓存的各种操作集合;Cache 接 口 下 Spring 提 供 了 各 种 xxxCache 的 实 现 ; 如 RedisCache , EhCacheCache , ConcurrentMapCache 等; 每次调用需要缓存功能的方法时,Spring 会检查检查指定参数的指定的目标方法是否已经被调用过;如果有就直接从缓存中获取方法调用后的结果,如果没有就调用方法并缓存结果后返回给用户。下次调用直接从缓存中获取。 使用 Spring 缓存抽象时我们需要关注以下两点; 1、确定方法需要被缓存以及他们的缓存策略 2、从缓存中读取之前缓存存储的数据
注: jsr是Java Specification Requests的缩写,意思是Java 规范提案。
4.6.2 基础概念
4.6.3 引用和配置
(1)引入依赖:
spring-boot-starter-cache、spring-boot-starter-data-redis
<dependency > <groupId > org.springframework.boot</groupId > <artifactId > spring-boot-starter-cache</artifactId > </dependency > <dependency > <groupId > org.springframework.boot</groupId > <artifactId > spring-boot-starter-data-redis</artifactId > <exclusions > <exclusion > <groupId > io.lettuce</groupId > <artifactId > lettuce-core</artifactId > </exclusion > </exclusions > </dependency >
(2)写配置
4.6.4 注解
@Cacheable触发缓存填充:触发将数据保存到缓存的操作
@CacheEvict触发逐出缓存:触发将数据从缓存删除的操作
@CachePut更新缓存,而不会影响方法的执行
@Caching重新组合要在一个方法上应用的多个缓存操作(组合以上多个操作)
@CacheConfig在类级别共享缓存相同配置
4.6.5 使用&细节
(1)开启缓存功能 @EnableCaching
@Cacheable({"category"}) @Override public List<CategoryEntity> getLevel1Categorys () { List<CategoryEntity> categoryEntities = baseMapper.selectList(new QueryWrapper <CategoryEntity>().eq("parent_cid" , 0 )); return categoryEntities; }
1、每一个需要缓存的数据我们都要来指定要放到那个名字的缓存。value属性指定分区【缓存的分区(按照业务类型分)】 2、@Cacheable 3、默认行为
4、自定义
1)指定生成的缓存使用的key:key属性的指定,接受一个SpEL表达式
2)指定缓存中数据的存活时间:配置文件中修改ttl spring.cache.redis.time-to-live=3600000
3)将数据保存为json格式 —>自定义缓存管理器
如果我们没有自己指定配置,就会使用默认的配置
5、原理
CacheAutoConfiguration
编写自定义配置类:
@EnableConfigurationProperties(CacheProperties.class) @Configuration @EnableCaching public class MyCacheConfig { @Bean RedisCacheConfiguration redisCacheConfiguration (CacheProperties cacheProperties) { RedisCacheConfiguration config = RedisCacheConfiguration.defaultCacheConfig(); config = config.serializeKeysWith(RedisSerializationContext.SerializationPair.fromSerializer(new StringRedisSerializer ())); config = config.serializeValuesWith(RedisSerializationContext.SerializationPair.fromSerializer(new GenericFastJsonRedisSerializer ())); CacheProperties.Redis redisProperties = cacheProperties.getRedis(); if (redisProperties.getTimeToLive() != null ) { config = config.entryTtl(redisProperties.getTimeToLive()); } if (redisProperties.getKeyPrefix() != null ) { config = config.prefixCacheNameWith(redisProperties.getKeyPrefix()); } if (!redisProperties.isCacheNullValues()) { config = config.disableCachingNullValues(); } if (!redisProperties.isUseKeyPrefix()) { config = config.disableKeyPrefix(); } return config; } }
spring.cache.type =redis spring.cache.redis.time-to-live =3600000 spring.cache.redis.cache-null-values =true spring.cache.redis.use-key-prefix =true
(2)@CachePut(双写模式)
可以用来解决缓存一致性中的双写模式,要求在更新完数据后返回最新的数据才可以使用,但一般更新操作返回值为void,所以一般来说用不到
(3)@CacheEvict(失效模式)
用来实现失效模式,在更新方法上添加这个注解,调用时就会删除掉指定的缓存。
// 一定要记得加单引号
@Override @Transactional @CacheEvict(value = "category", key = "'getLevel1Categories'") public void updateCascade (CategoryEntity category) ...
根据业务逻辑,进入后台管理系统进行更新操作,需要先修改数据库然后删除缓存。
(4)批量删除
但是要删除的缓存涉及到redis中创建的category中的两个缓存: CACHE_getCatalogJson 和CACHE_getLevel1Categorys
删除方式一:
@Caching(evict = {
         @CacheEvict(value = "category",key = "'getLevel1Categorys'"),
         @CacheEvict(value = "category",key = "'getCatalogJson'")
 })
删除方式二:
@Caching(value = "category", allEntries = true)
(5)实践
存储同一类型的数据,都可以指定成同一个分区。分区名默认就是缓存的前缀。
4.6.6 Spring-Cache的不足之处
缓存穿透:查询一个null数据。解决方案:缓存空数据 ----> spring.cache.redis.cache-null-values=true

缓存击穿:大量并发进来同时查询一个正好过期的数据。解决方案:加锁 ? 默认是无加锁的;使用sync = true来解决击穿问题

缓存雪崩:大量的key同时过期。解决:加随机时间。加上过期时间
(2) 写模式:(缓存与数据库一致)
读写加锁。
引入Canal,感知到MySQL的更新去更新Redis
读多写多,直接去数据库查询就行
4.5.7 总结
常规数据(读多写少,即时性,一致性要求不高的数据,完全可以使用Spring-Cache):写模式(只要缓存的数据有过期时间就足够了)
特殊数据:特殊设计
原理:
CacheManager(RedisCacheManager) -> Cache(RedisCache) -> Cache负责缓存的读写